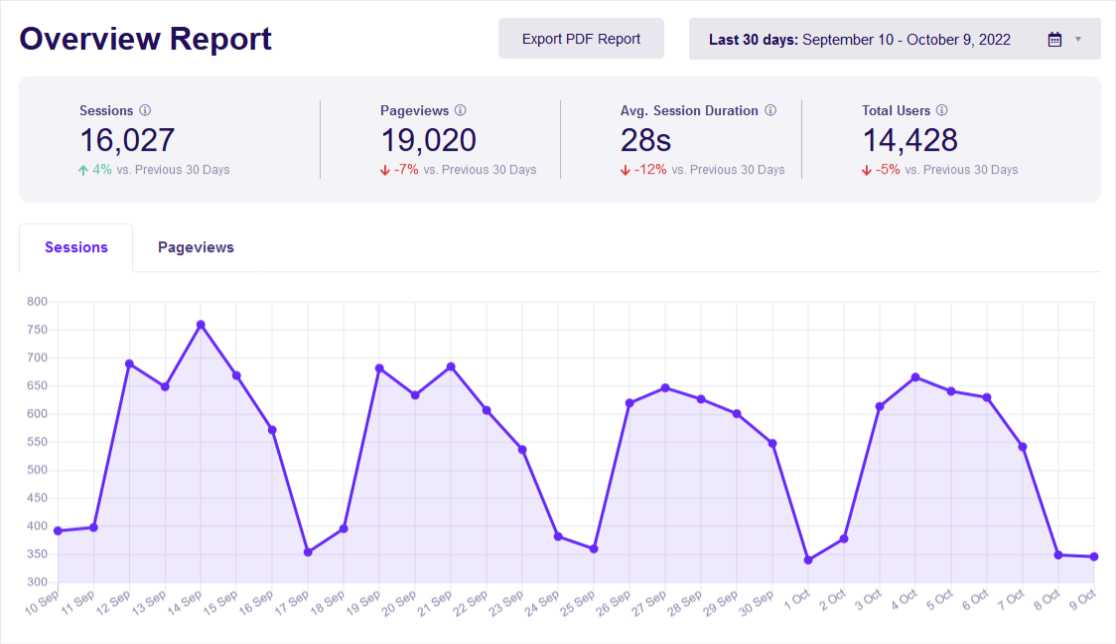
Are you wondering how many people convert when visiting your WooCommerce store? If so, you need to set up WooCommerce conversion tracking to see how your online store is performing.
Conversion tracking gives you data about which products your customers buy the most, where your converting traffic comes from, which campaigns perform the best, and more.
In this article, I’ll show you how to easily set up WooCommerce conversion tracking in WordPress. Let’s start by going over the benefits of tracking your online store’s conversions.
Why Track WooCommerce Conversions?
If you have a WooCommerce store, you probably wonder what the best way to increase revenue is. Well, that’s where WooCommerce conversion tracking can help.
Your store’s revenue depends on a lot of things like how visitors use your website, what pages they view, how they find your eCommerce store, what they purchase, and more.
To answer these questions and make data-driven decisions for your business, you need to have WooCommerce conversion tracking enabled on your website. Tracking your conversions can help you gather information about:
- Understand User Behavior – Through conversion tracking, you can better understand user shopping behavior. See add-to-cart and remove-from-cart events, average order value, and more.
- Reduce Cart Abandonment – See how often customers leave items in their cart and gather data to help you optimize your checkout process and reduce cart abandonment.
- See Popular Products – Find out which products sell the most through conversion tracking, so you can promote them more on your website.
- Measure Marketing Campaigns – Conversion tracking helps you see the impact of your marketing campaigns and measure your ROI (return on investment).
- Track Sales Performance – See how much money your store makes, how many refunds were issued, which products contribute to revenue the most, your overall conversion rate, and more.
So, are you ready to learn how to track conversions for your WooCommerce store? Let’s get started.
WordPress Tutorial: How to Enable WooCommerce Conversion Tracking
The best way to track conversions is by setting up Google Analytics for WooCommerce. This lets you gather data from your website and visitors to see how your online store is performing.
That said, setting up Google Analytics for WooCommerce conversion tracking isn’t very straightforward, especially for beginners.
Luckily for WordPress users, there’s a much easier way to enable WooCommerce conversion tracking, and you won’t have to touch any code, hire a developer, or use a complicated tool like Google Tag Manager.
Just follow these simple steps to start tracking your WooCommerce conversions in WordPress.
- Step 1: Install ExactMetrics
- Step 2: Activate the eCommerce Addon
- Step 3: Track WooCommerce Conversions
- Step 4: See More WooCommerce Reports
Step 1: Install ExactMetrics
ExactMetrics is the best premium WordPress Analytics plugin, allowing you to easily set up Google Analytics without editing any code. You get advanced tracking right out of the box with an extremely user-friendly interface and Google Analytics reports right inside your WordPress dashboard.
ExactMetrics comes with an eCommerce addon that integrates seamlessly with WooCommerce to automatically track conversions and other eCommerce events for your online store. Plus, you gain access to tons of additional Google Analytics features and advanced tracking capabilities with just a few simple clicks.
Here are some of ExactMetrics’ most popular features:
- Conversion tracking for ad campaigns
- User Journey report to see every step in the buying journey
- Social media tracking
- Custom dimensions and custom event tracking
- Advanced form tracking and integration with the most popular form builders
- Display popular products or posts
- Affiliate and outbound link tracking
- Media and video play tracking
- And much more…
The first step to enable WooCommerce conversion tracking is to install ExactMetrics on your WordPress site. Head to the pricing page to get started. Do note that you’ll need ExactMetrics’ Pro version or higher to access eCommerce features.
After you’ve purchased a license, you’ll need to download the plugin file and install it on your site.
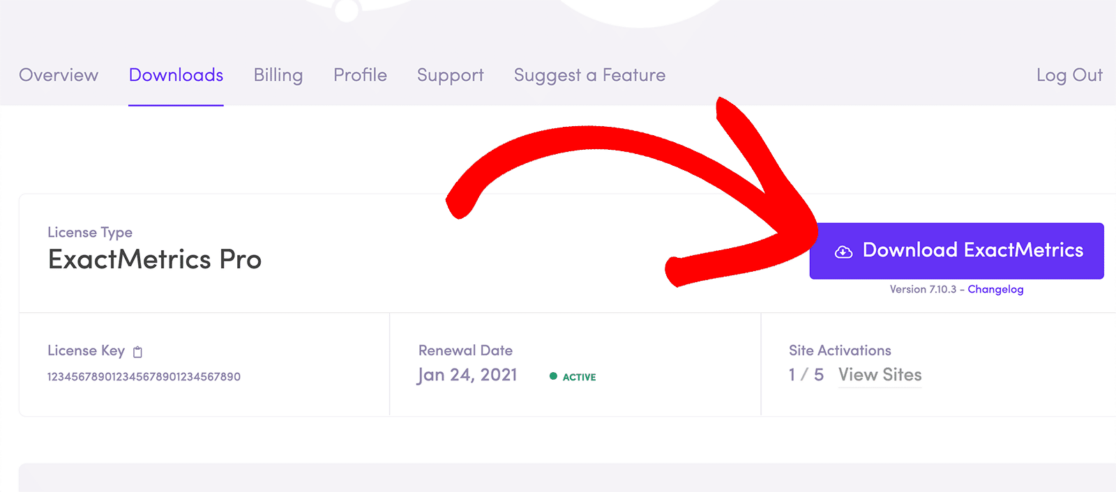
After the plugin is installed and activated, use the setup wizard to easily connect your Google Analytics account. Then, ExactMetrics can do the behind-the-scenes work of installing tracking code and setting up conversion events for you.
If you need help getting started, check out How to Add Google Analytics to Your WordPress Site for our step-by-step tutorial.
Step 2: Activate the eCommerce Addon
Next, you’ll need to activate the eCommerce addon to enable WooCommerce conversion tracking. You can find the addon by going to ExactMetrics » Addons and navigating to the one titled eCommerce. Click Install and the addon will automatically activate.
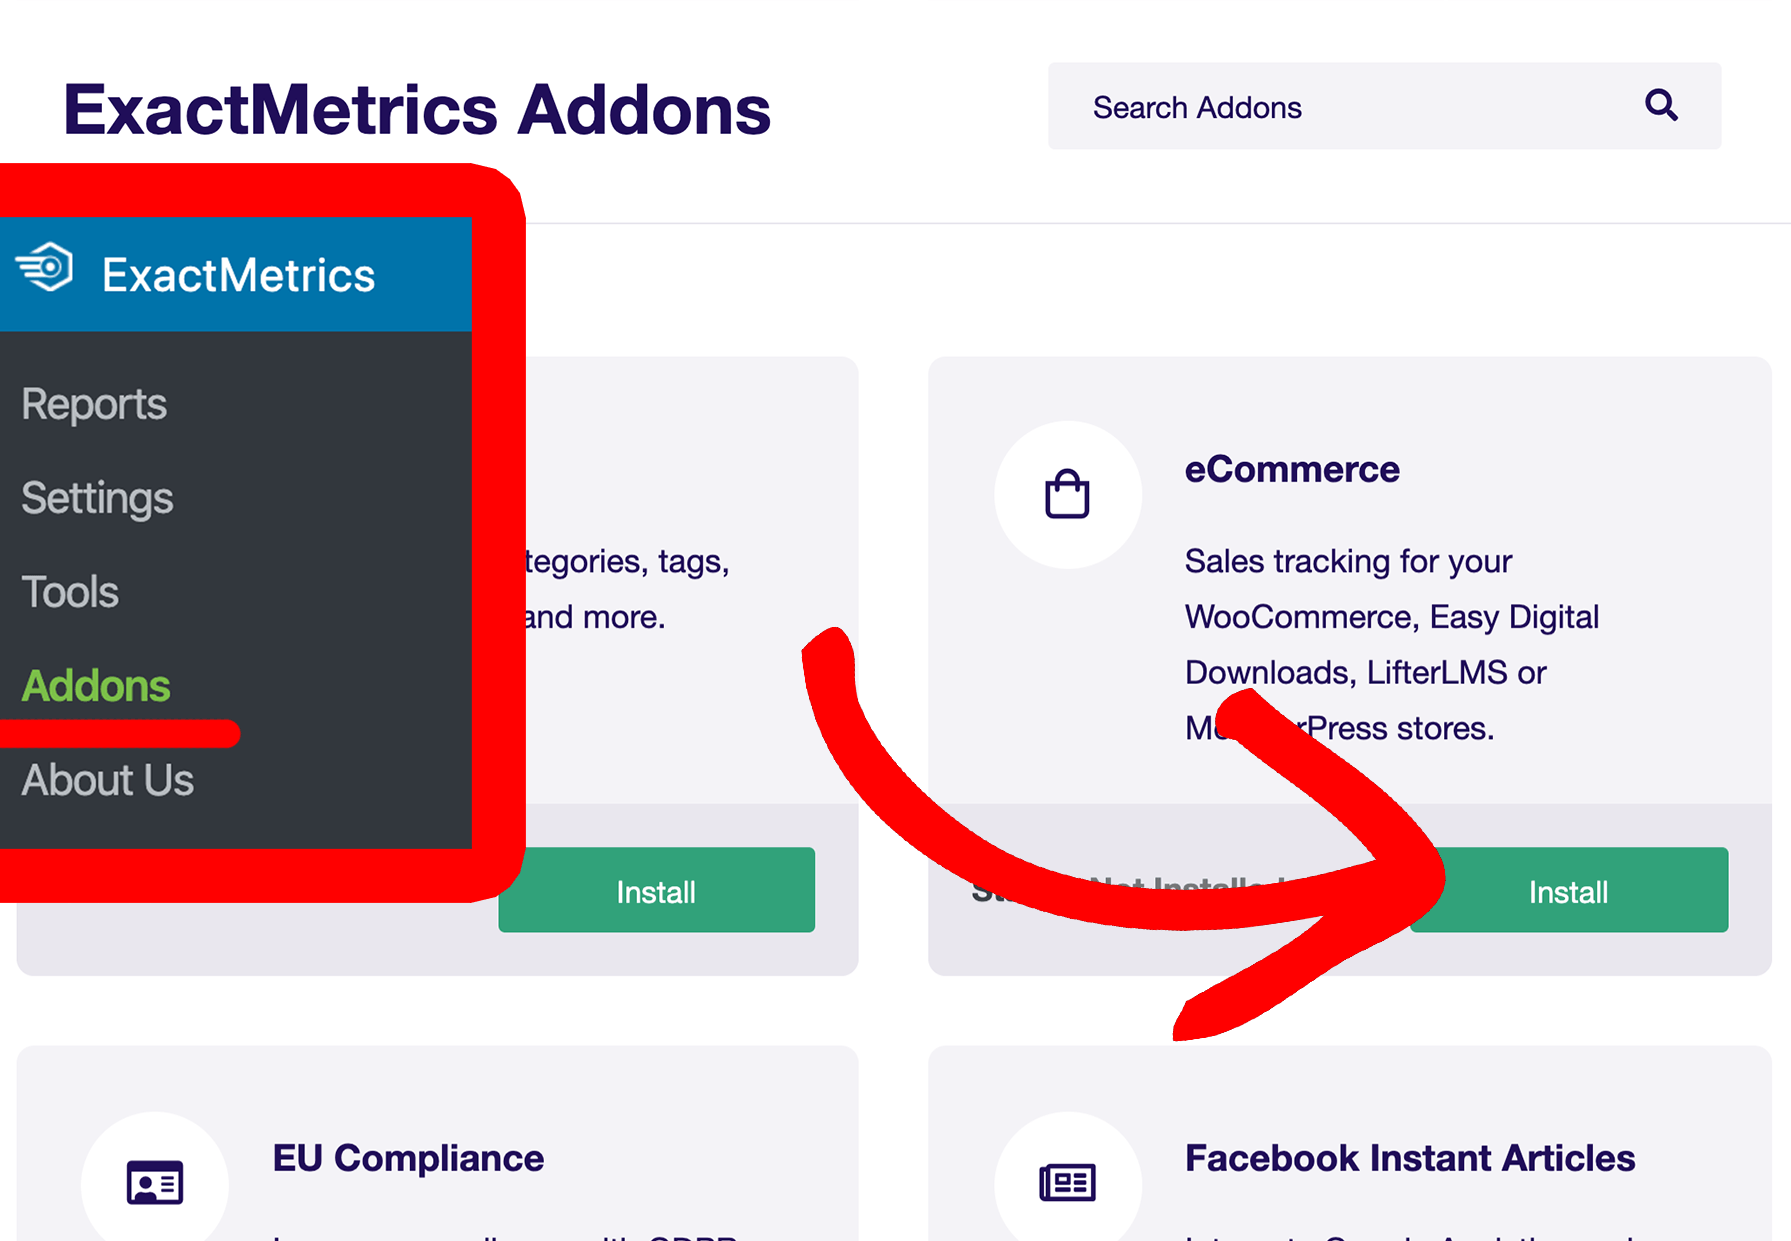
That’s it! ExactMetrics will automatically detect WooCommerce on your site and start tracking your WooCommerce store conversions and performance.
Step 3: Track WooCommerce Conversions
After successfully setting up WooCommerce conversion tracking in WordPress, you can view detailed reports right inside your WordPress dashboard. To view your report, go to ExactMetrics » Reports and click eCommerce » Overview at the top.

First, you’ll see the Conversion Rate, number of Transactions, Revenue, and Average Order Value for your eCommerce store.
Below this, you’ll see your Top Products report. Quickly see your most purchased products and other important metrics like the quantity sold, their contribution to total sales, and the total revenue they generated.
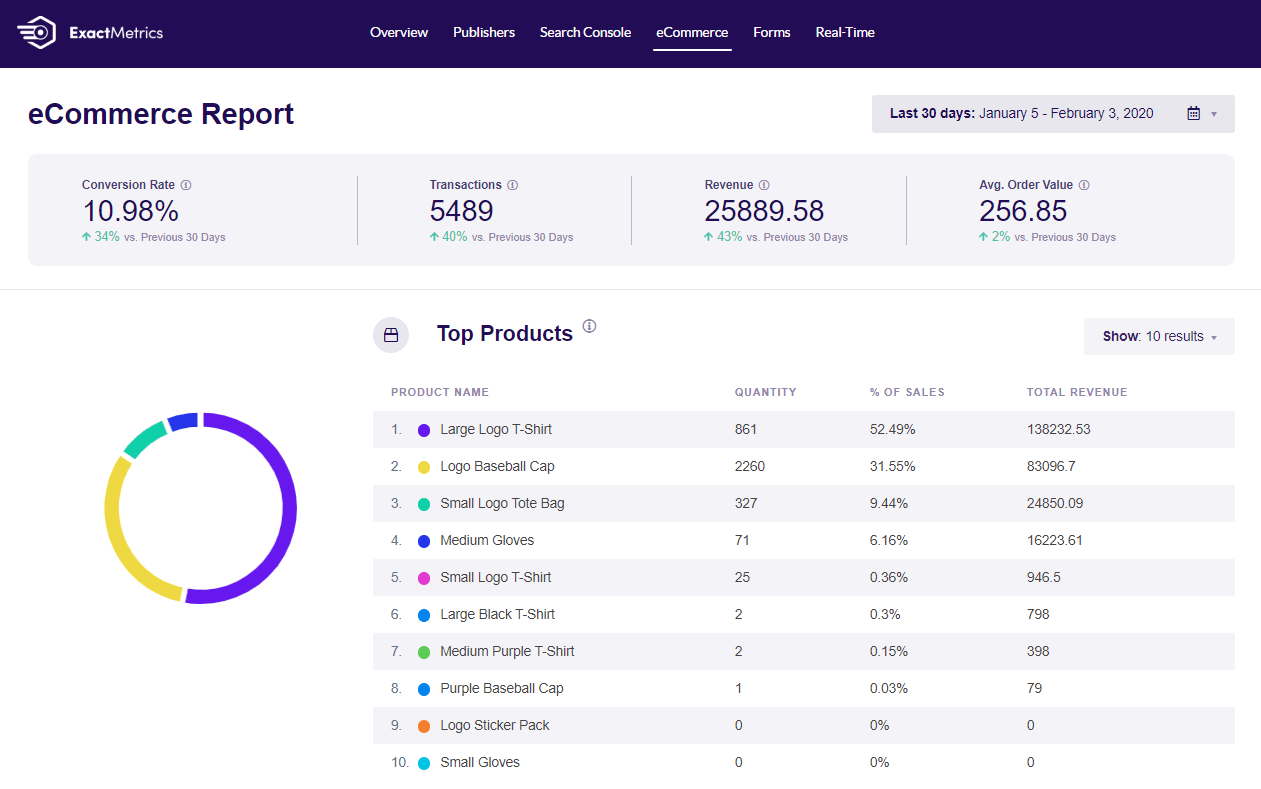
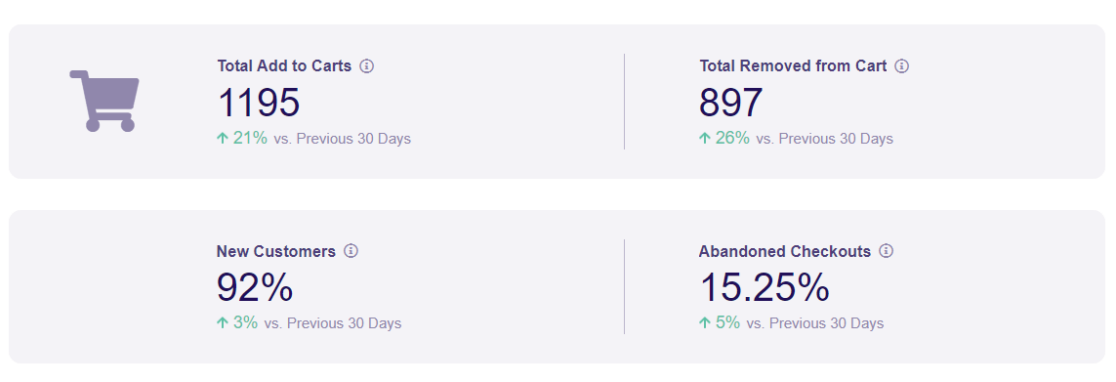
If you scroll down, you’ll get more reports. See the total number of Add to Carts and Remove from Carts events, the percentage of New Customers, and your rate of Abandoned Checkouts.
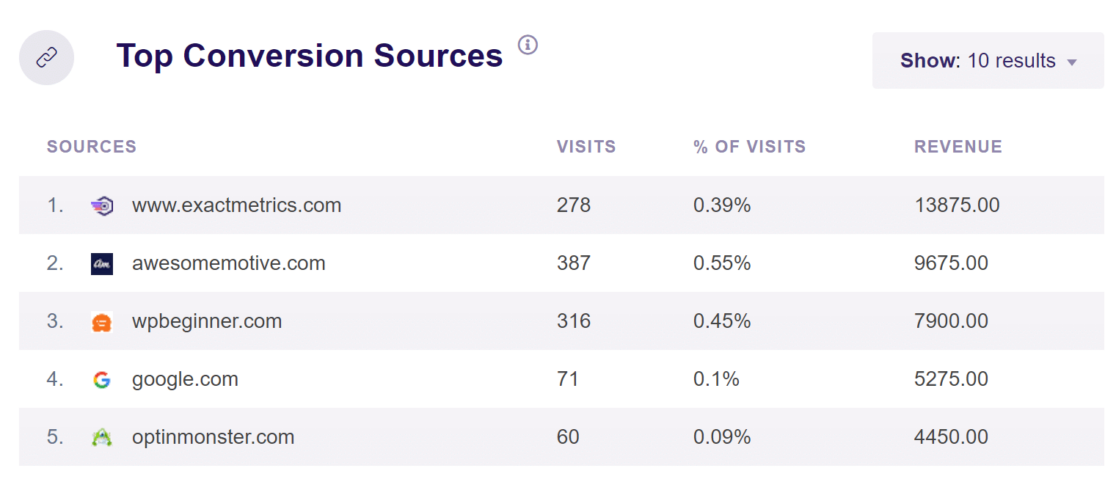
Below this, you can also view where your converting traffic is coming from in the Top Conversion Sources report. See which sources bring the most visitors and revenue. Using this data, you can focus on creating the right marketing strategy to boost your conversions.
Congrats! You learned how to successfully set up WooCommerce conversion tracking. Ready to see some additional eCommerce reports you can find in ExactMetrics and Google Analytics?
Step 4: See More WooCommerce Reports
Once you have ExactMetrics installed, there are all kinds of other data you can see for your WooCommerce store, like conversion tracking for Google Ads, coupon code usage, and each step in the customer buying journey. Let’s see how to find those reports.
Track WooCommerce Ad Campaign Conversions
If you run Google Ads, Microsoft (Bing) Ads, or Meta (Facebook) Ads, you can set up conversion tracking to find out which campaigns are bringing in the most sales. Just install the PPC Tracking addon in ExactMetrics » Addons.
![]()
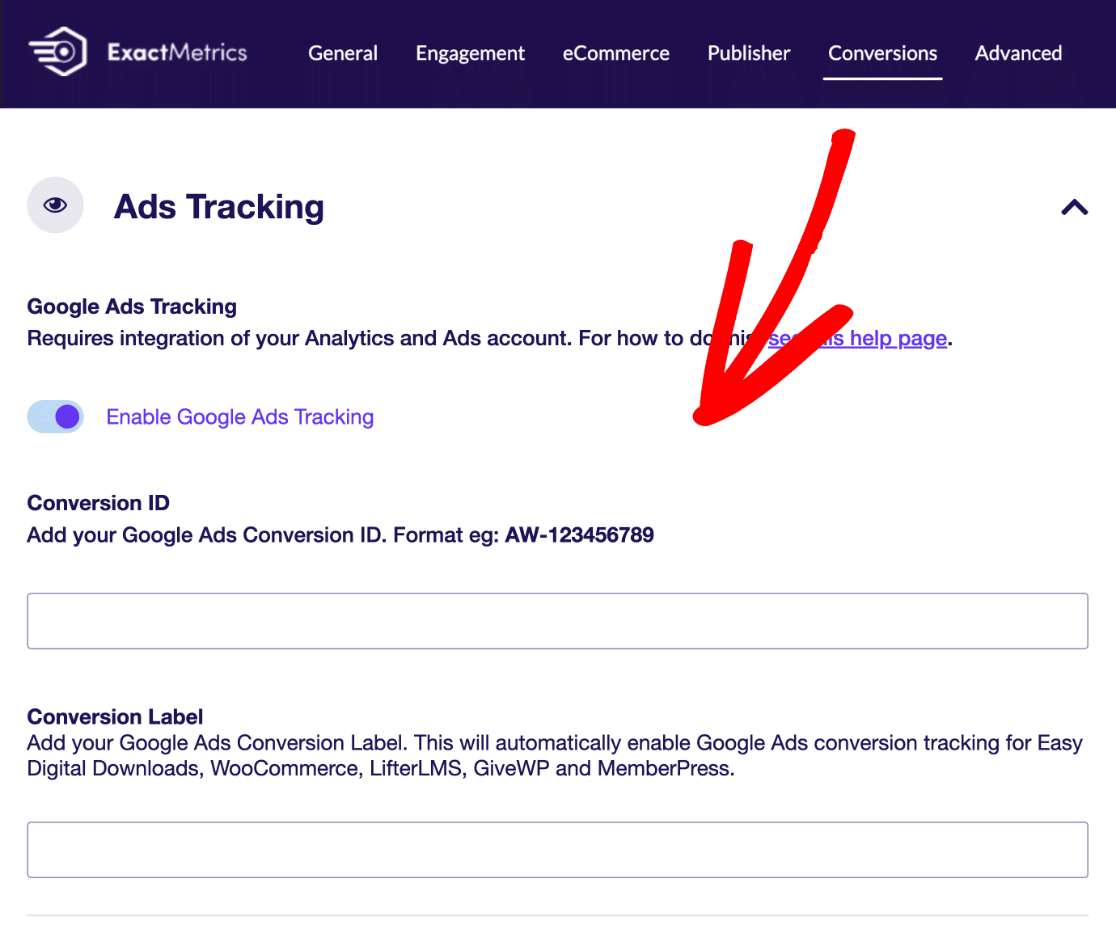
Then, head to ExactMetrics » Settings and click Conversions in the top menu. Expand the section titled Ads Tracking and enter the conversion information for your ad campaigns in the correct area.
For more detailed instructions on setting up WooCommerce conversion tracking for your ad campaigns, check out these tutorials:
- Google Ads conversion tracking
- Microsoft Ads (Bing) conversion tracking
- Meta (Facebook) Ads conversion tracking
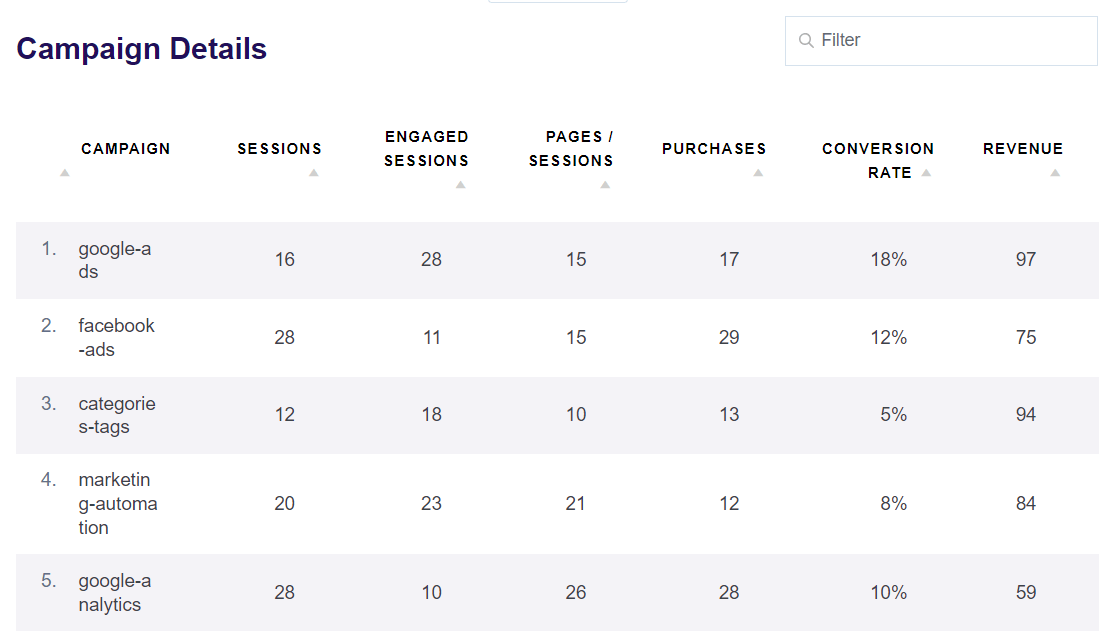
You can easily see how well your campaigns are converting by going to ExactMetrics » Reports » Traffic » Campaigns. You’ll be able to see the conversion rate, number of purchases, revenue, and more metrics for all your marketing campaigns.
See WooCommerce Customer Journeys
Want to see every step in the users’ buying journeys, how long each step took, UTM campaigns, and more for every transaction? Install the User Journey addon in ExactMetrics » Addons.
Then, click ExactMetrics » User Journey. Here, you can see each transaction ID for your WooCommerce store, UTM information, order total, and the number of steps to purchase, even if they took place over multiple sessions or days.

To see the individual steps taken for any purchase journey, like products or pages viewed, just click the linked Transaction ID. This can help you identify pain points and see what leads customers to buy something. Then, you can optimize your WooCommerce site to maximize conversions.
Analyze Cart Abandonment
Want to see which products are being left behind in the cart and when? Just head to ExactMetrics » Reports » eCommerce » Cart Abandonment.
First, you’ll see the Products Cart Abandonment report:
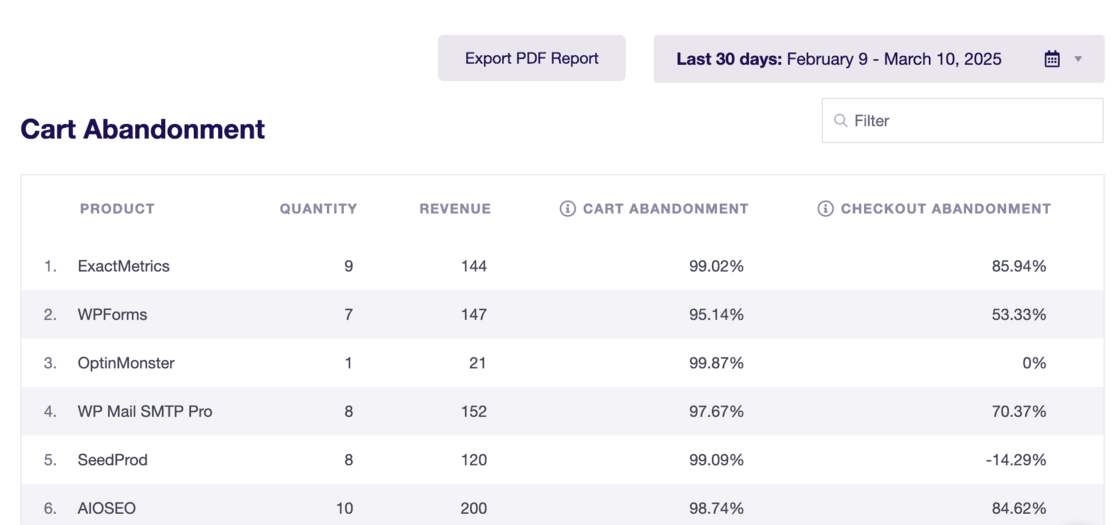
Showing you:
- Which products are being abandoned
- How much revenue you’re losing
- The cart and checkout abandonment for each product
- Where you should optimize to boost sales
And if you scroll further down the page you’ll see the Cart Abandonment by Day report:
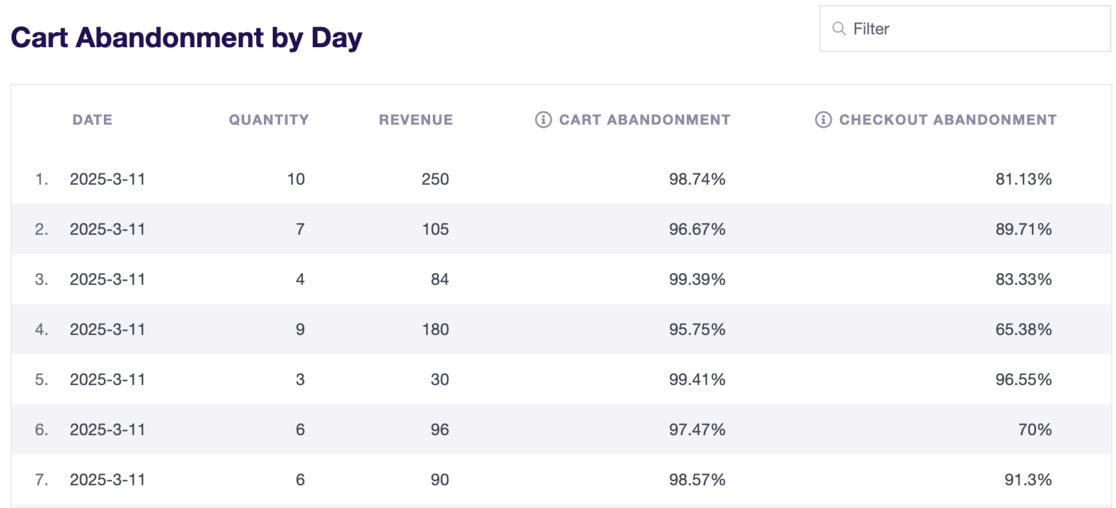
This allows you to analyze which days or months struggle with sales. Why not run a promotion to see if you can turn things around?
Track WooCommerce Coupons
If you use coupons for your WooCommerce store, you can also see which discount codes are contributing to conversions the most in your Coupons Report. Just navigate to ExactMetrics » Reports » eCommerce » Coupons.
Here, you can see how many transactions each coupon was used in, which discount is bringing in the most revenue for your WooCommerce store, and the average order value for each coupon.
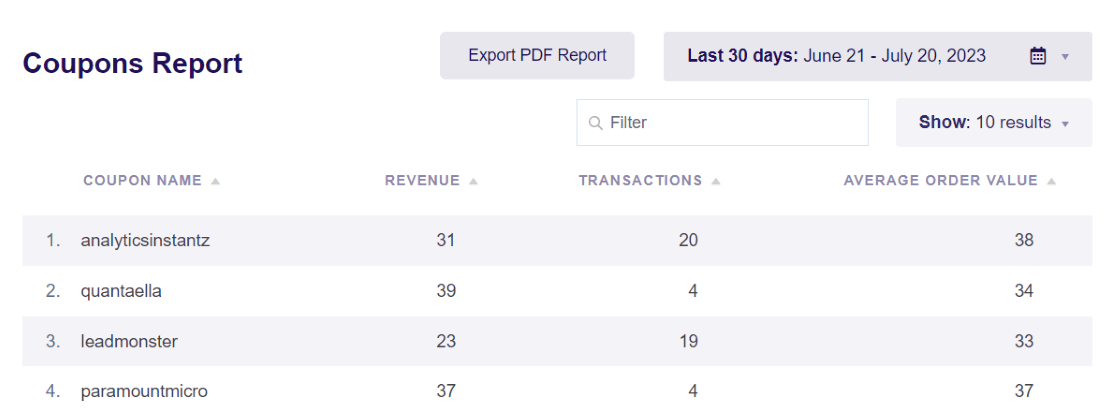
ExactMetrics brings you data that matters right to your WordPress dashboard, so you can make decisions to grow your business and increase revenue easily.
Start Tracking Your WooCommerce Conversions Now!
View WooCommerce Conversions in Google Analytics
You’ve learned how to set up WooCommerce conversion tracking in WordPress, but what if you want to view your data in Google Analytics? Since ExactMetrics already took care of the complicated stuff behind the scenes, you can easily see your WooCommerce data in Google Analytics.
To access WooCommerce reports, navigate to Reports » Monetization » Overview. Here, you can get an overview of your WooCommerce store. See your revenue trend by day, purchases by day, purchases by item name, purchases by item list, and more.

With that, you’ve made it to the end of this tutorial. You can start tracking your WooCommerce store conversions and get the data you need to grow your business and boost sales.
I hope you enjoyed learning how to set up WooCommerce conversion tracking in WordPress. Before you leave, be sure to check out How to Find Your WooCommerce Customer Lifetime Value.
Not using ExactMetrics yet? What are you waiting for?
Don’t forget to follow us on X and Facebook to see all the latest reviews, tips, and Google Analytics tutorials.


