Do you want to learn how to add a popup on WordPress?
Popups are really helpful tools for collecting visitors’ contact information, showing special offers, and more. By adding a WordPress popup, you can easily boost your marketing, conversions, and sales!
In this article, we’ll show you how to make a popup on WordPress easily using the best popup plugin available combined with the most popular form builder. Ready to get started?
Why Use a WordPress Popup?
A popup is a small window that appears on your website to show something important. There are tons of reasons why you might want to add a popup to your WordPress website, but these are a few of the most common and valuable uses:
- Collect email addresses: Grow your subscriber list to take your email marketing to the next level.
- Promote special offers and sales: Drive traffic to your sales pages and generate excitement for promotions.
- Event/appointment signups: Promote an event and allow users to quickly register, or use a popup to let customers easily sign-up for a call or appointment.
- Collect feedback: Use a short popup question or survey to gather user feedback and comments.
- Grab users’ attention and drive traffic: Reduce the number of visitors leaving your site, promote other content, and encourage users to explore your website further.
As you can see, there are many types of popups and tons of reasons to use a WordPress popup maker for your site. Ready to learn how? Let’s begin!
How to Add a Popup on WordPress
We’ll combine the best popup maker plugin with the best forms plugin to create our WordPress popup. This method can be used to create popups of any kind, but for our tutorial, we’ll walk you step-by-step through creating a popup to capture leads.
- Step 1: Install WPForms
- Step 2: Create a New Form
- Step 3: Install OptinMonster
- Step 4: Create a Popup Campaign
- Step 5: Publish Your Popup
- Step 6: Track Your WordPress Popups
Step 1: Install WPForms
WPForms is the best WordPress forms plugin available, with over 5 million active installations! It’s an excellent, user-friendly tool for creating various types of forms for your WordPress website. You can make survey forms, contact forms, order forms, donation forms, and pretty much any other form you can think of!
Some of WPForms key features include:
- Drag-and-drop form builder
- 600+ pre-built templates
- Mobile-friendly
- Integrates with popular email marketing services like Drip, MailChimp, and more.
- Integrates with WooCommerce, other eCommerce platforms, and popular payment systems.
- Embed forms anywhere on your site
- Use smart answer fields and conditional logic
- And more…
We recommend WPForms Pro to access tons of advanced functionality and features, but you can still create some common form types to add to your WordPress popups with the free version, which is what we’ll use for this tutorial.
To install the plugin, head to Plugins » Add New from your WordPress dashboard menu. Search for wpforms, and press Install when you see it. Then, press Activate. If you’re not familiar with installing plugins on WordPress, here are detailed instructions you can follow.
Once you’ve successfully installed and activated the plugin, you’re ready to continue learning how to add popup windows in WordPress.
Step 2: Create a New Form
To start, we’ll create a new form that we can later use to embed in our WordPress contact form popup. Click WPForms » Add New for your admin menu.
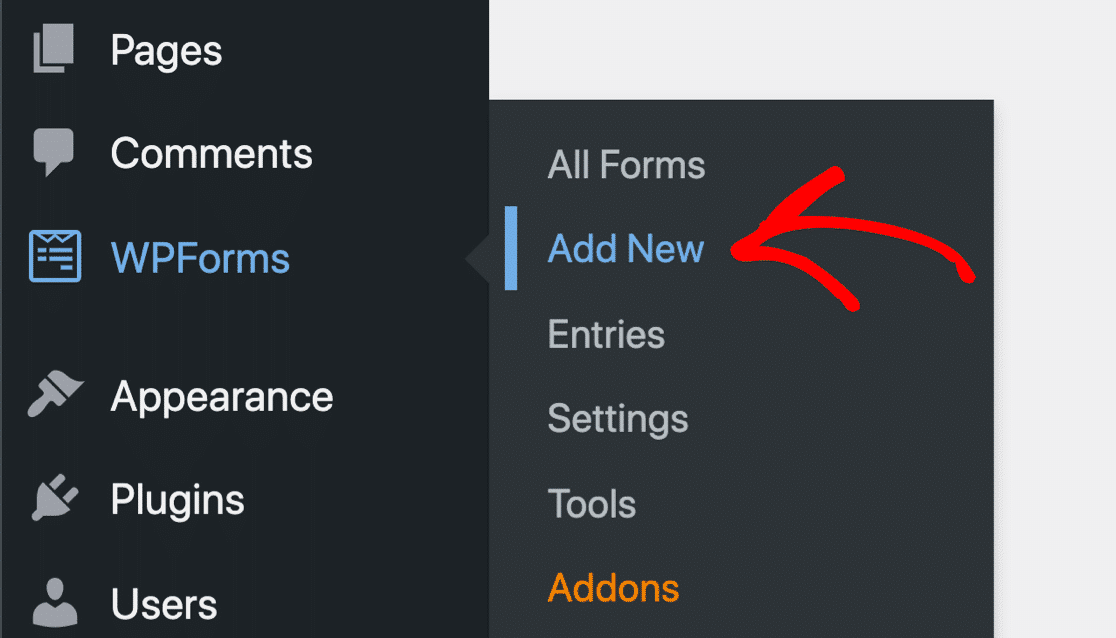
You’ll be prompted to Select a Template. Although you’ll see an option to create a Blank Form, we definitely recommend using a template to speed things along when you’re first getting started.
Plus, if you decide to upgrade to WPForms Pro you’ll be able to access templates for pretty much any form you could ever need.
Before you pick your template, make sure to Name Your Form to keep track of it in the future. We’ll name ours Email Lead Capture – Newsletter Signup.
Then, select a template from the options below. We’re going to select Newsletter Signup Form. Press the orange button Use Template.
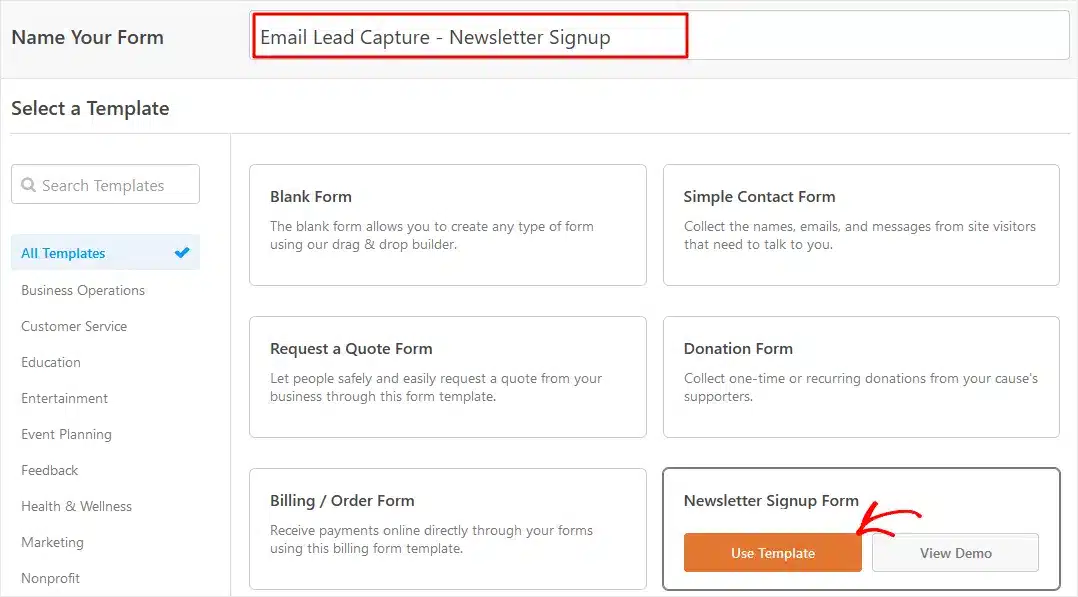
Next, you’ll be taken to the drag-and-drop form builder.
Customize Your Contact Form
The template already includes fields for Name and Email. It’s usually best to keep popup forms as simple and short as possible to maximize conversions. But, if you’d like to add fields or customize it differently, feel free to do so.
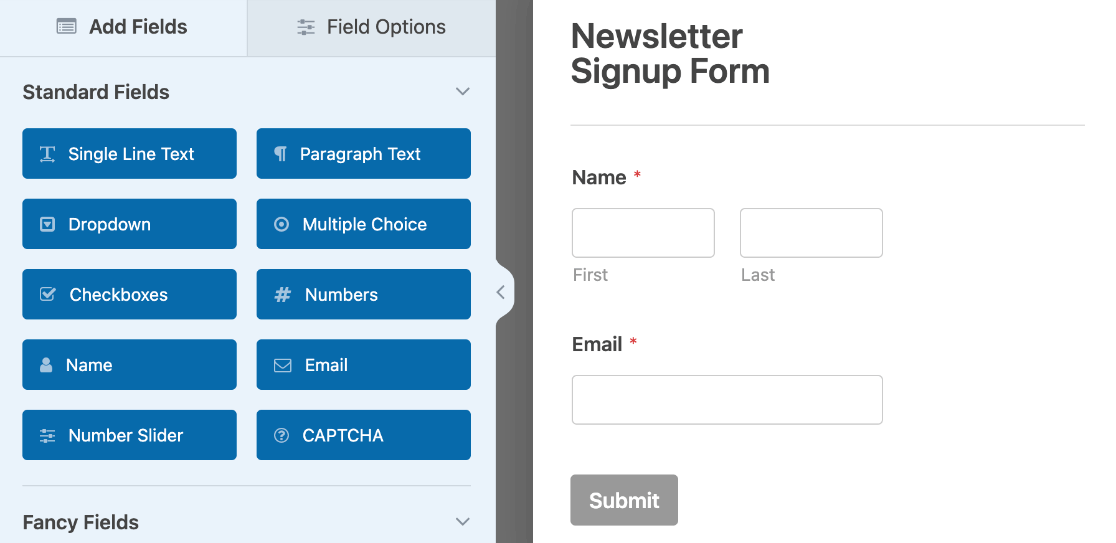
You may also want to change the settings for a field on your popup form. For example, the Name field is required by default, but you can change that by clicking Field Options at the top of the sidebar and toggling off where it says Required.
You can also change the button text, and other settings by clicking each area on the form. Once it looks the way you want, click the Save button in the top right.

When you’re ready, click the X at the top to exit the builder. Next up, we’ll use OptinMonster to turn your opt-in form into a beautiful new popup.
Step 3: Install OptinMonster
OptinMonster is the best popup plugin for WordPress. With over a million active installations, it’s an incredibly popular popup builder that’s specifically designed to help you make attractive, highly engaging opt-in forms and popup boxes easily. It’s a perfect choice for beginners and experts alike.
OptinMonster offers tons of powerful features such as:
- Drag-and-drop popup builder
- 400+ templates and multiple campaign types
- Many trigger options and advanced targeting features let you display popups where, when, and how you want
- Mobile-friendly
- Integrates with popular email services, eCommerce platforms, and more.
- Conversion-boosting features like Exit-Intent® and InactivitySensor™ technology
- And more…
While OptinMonster can create simple opt-in forms, we recommend using a dedicated forms builder plugin like WPForms for more advanced forms with additional design customization options.
Thankfully, OptinMonster integrates seamlessly with WPForms right out of the box, so you don’t need to worry about any extra configuration. It allows you to easily add forms to your popups in just a few clicks, without needing any web development knowledge or HTML coding.
OptinMonster allows you to build up to 3 free popup campaigns with a total of 300 impressions per month. That said, after you see how much you can do with this awesome plugin, you’ll probably want to purchase a paid plan to create an unlimited number of campaigns.
To get started, you’ll do the same thing we did when installing WPForms. Head to Plugins » Add New from your WordPress dashboard menu. Search for optinmonster. Press Install when you see it and then Activate after the button changes. Here are detailed instructions for installing OptinMonster.
After you’ve added OptinMonster to your WordPress site, continue with the next step.
Step 4: Create a Popup Campaign
From your WordPress dashboard, click OptinMonster » Campaigns.
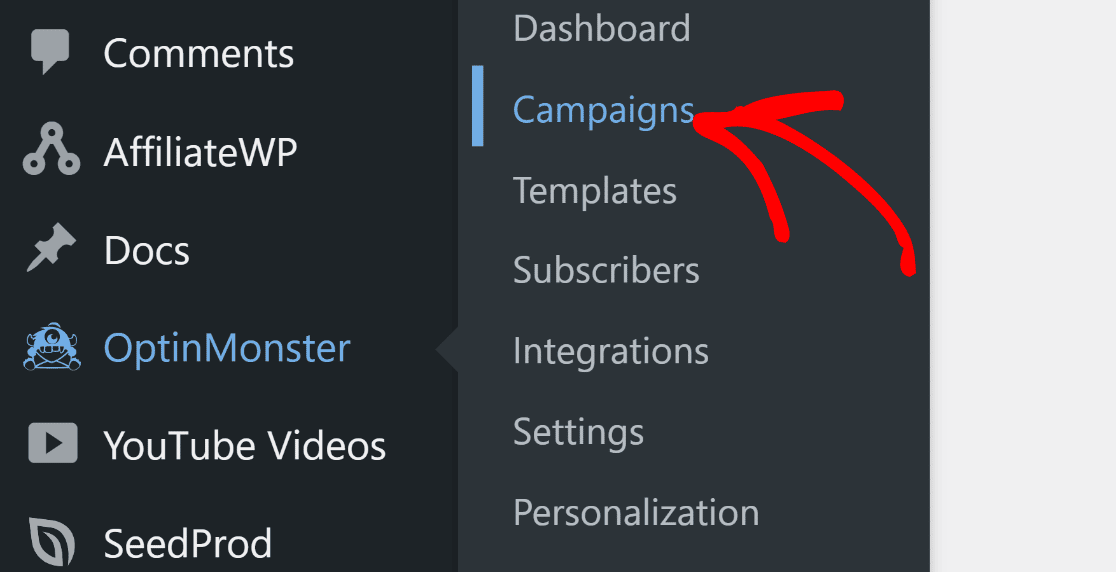
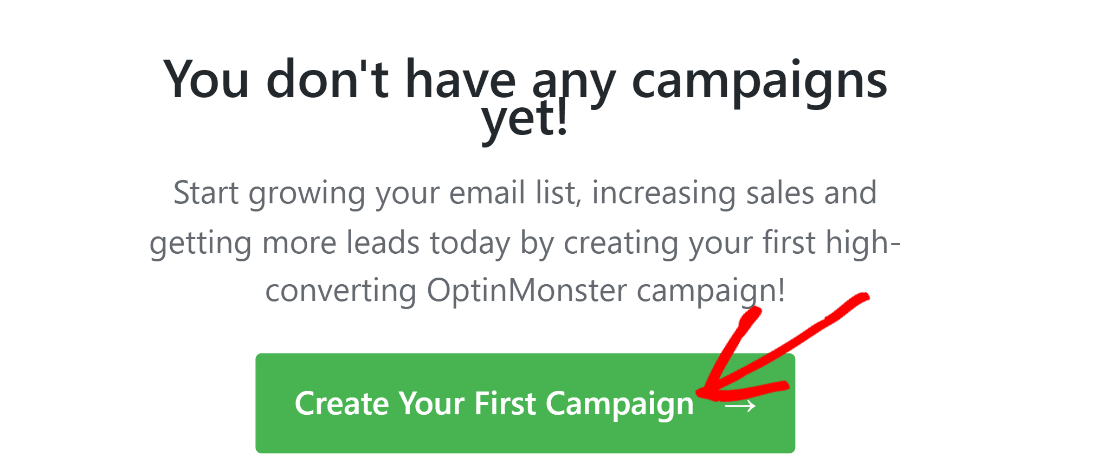
Click the green button to Create Your First Campaign. (If you’ve made your first campaign, you can click Add New at the top.)
Pro tip: If you’d rather have an expert build your first popup campaign, the OptinMonster Basic plan includes Done-For-You Setup™ where a conversion specialist will help design and set up your campaign to ensure its success!
Here, you’ll see that OptinMonster has a lot of different campaign types that are awesome for different uses! For now, click to select Popup.

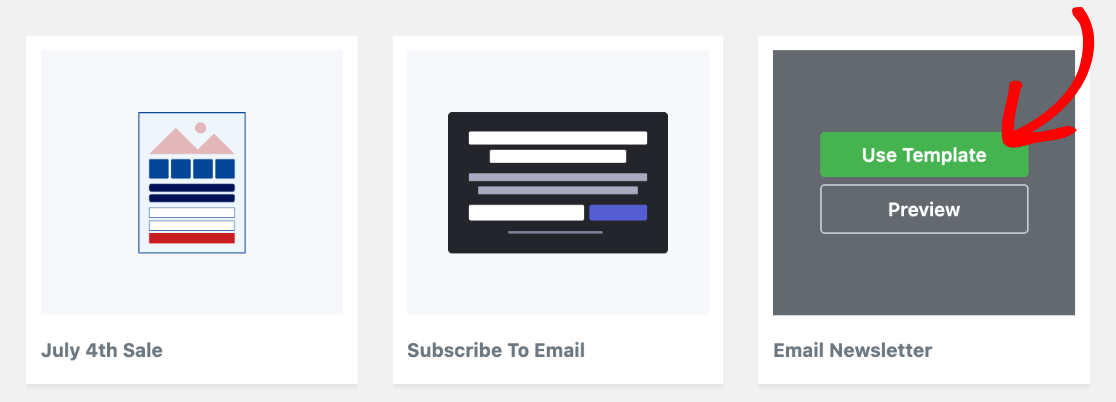
Next, you’ll need to scroll down and select a template for your WordPress popup. There are lots to choose from, and you can search by different uses as well. We’re going to select the one titled Email Newsletter. When you hover over it, click the green button Use Template.
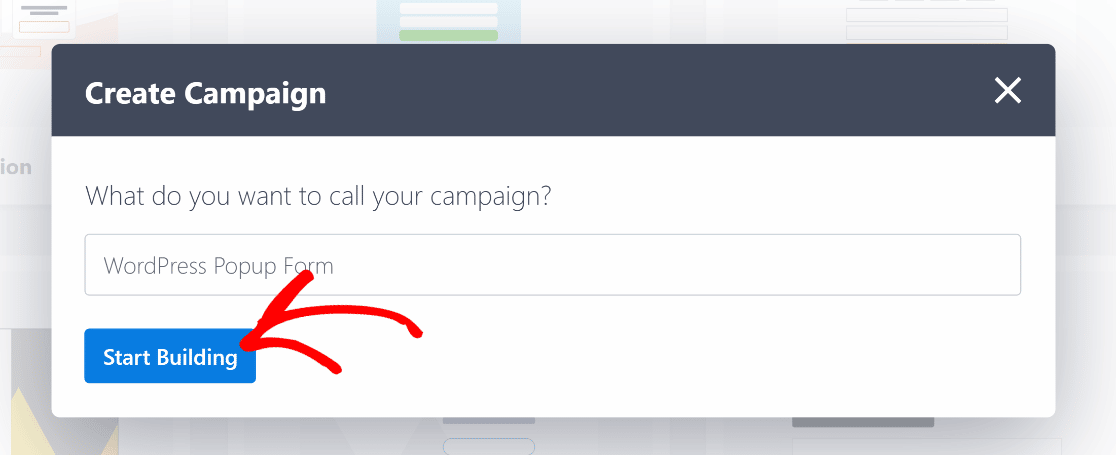
After that, a popup appears for you to name your campaign. Go ahead and do that, and press the button to Start Building.
You’ll now be taken to the drag-and-drop popup builder with your template loaded.
Add a Form to Your Popup
In this scenario, our basic WPForms signup form that we made earlier won’t add a whole lot more than the OptinMonster template does. So, you could technically use OptinMonster by itself to get to this step.
But, the real power of combining WPForms with OptinMonster is that you can easily combine different forms on the same popup, which is why we’ll show you how to do it.
In the left sidebar, scroll down and find the WPForms block. Just drag and drop it onto your template. Then, you can use the drop-down menu under Form Selection to choose the correct form from the previous steps (ours is Email Lead Capture – Newsletter Signup).
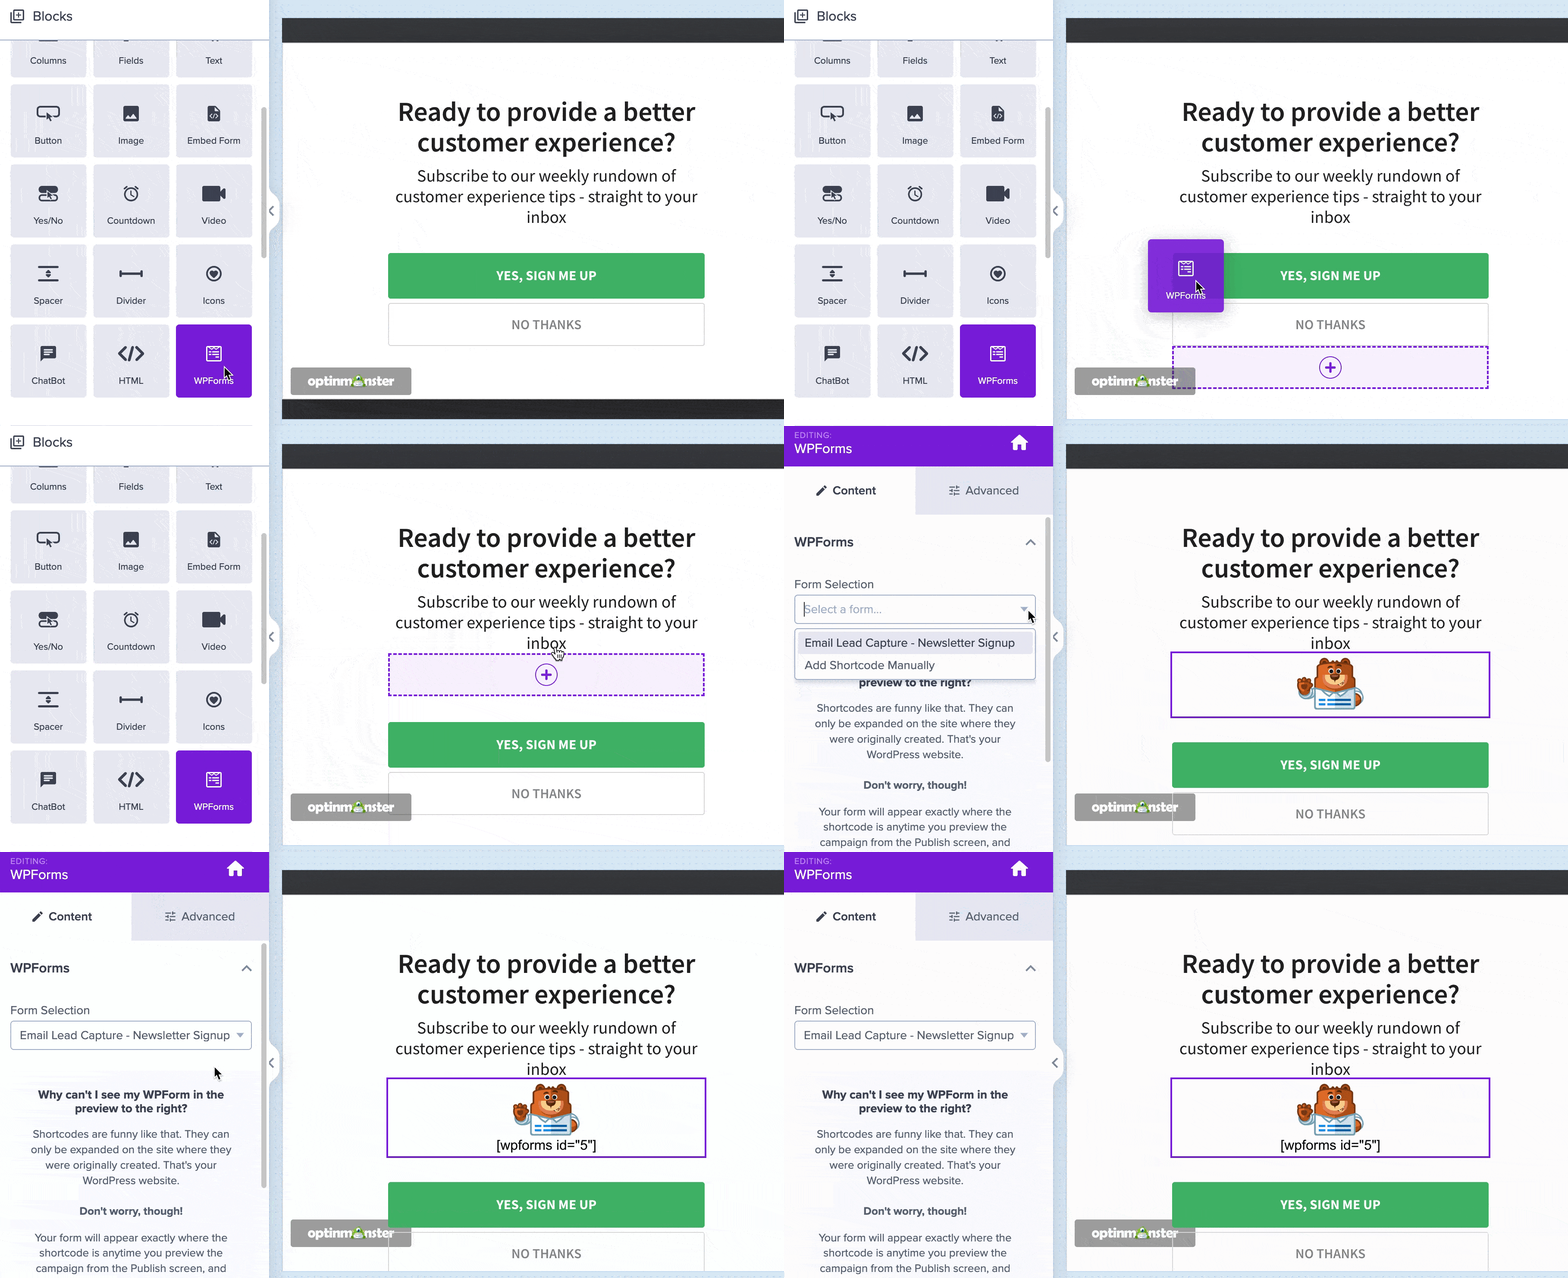
If you wanted to add another WPForm to your popup, you’d simply do the same thing again.
Customize Your Popup Design
First, you’ll want to delete the buttons on the OptinMonster template since our WPForm already includes a submit button. To delete the block, just hover over it and click the Trash icon that appears.

Now that your WordPress popup is set up, you’ll probably want to customize it further. Just click on a block to edit the text. You can use the settings in the left sidebar to change things like background, spacing, styling, add custom CSS, and more.
When your popup looks the way you like, make sure to click the green Save button at the top.
Note: Because OptinMonster embeds the WPForms shortcode for your chosen form, you can’t immediately see the forms in the live preview. Don’t worry though, we’ll show you how to preview it before publishing!
Using WPForms, you could add a Likert scale survey question to quickly collect customer feedback along with your email capture or a quick multiple-choice question where users can select the content they’re most interested in receiving emails about. You could even use a popup form to accept donations or payments.
The possibilities really are endless when you combine these two plugins! But for now, let’s get back to our newsletter signup.
Customize Your Popup Display Rules
By default, your popup will appear to website visitors on page load. However, you can customize the time delay or change the trigger and targeting by clicking the Display Rules tab at the top.

You can trigger on click for specific links/buttons/images, by how far the user scrolls on a web page, when a visitor is about to leave your site to reduce cart abandonment, and lots more.
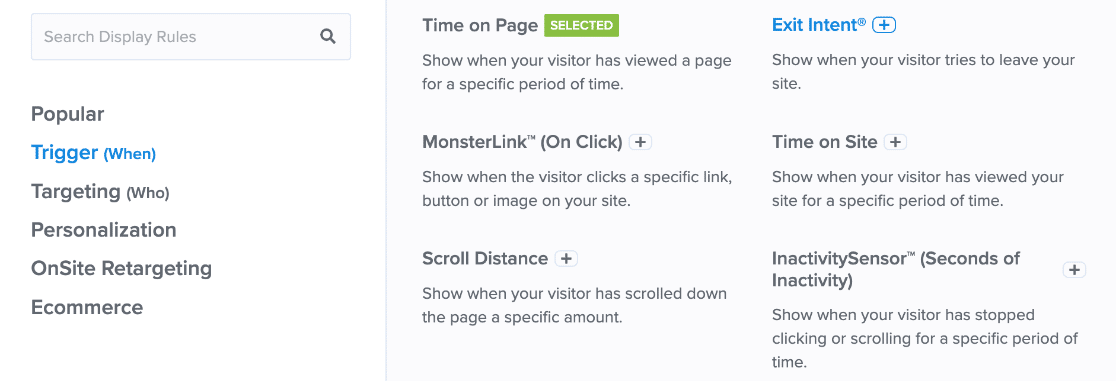
You can also use targeting to set rules that are specific to visitors’ activity on your site, location, device type, eCommerce cart total or purchase history, and much more.
Using targeting and triggers helps you create a much better user experience, which increases conversions and indirectly helps your SEO. You’ll definitely want to take advantage of all these advanced features when you start using multiple campaigns!
If you made any changes, press Save again. We’ll move on to the final step to add the popup to your WordPress site.
Step 5: Publish Your WordPress Popup
Only one more step, and you’ll have learned how to add a popup on WordPress! Click the Publish tab at the top when you’re ready.

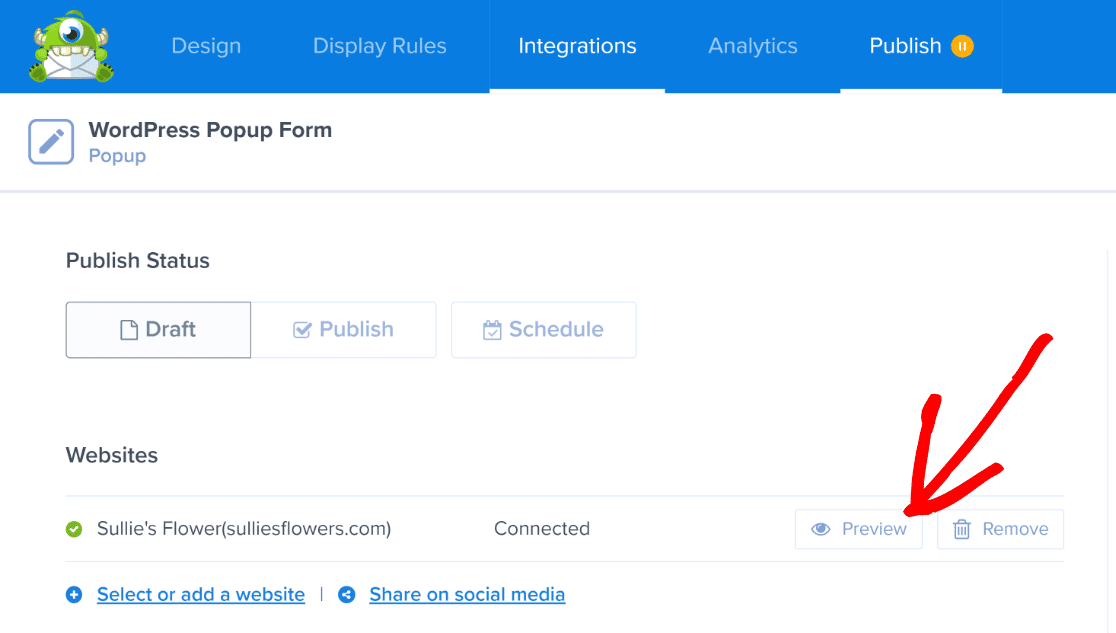
Under Websites, you’ll see a Preview button. Go ahead and click that and a new tab will open that shows you how your website will look to visitors when your popup campaign is live.
Here’s how our WordPress popup campaign looks in the preview after we finished customizing it.

If you’re happy with how everything looks on the frontend, you’re ready to publish! Click the Publish button under Publish Status.
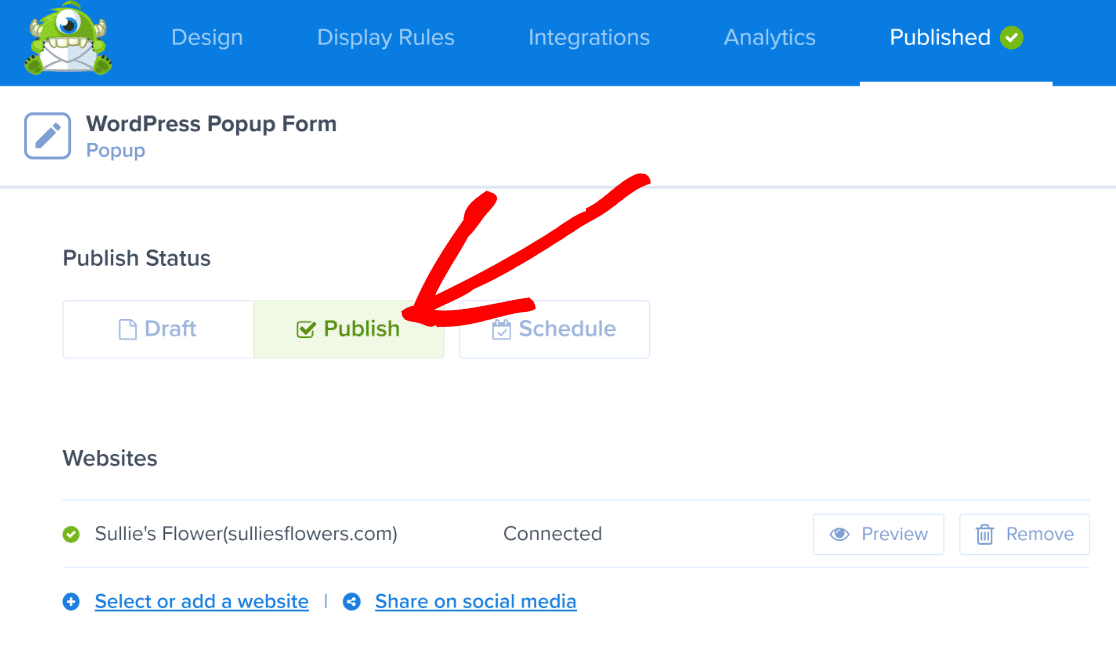
That’s it! You’ve successfully learned how to add a popup on WordPress.
Other Popup Settings
If you’d like to customize your popup settings further, you can do so by heading back to OptinMonster » Campaigns from your admin menu. Under your popup campaign, click Output Settings.
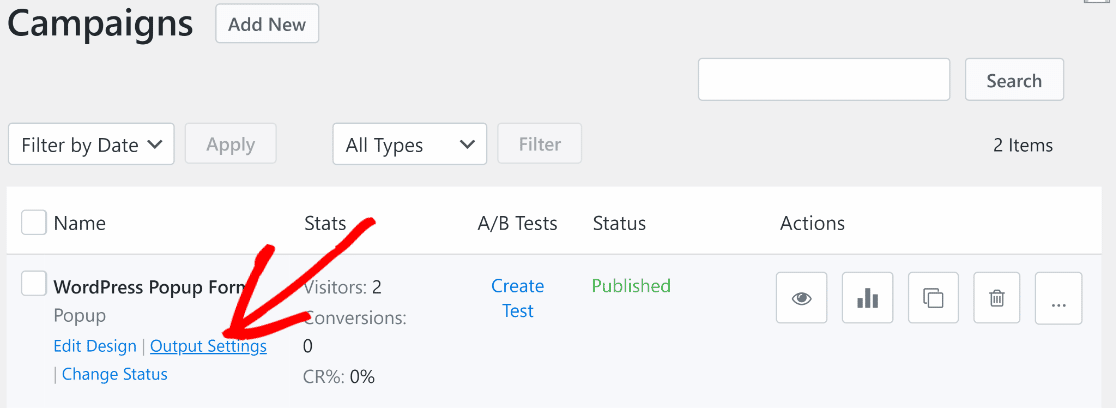
In this area, you can change other various settings for your popup like excluding logged-in users under Visibility & Status.
If you click to expand Advanced Settings you’ll also have the ability to decide which pages your popup appears on. You can exclude it from pages, only have it pop up on specific pages, or use filters to exclude certain content types.
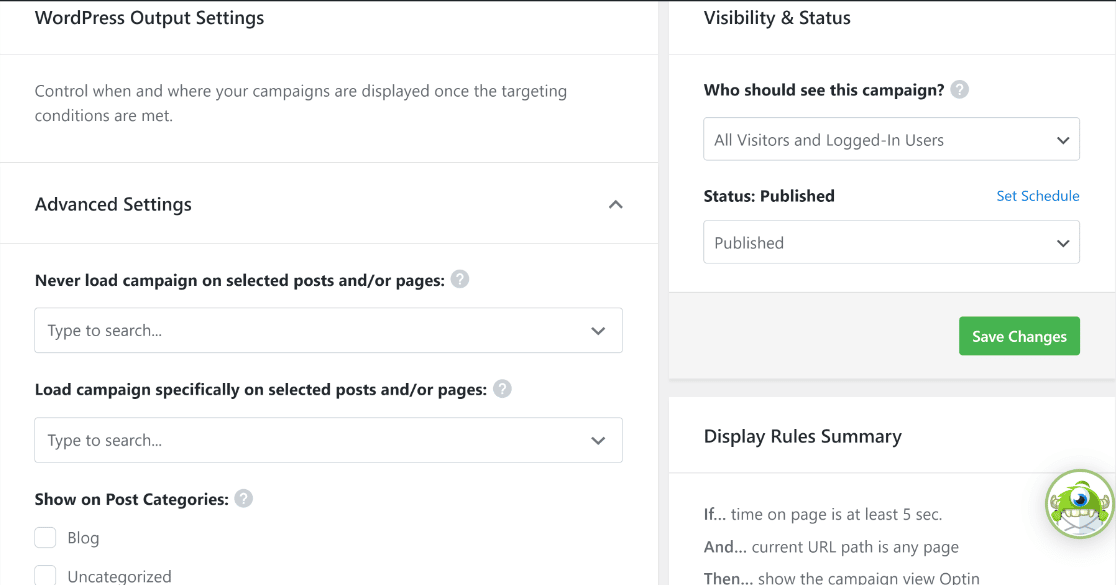
Once you’ve customized your settings, make sure to click the green Save button on the right side.
Congrats, you’re done with making a popup in WordPress!
Step 6: Track Your WordPress Popups
Lastly, we’ll show you how to find form submissions from your popups. We’ll also show you how to track the performance of your campaigns and other forms on your website so that you can optimize your popup forms and improve your marketing strategy!
Find Your Popup Entries
Unfortunately, the free version of WPForms doesn’t store your form entries in WordPress. Instead, you’ll receive your popup form submissions by email notification.
If you’d like to be able to see your entries in WordPress and quickly export them, you’ll want to upgrade to the pro version where you can easily find all your popup submissions by clicking WPForms » Entries.
You’ll also be able to use WPForms’ awesome addons to automatically add new subscribers to your email lists on popular providers like Constant Contact, Brevo, and more to automate your workflow.

Get started with WPForm Pro now!
Track the Performance of Your Popup Forms
Accessing your popup form submissions in WordPress is super helpful for saving time, but it won’t give you a whole lot of information about how your campaigns are performing. To find out how well your WordPress popups are doing, compare multiple campaigns, and optimize them, you need a tool like ExactMetrics, the best premium Google Analytics plugin.
ExactMetrics allow you to easily set up Google Analytics without editing any code and use advanced tracking right out of the box. Plus, it includes a powerful Forms addon to track how visitors interact with the forms on your site.
ExactMetrics already brings important Google Analytics data to your WordPress dashboard, and the Forms addon allows you to see additional important metrics about your popup campaigns and other forms right inside WordPress, including impressions, conversions, and conversion rates for each form.
To find your forms report in ExactMetrics, just navigate to ExactMetrics » Reports and click the Forms tab at the top.
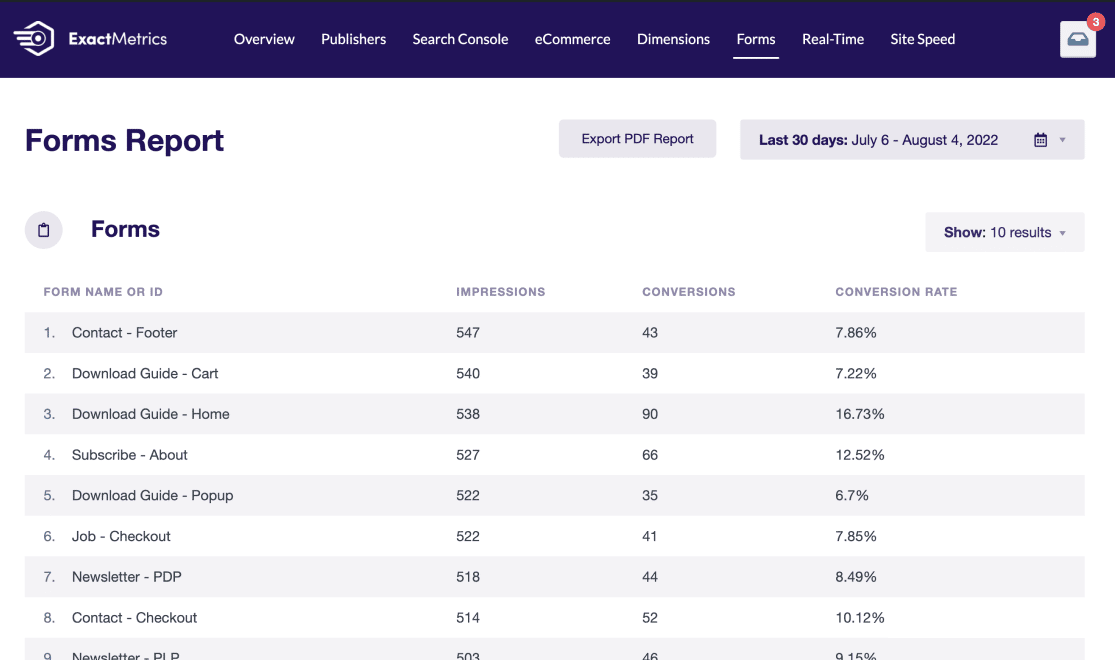
From one convenient page, you can quickly see how all of your forms and popups are performing. Check out How to Track Form Submissions in Google Analytics (Easy Way) for more information and to get started tracking your new popup form!
Well, that’s it for this article! We hope you enjoyed learning how to add a popup on WordPress. If you liked this article, we think you’ll want to learn How to Create an Email Newsletter That Works With WordPress next!
Not using ExactMetrics yet? What are you waiting for?
Don’t forget to follow us on Twitter and Facebook to see all the latest reviews, tips, and Google Analytics tutorials.


