Do you use coupon codes in your online store? They’re an awesome way to entice shoppers to purchase your products. If you do use them, you’d probably like to know how to track coupon codes in Google Analytics.
Tracking the coupon codes that your customers are using in Google Analytics is incredibly helpful. It can show you how much revenue you’re making with each coupon purchase, how many transactions were completed using the code, and much more.
When you can gather so much data about the way shoppers are using your coupon codes and shopping in your store, you can make the very best decisions to grow.
In this article, we’ll talk about all the benefits of tracking coupon codes in Google Analytics, and we’ll go over how to track them step-by-step.
Benefits of Google Analytics Coupon Tracking
If you use coupon codes as a way to get more sales in your eCommerce store, then tracking them is incredibly important. You need to know how they were used in order to decide if they’re really helping out your sales or not.
Use coupon tracking to find out things like:
- How many transactions took place using your coupon code
- How much revenue you made from the transactions made with your coupon code
- What the average order value was for each order using your coupon code
- Which channels were used (direct, organic, email, etc.) to come to your site and complete a purchase using your coupon code
- And more!
When you have access to all that data, you can make the right decisions that are going to help you grow your business.
How to Track Coupon Codes in Google Analytics
Tracking coupon codes in Google Analytics is easy, as long as you’re using the right tools.
First, you need to have general eCommerce tracking set up. When you have eCommerce tracking set up, you’re able to track what’s going on in your store, including your revenue, transactions, average order value, top products, coupon codes, and so much more.
That said, setting up eCommerce tracking can be tricky, especially for users who’ve never used Google Tag Manager and/or don’t know how to code.
Thankfully, if you’re using WordPress, there’s an incredibly easy way to set up eCommerce tracking without having to touch any code: ExactMetrics.
ExactMetrics is the best premium WordPress analytics plugin. With ExactMetrics, you can quickly and easily set up a ton of different Google Analytics tracking features, including eCommerce and coupon tracking, right inside your WordPress dashboard.
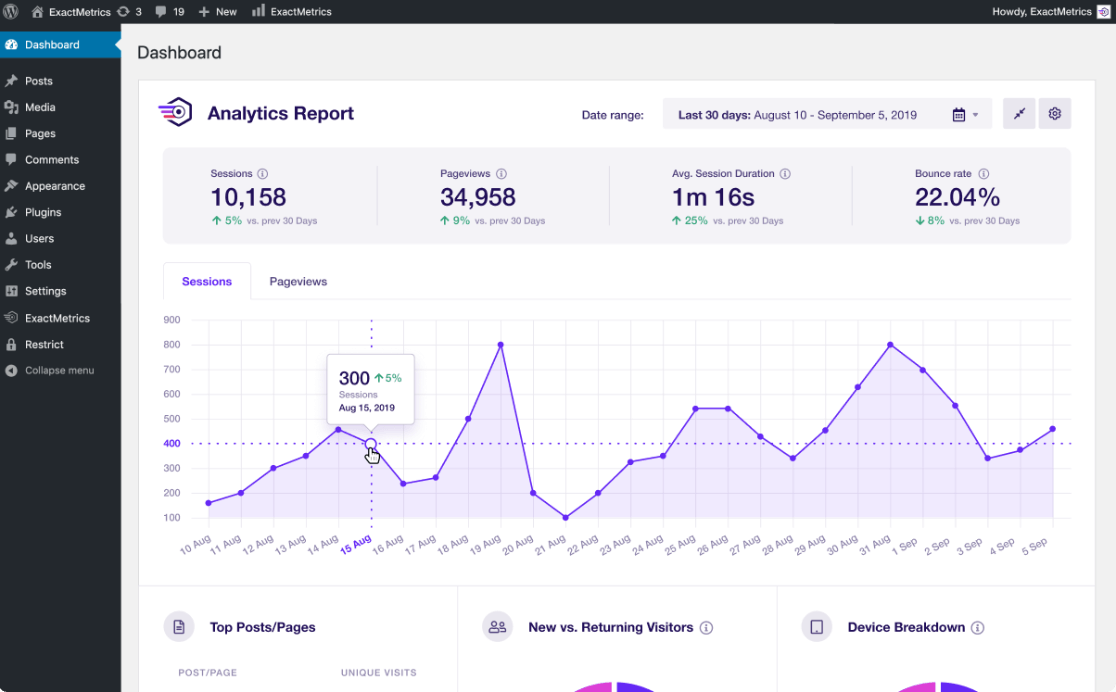
Our most popular features include:
- Easy eCommerce setup and tracking
- Forms tracking
- eCommerce user journey tracking
- Annotations
- Video play tracking
- Top outbound and affiliate link clicks
- GDPR compliance
- Popular products widget
With ExactMetrics, all your most important metrics are right there in your WordPress dashboard.
So, in our coupon tracking tutorial, step one is to install ExactMetrics.
Step 1: Install ExactMetrics
Before you can set up eCommerce and coupon code tracking, you’ll need to purchase ExactMetrics at the Pro level or higher.
After purchasing your license, download the plugin from your account area.
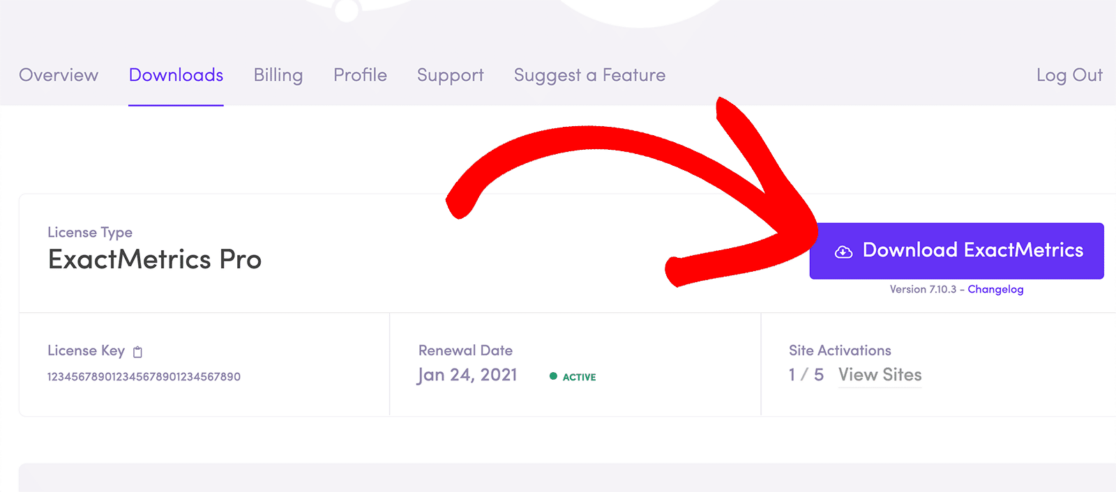
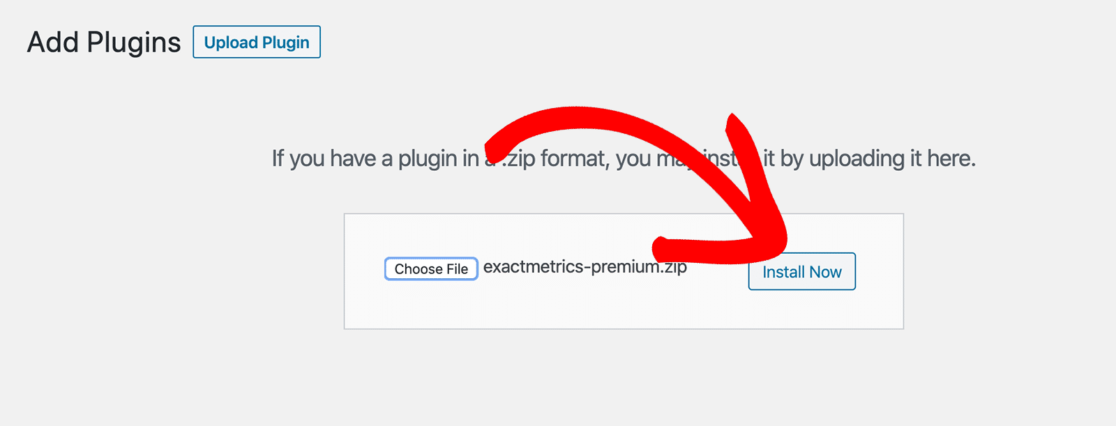
Then, head to your WordPress site and go to Plugins » Add New, then upload the ExactMetrics plugin file:
Once that’s done, click ExactMetrics from your WordPress dashboard and press the button that says Launch the wizard!
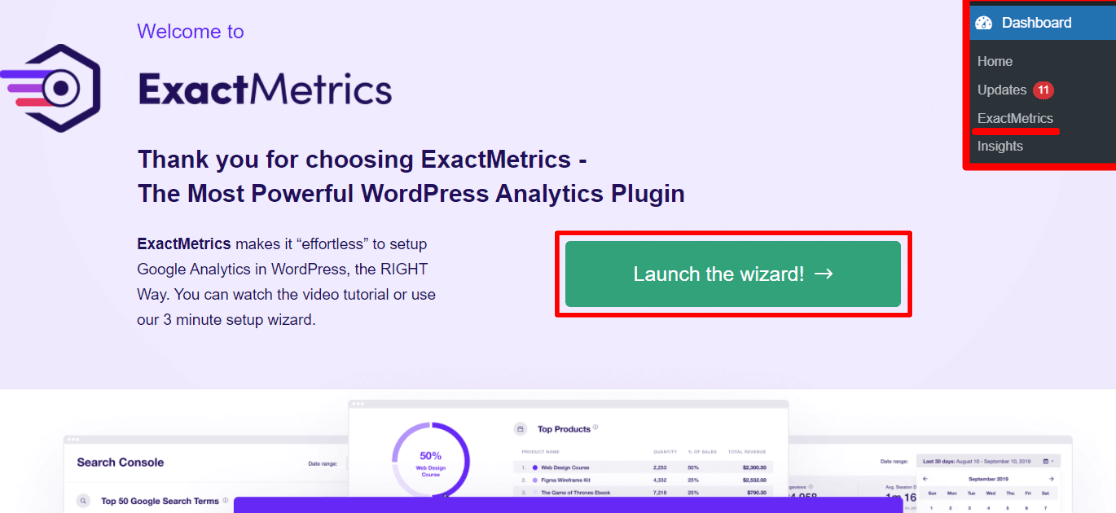
Now, the setup wizard will take you step by step through adding your license key and connecting with Google Analytics. Just go through each step to connect your site with Google Analytics without touching any code whatsoever.
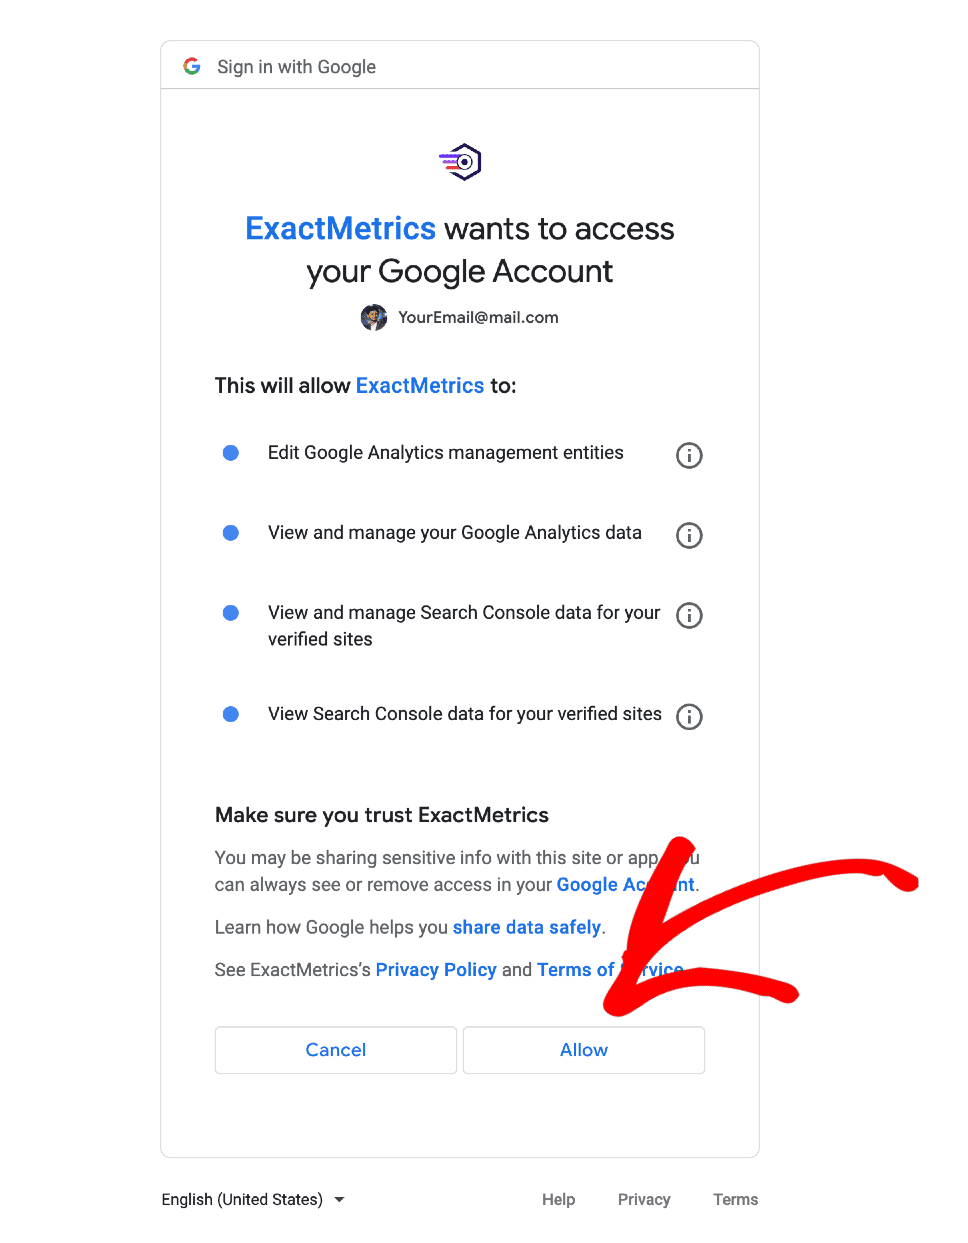
If you need additional help with creating a Google Analytics account and getting started with ExactMetrics, check out our step-by-step tutorial on How to Add Google Analytics to Your WordPress Site.
Step 2: Activate the eCommerce Addon
Once you’ve finished the setup process and connected ExactMetrics to your Google Analytics account, you’ll need to install the eCommerce addon. From your WordPress dashboard, navigate to ExactMetrics » Addons. Find the one titled eCommerce and click Install.
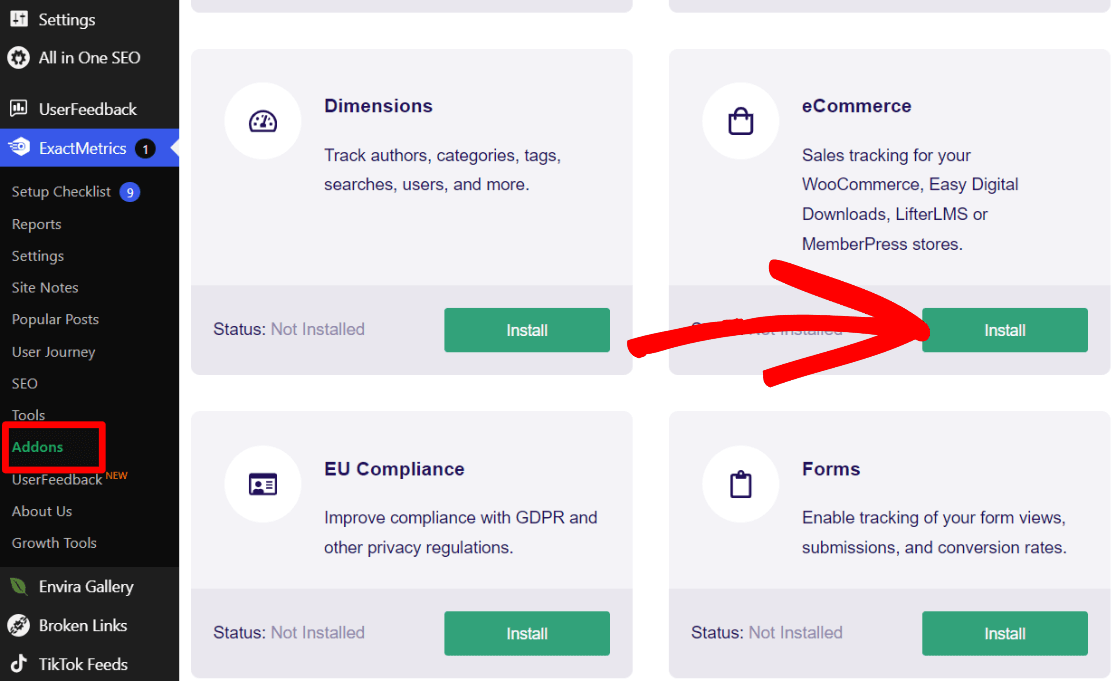
After you click the install button, wait for a few seconds and the addon will automatically activate.
That’s it! Can you believe you just set up eCommerce tracking with a couple of clicks?
Step 3: Access the Coupons Report in WordPress
Now that you’re connected to Google Analytics and eCommerce tracking is set up, you can access your Coupons report. Just head to ExactMetrics » Reports » eCommerce » Coupons:
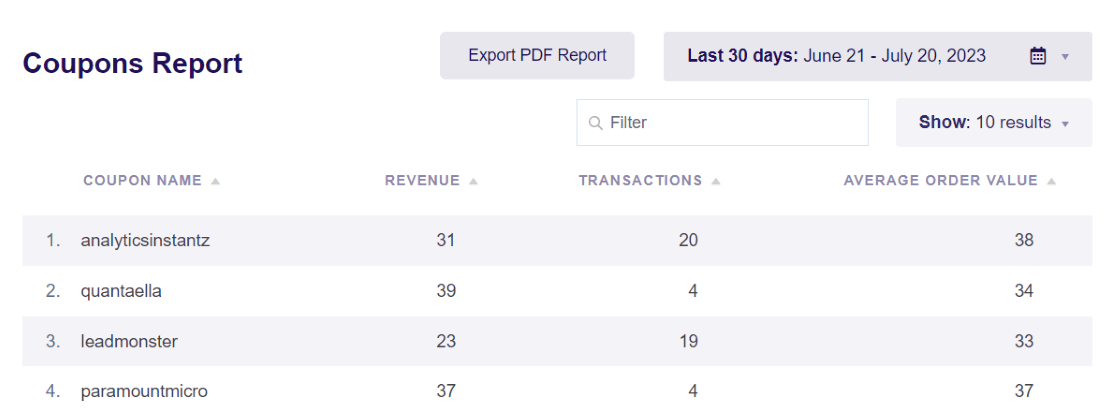
Within the report, you’ll see the revenue you made with each coupon code, the number of transactions in which each code was used, and the average order value of the orders where the coupon code was used.
Step 4: Check the Coupons Report in Google Analytics
If you still need more information about your coupon code usage, head to your Google Analytics account. Then, head to Monetization » Overview and scroll down until you find the Purchase revenue by Order coupon box. Click on the View order coupons link in the bottom right corner:
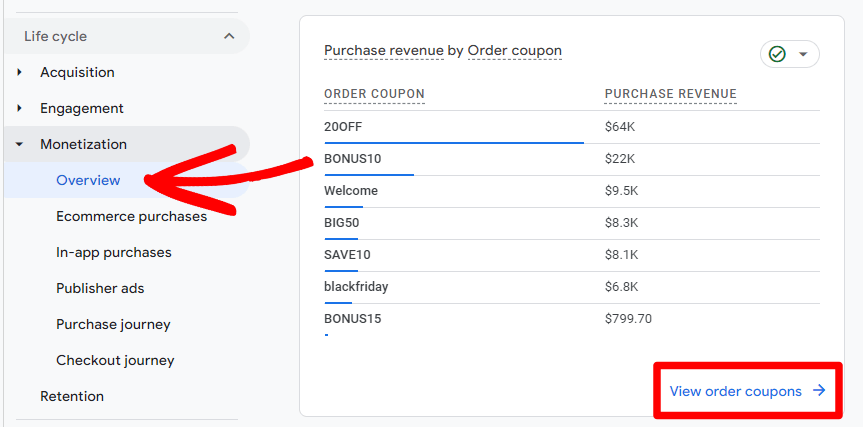
Now, you can add another dimension to the coupons report to see where your buyers came from who used your coupons.
To do that, click the + sign next to Order coupon and click Traffic source » Session source/medium:
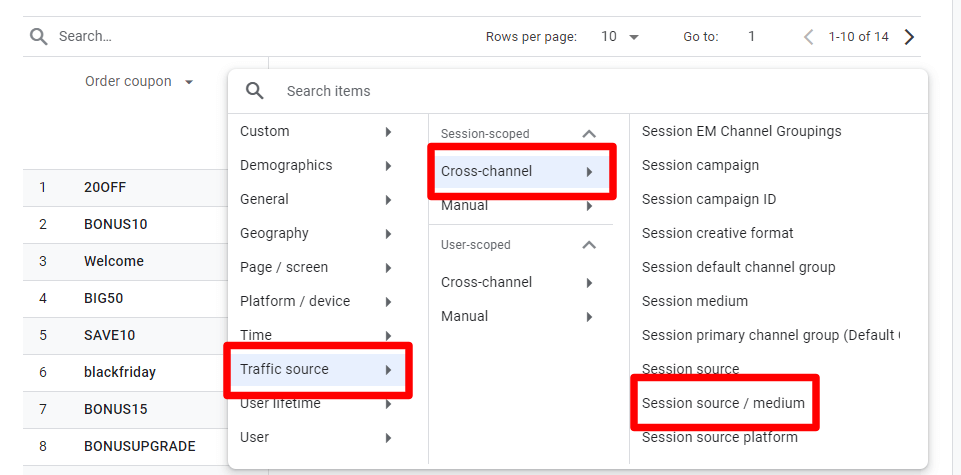
Now, you’ll get a lot more information about exactly where your users came from who used your coupon codes:

To set up eCommerce tracking in a couple of clicks and get a Coupons report right inside your WordPress dashboard, get started with ExactMetrics now.
That’s it!
If you liked this article, you might also want to check out:
How to Set Up GA4 Event Tracking in WordPress
How to Use WooCommerce Breadcrumbs (WordPress)
Guide to eCommerce Customer Journey Analytics in WordPress
15 Simple Ways to Boost Your eCommerce Conversion Rate
Don’t forget to follow us on Twitter and Facebook to see all the latest Google Analytics tutorials.

