Are you trying to figure out how to set up Google Analytics to track your website? Do you want to understand your audience better, track your traffic, and boost your online presence?
You’re not the only one. Many website owners realize data is essential but struggle with the technical aspects of adding analytics tools and plugins to their websites.
But don’t fear! Setting up Google Analytics is easier than you might think, and it’s a valuable tool for growing an online presence.
In this guide, we’ll show you the step-by-step process of adding Google Analytics to your website. We’ll cover everything from creating your Google Analytics account to properly connecting it to your site:
- Why is Google Analytics So Important?
- How to Set Up Google Analytics 4
- How to Set Up Google Analytics Using a Plugin
- Frequently Asked Questions
Why is Google Analytics So Important?
If you want your website to be more successful, whether for business, blogging, or anything else, Google Analytics is a tool you can’t overlook. It’s like having a secret assistant showing you exactly what’s happening on your site.
Imagine improving your site without knowing what visitors like or how they found you. That would be like shooting blindfolded, right?
With Google Analytics, you’re no longer guessing. You get real data about what’s going on.
This means you can make informed and smarter choices about what to change or improve. For instance, you might discover people love a certain type of post on your blog or that a product in your online store is super popular.
You can focus on what works and ditch what doesn’t with insights like those.
And it’s not just about the good stuff. Google Analytics can also show you which parts of your site might be confusing and where you lose visitors. Fixing those issues can massively boost your site’s success!
Here are great insights you can gain by setting up Google Analytics:
- Understand your visitors: See who is coming to your site, where they’re coming from, and what content they like.
- Track your best and most popular content: Find out which blog posts or pages are most popular to know what resonates with your visitors.
- Help with ad optimization: You can track paid ads, which shows you which are worth it and which aren’t. Ultimately, this will save you money and allow you to spend your budget better.
- Avoid guesswork: It gives you the real picture instead of guessing what visitors like allowing you to make data-driven decisions.
- Identify and fix issues: If something is wrong, like duplicate tracking codes, Google Analytics can help you identify it before it negatively affects your data.
How to Set Up Google Analytics 4
Getting started with Google Analytics 4 (GA4) is easier than you might think, and best of all – it’s totally free! All you need is a Google or Gmail account to get started.
If you’re worried this will be complex, don’t be – the process is straightforward. We’ll guide you through each step of setting up the latest version, Google Analytics 4 (GA4).
1. Create a Google Analytics 4 Account
First, you must create a Google Analytics account. This is where all of your website’s data will live, so it’s essential to get it set up correctly.
We’ll walk you through how to create a Google Analytics account, keeping things simple.
Step 1: Go to Google Analytics
First, go to the Google Analytics website. Once there, click the Get started today button at the top right corner.

Step 2: Sign into Google
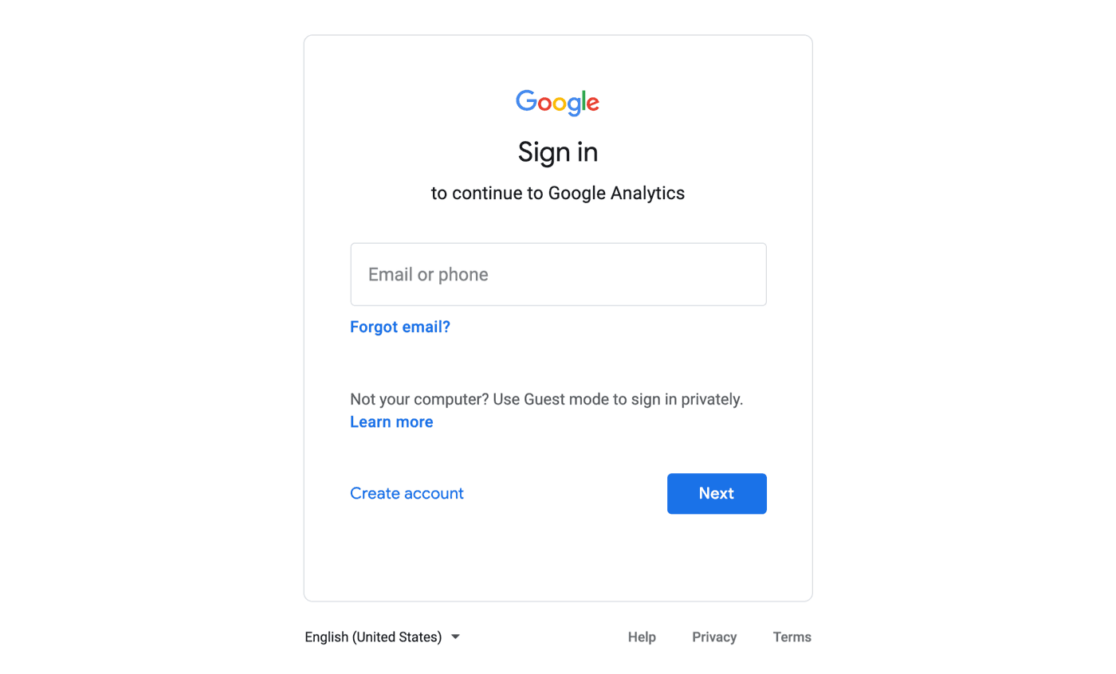
Next, you’ll be asked to sign in using your Google account. You can use an existing Google/Gmail account or create a new one if needed.
Step 3: Create Your Property
After signing in, you need to click the Start measuring button.

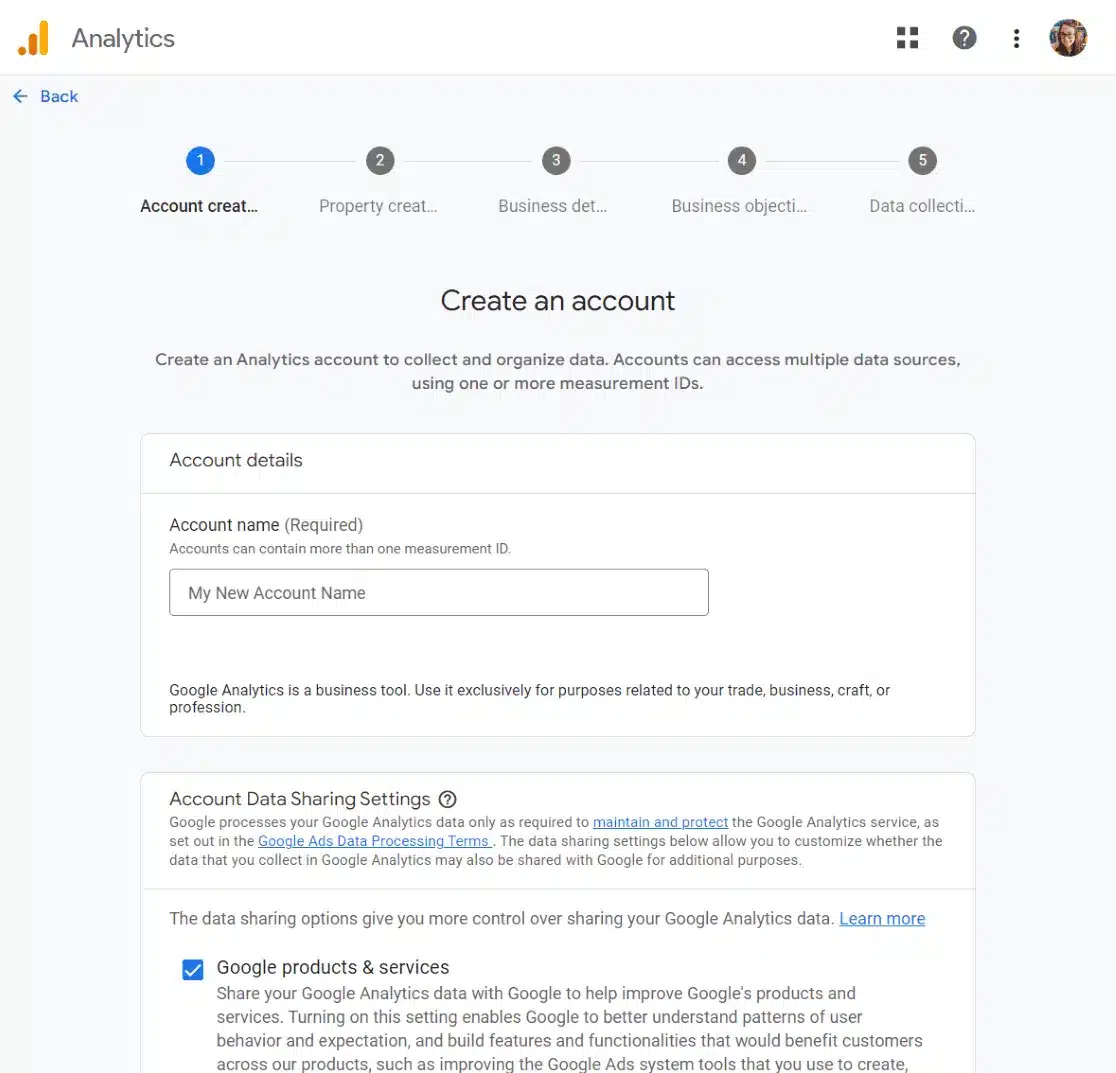
Then, you’ll enter the name of your Google Analytics account. You’ll also see various data-sharing options you need to configure. Once you’re finished, click Next.
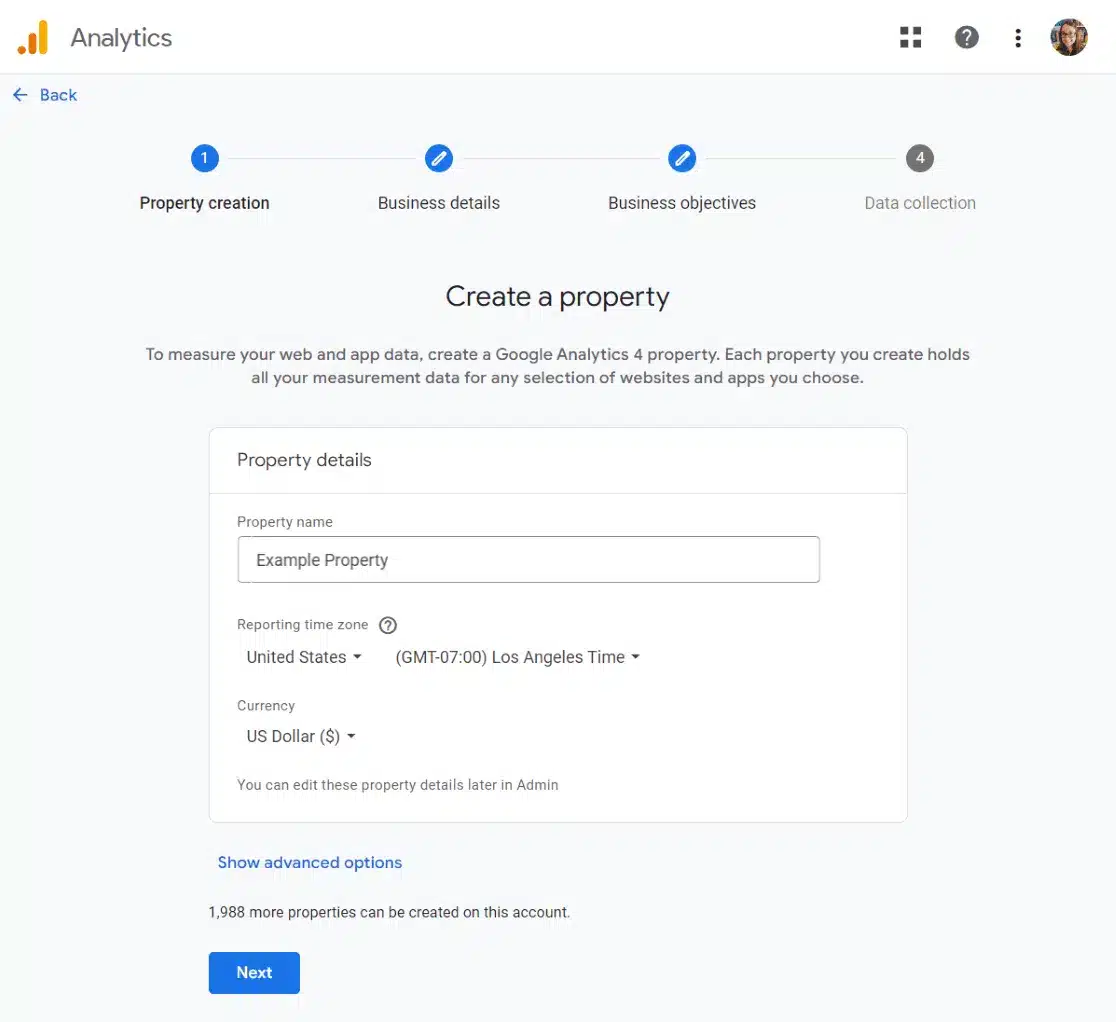
Next, you must enter the property details for your website – the property name, reporting time zone, and currency. Proceed by clicking Next.
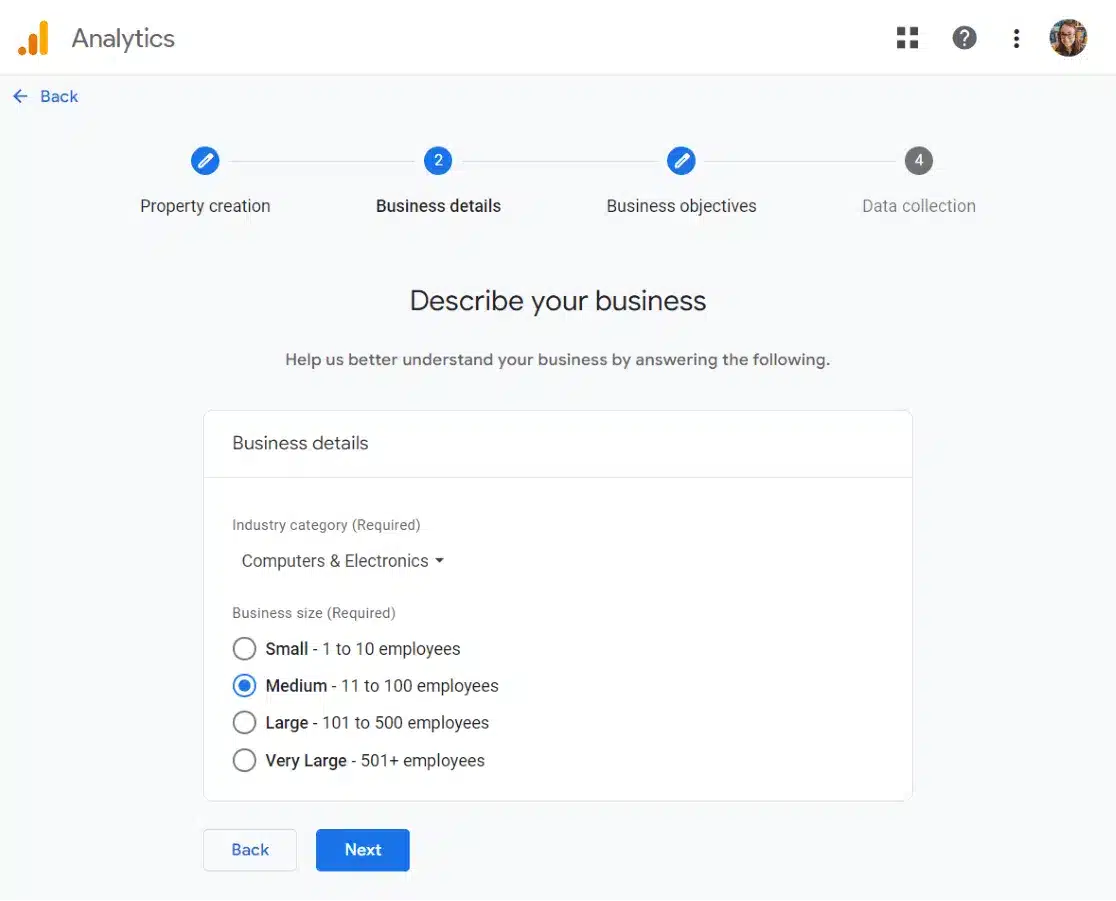
After that, select your industry category and business size.
Finally, choose your main business objectives. Then, select Get baseline reports to access all of Google Analytics’ standard data and reports.
Click Create, and that’s it – you’re now signed up!
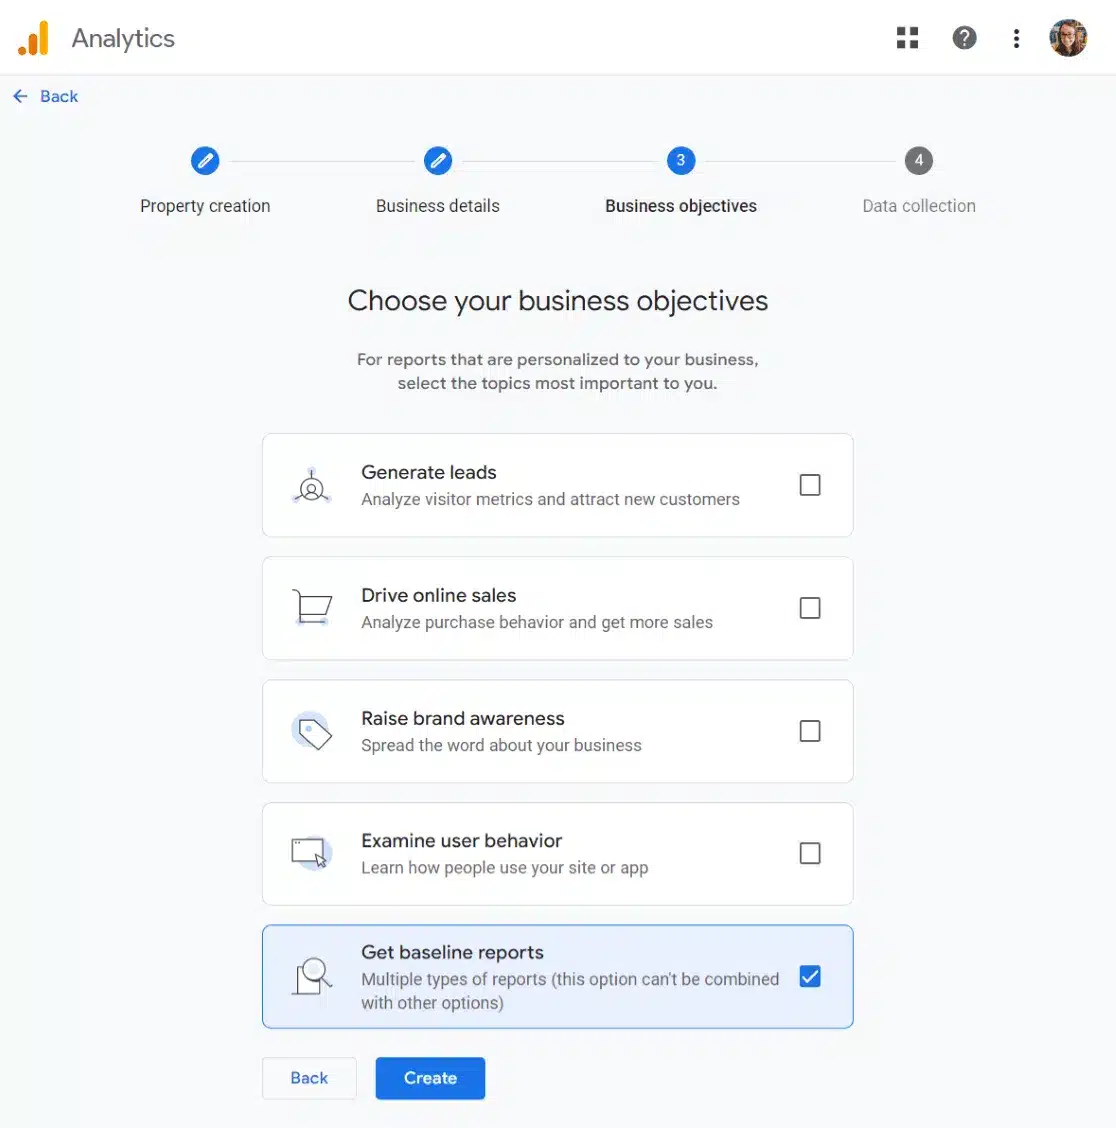
Next, you must choose and set up your web stream.
Step 4: Choose Web Stream
Now, you’ll see options to set up your Google Analytics web stream. Since we’re setting up GA4 for a website, select ‘Web’ as your platform.
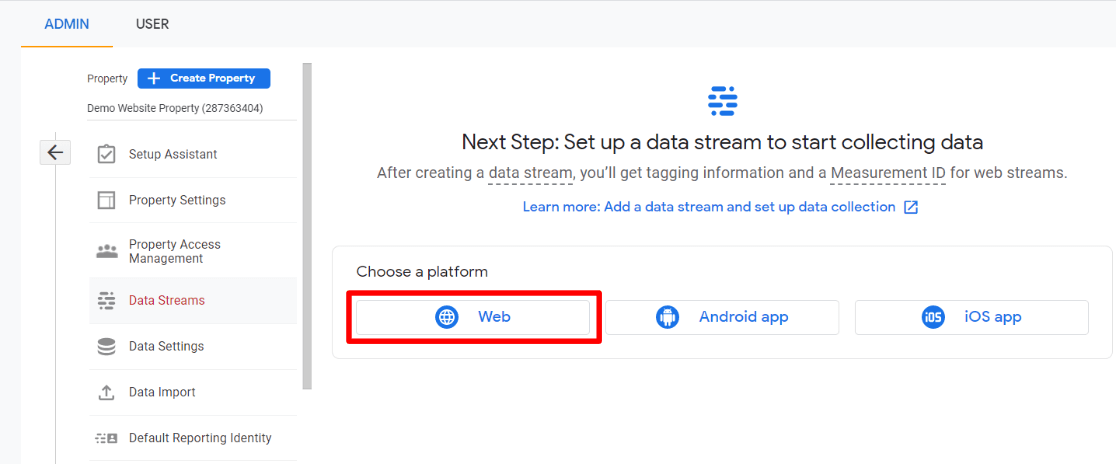
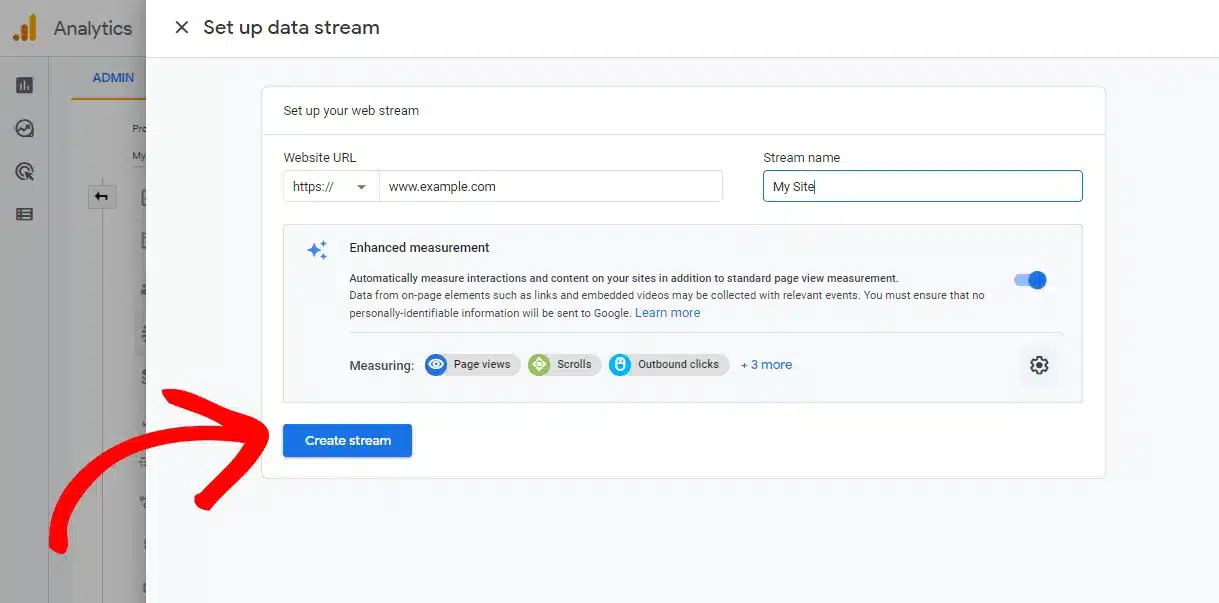
You’ll need to enter your website URL and choose a Stream name.
By default, Google has enabled ‘Enhanced measurement,’ which allows for tracking visitors, scrolls, outbound clicks, and more. Just leave this as it is.
Next, click Create stream.
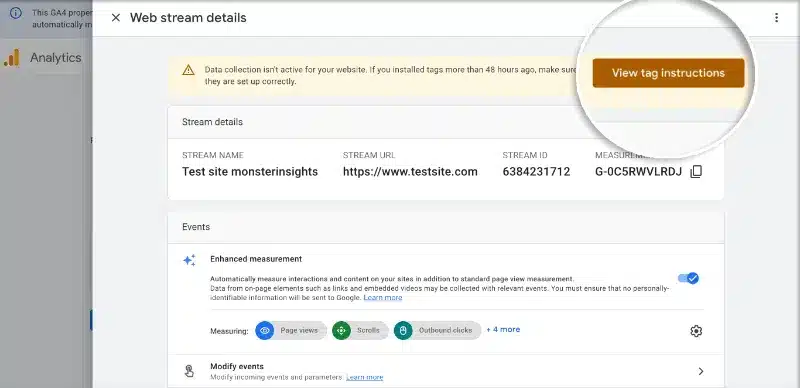
You’ll now see your Stream details, such as the ID, URL, and Measurement ID. It also shows you the enhanced measurements it will track.
At the top is a bar explaining how to add Google Analytics tracking to your website.
Click View tag instructions, and you’ll see different code installation options.
Switch to the Install manually tab to see your Google Analytics tracking code.
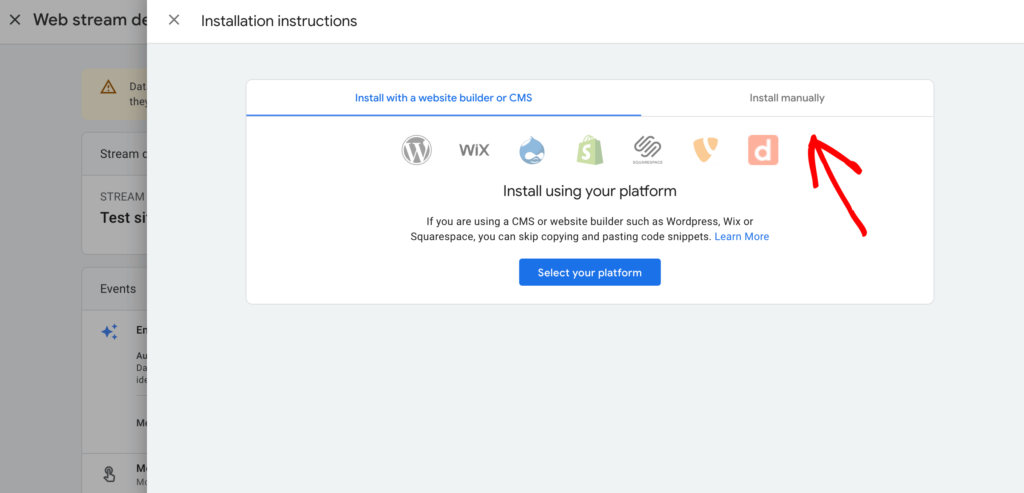
Make sure to copy this tracking code. Depending on how you install it later, you may need to paste this code into your website.
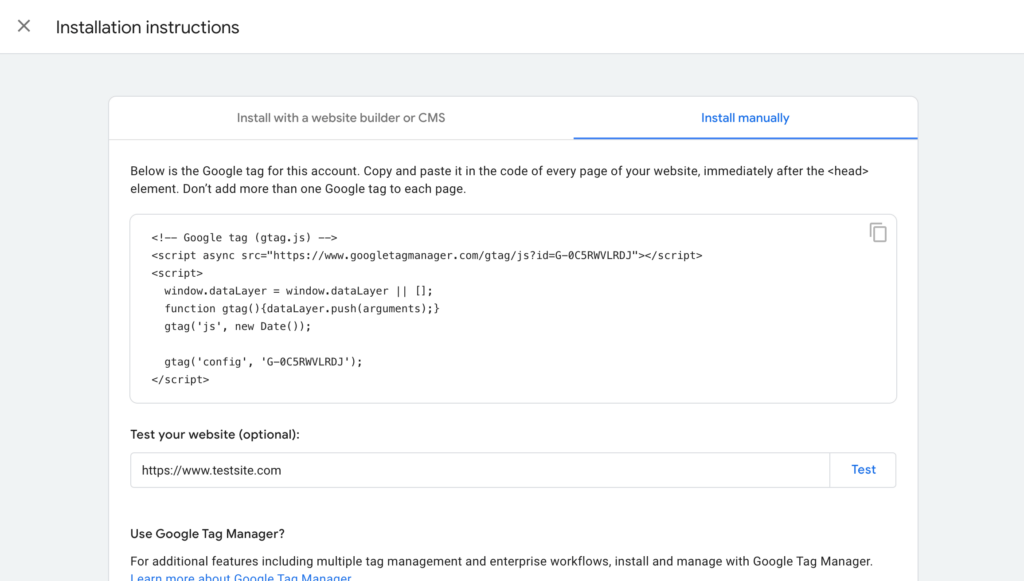
It’s a good idea to leave this page open for now. You may need to refer back to it.
Now that your GA4 account is ready let’s examine how to add Google Analytics to your website.
2. Install Google Analytics 4 on Your Site
You have a few options for adding Google Analytics to your website.
We’ll explain three methods. Choose whichever one seems best for you and your site.
Important: Only use one method. Using multiple methods could mess up your data by double-tracking pageviews in Google Analytics.
Code Installation Methods
The process for adding the tracking code can vary a bit depending on the type of website you have.
The steps for integrating the code will be slightly different for each platform, whether you’re on WordPress, Wix, Shopify, or another one.
Don’t worry, though – we’ll cover the basics so you can apply them to your specific website setup.
Let’s go over how to install Google Analytics tracking with code for different website types:
WordPress Sites
If you own a WordPress website, the easiest way to set up Google Analytics is with ExactMetrics.
With ExactMetrics, you don’t need to mess with any code, and you can even get started for free.
You can install and activate ExactMetrics by going to your WordPress dashboard, clicking Plugins, searching for ExactMetrics, and installing and activating the plugin.
Or, to get tons of extra tracking features, like eCommerce tracking, ads tracking, form tracking, and more, get an ExactMetrics license and install the plugin by uploading the files to your account.
From there, the plugin will guide you step-by-step on connecting Google Analytics to WordPress.
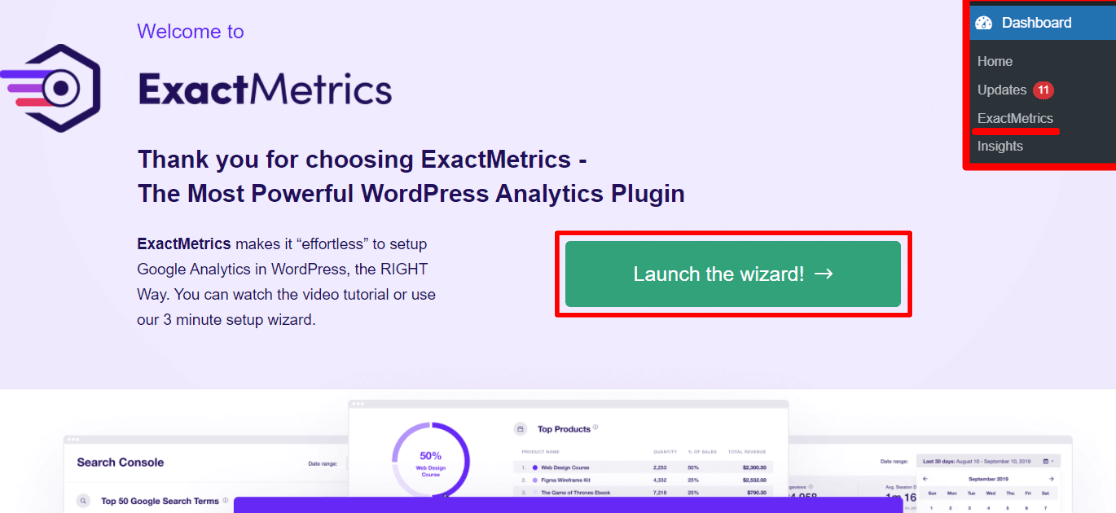
For more on using ExactMetrics to set up Google Analytics, jump straight to the How to Set Up Google Analytics Using a Plugin section below.
If you want to install the tracking code manually without ExactMetrics, using the free WPCode plugin is the easiest method.
First, copy your Google Analytics tracking code from when you created your GA4 account earlier.

Then, install and activate the WPCode plugin. Paste the tracking code into the Header section under Code Snippets » Header & Footer.
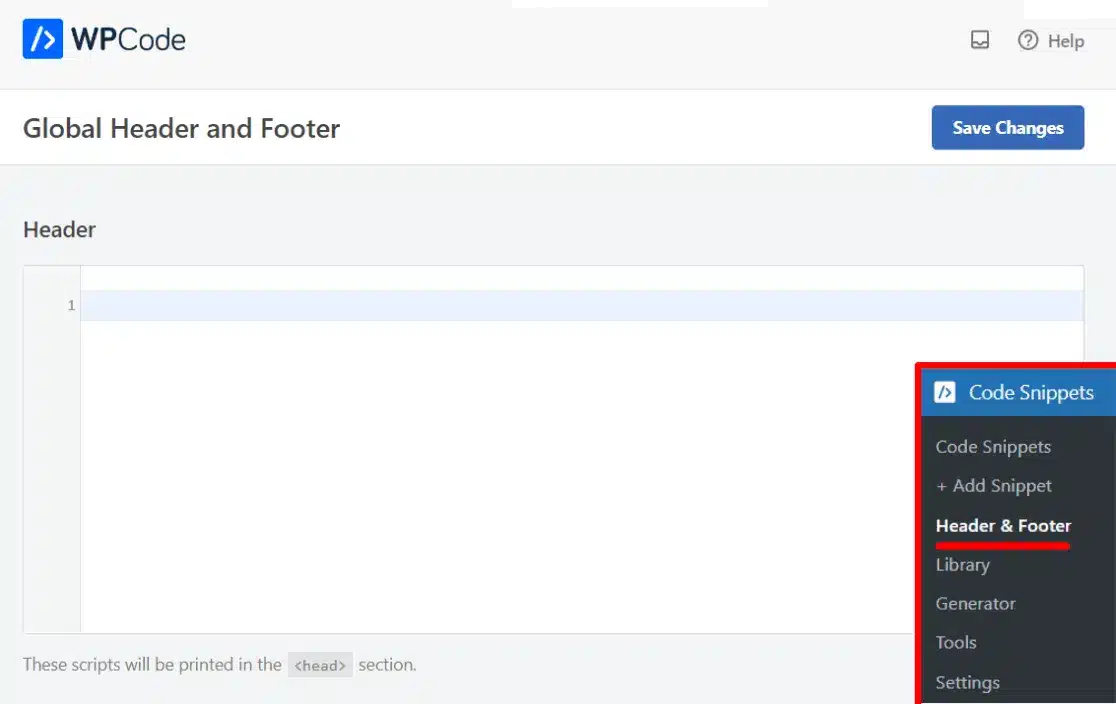
Click Save Changes, and that’s it!
Other Website Platforms
If you’re not on WordPress and are using a platform like Wix, Shopify, or something else, the process will be a bit different, but the overall idea is the same.
Like with WordPress, start by copying your Google Analytics tracking code from your GA4 account.

Then, you need to find where your website platform allows you to add code snippets or edit the header HTML.
Each platform has its own way of letting you do this – it might be the site editor, HTML/CSS editor, dashboard settings, etc.
Once you find that area, simply paste your tracking code into the global header so it loads on every page.
Make sure to save your changes, and you’re all set!
Set Up With Google Tag Manager
Another possible route is to use Google Tag Manager to install Google Analytics, but it is a bit more complex.
First, you need to create a Google Tag Manager account. This will provide you with two code snippets you need to add to your website.
Next, you have to configure your GA4 property within Google Tag Manager. This part is the one that is a bit more technical, so pay attention to each step.
If you’re not confident with this setup, one of the other methods may be better. But if you’re interested, follow this guide on setting up GA4 with Google Tag Manager.
WordPress Theme Method
This more technical method is best for those comfortable with coding. One important note is that this approach can be risky.
How so? If you ever change or update your WordPress theme, your tracking code could be deleted with the old theme files. Then, you’d have to reinstall it, which is a hassle.
But if you’re still interested, here’s how to add Google Analytics tracking code directly to your WordPress theme:
First, copy your GA tracking code.

Then you have two options (use one or the other, not both):
1. Add to header.php file
Open your theme’s header.php file and paste the code straight after the opening <body> tag.
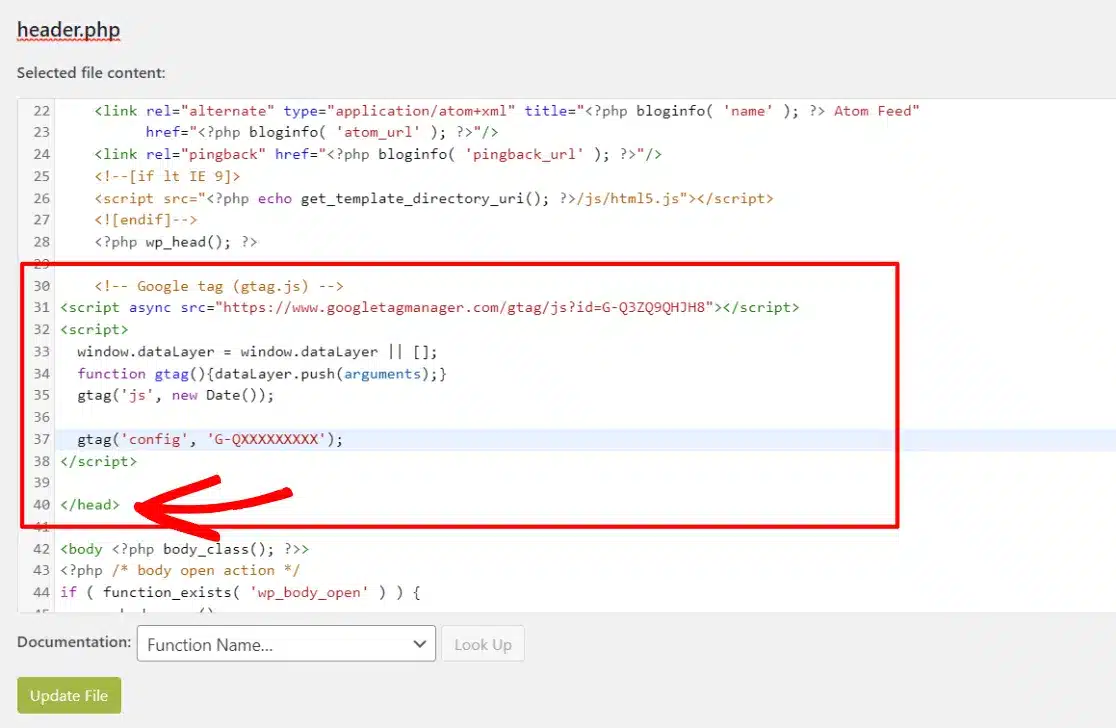
Remember to save your changes by clicking Update File. Then, you have to upload the file to your server.
2. Insert via functions.php file.
The other option is to add the code to your theme’s functions.php file. This will automatically insert the tracking code on every page of your WordPress site.
You’ll need to add this code snippet to the functions file:
![]()
Replace the placeholder text with your real Google Analytics tracking code and save your changes.
3. Test That It’s Working
Okay, now that Google Analytics is installed, you’ll start seeing data about your site’s traffic and visitors in your GA4 account.
The next crucial step is verifying that it works appropriately and data flows as it should. After 15-30 minutes, go to the Data Streams page in Google Analytics and look for a notice saying, ‘Receiving traffic in past 48 hours.’ This means data will start flowing.
However, it can take up to 24-48 hours for Google Analytics to collect all report data fully. So if you don’t see much at first, don’t panic – it’s normal.
If you still don’t see data collected after a few days, double-check that you followed all the steps correctly.
Still not working as it should? You may need to contact Google support for additional help.
How to Set Up Google Analytics Using a Plugin
Now, if all of this code installation seems overwhelming and you have a WordPress site, there’s an easy alternative.
You can set up Google Analytics using the ExactMetrics plugin for WordPress.
ExactMetrics is the top Google Analytics plugin that streamlines linking your WordPress site with Google Analytics so you can access all the data right in your WordPress dashboard.
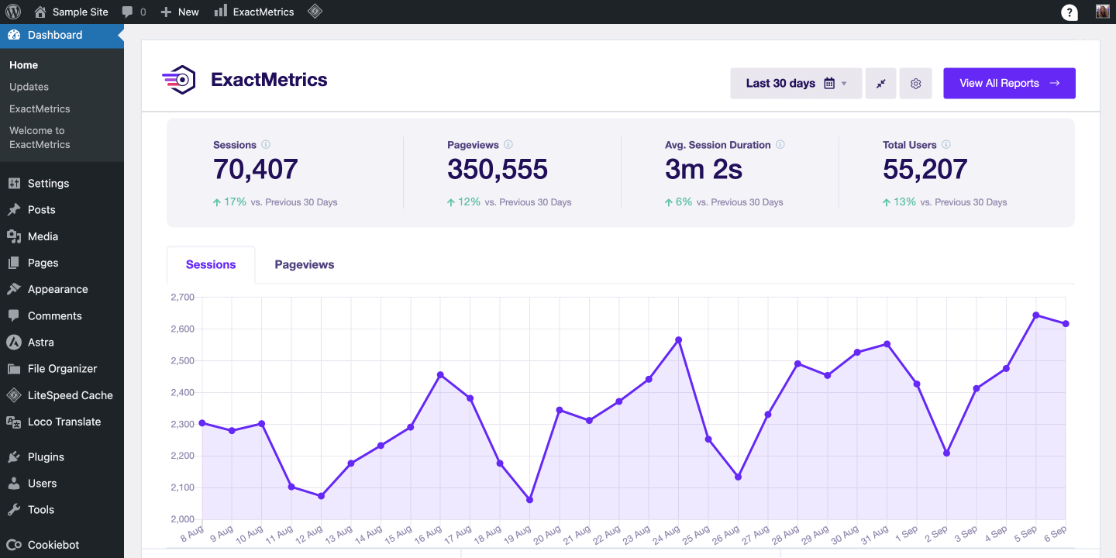
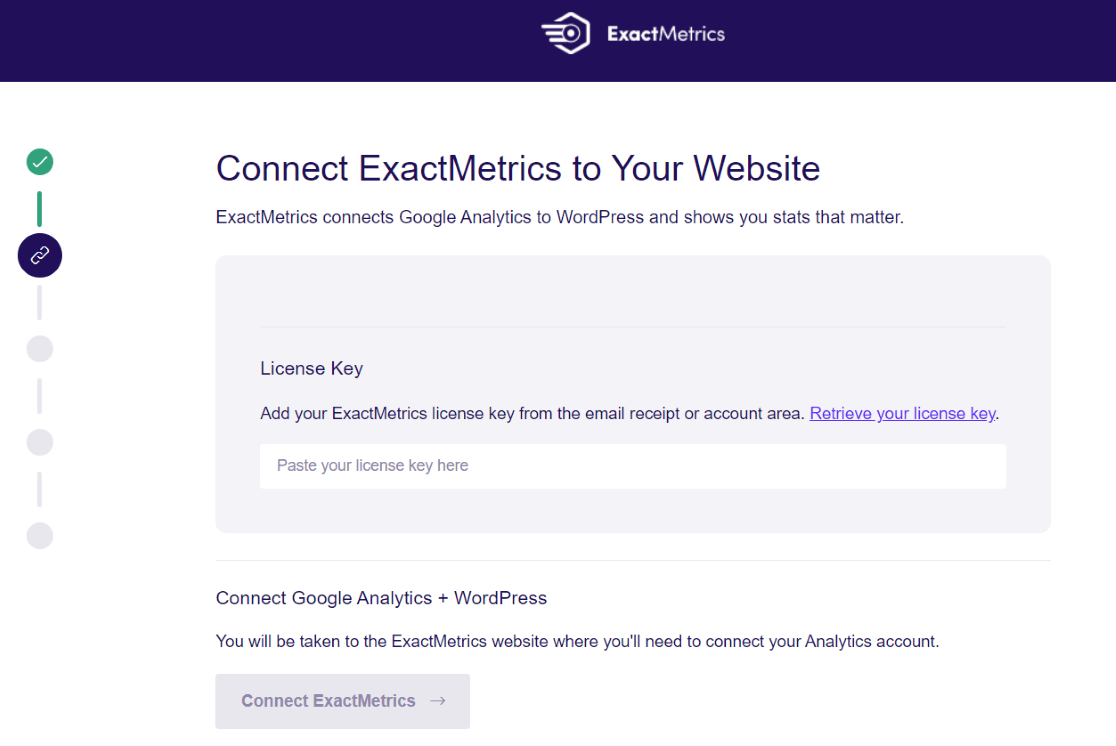
The best part is how incredibly easy ExactMetrics makes the setup process. No coding is required, and you can even skip creating the web data stream yourself – ExactMetrics automatically takes care of that step.
Simply follow steps 1-3 of this guide and connect GA4 with ExactMetrics. It’s that easy!
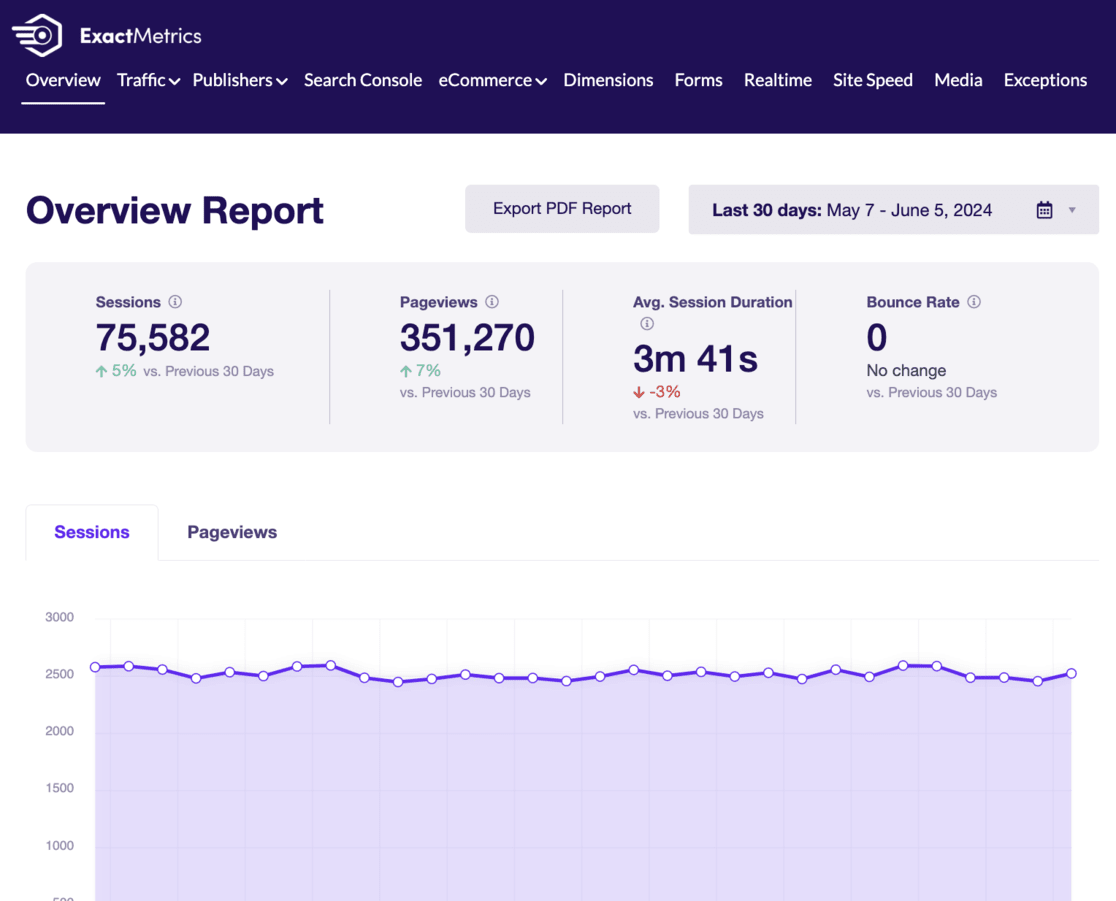
Without ExactMetrics, you’d have to navigate the Google Analytics interface separately to find the stats you need.
ExactMetrics provides clean dashboard reports tailored for various uses, such as real-time user activity, eCommerce, site speed, Search Console data, video tracking, and more.
It also allows you to activate advanced tracking features with one click – no code required. These features include form tracking, event tracking, author stats, outbound link tracking, WooCommerce stats, custom dimensions, and lots more.
This is why over 1 million websites use ExactMetrics to easily connect their WordPress sites with Google Analytics’ powerful insights.
For a full tutorial, see How to Add Google Analytics to WordPress guide.
Frequently Asked Questions
Is Google Analytics free?
Yes, Google Analytics is free to use! You can track and see how people use your website without paying any money.
Do I need Google Analytics for my website?
You don’t have to use it, but Google Analytics can be really helpful. It shows who is visiting your website, what they are looking at, and how they found it. This information can help you improve your website and grow your business.
Can I run Google Analytics on any website?
Yes, you can use Google Analytics on any website. As long as you can add a little bit of code to your website, you can track visitors with Google Analytics.
Can I use Google Analytics on a website that is not mine?
No, you can’t use Google Analytics on someone else’s website unless they give you permission. You need to be able to add a special code to the website to track its visitors.
That marks the end of our guide on how to set up Google Analytics on your website.
We hope you liked this article, and it made the whole process super easy. Maybe you’d also like to check out:
- 8 Types of Google Analytics Reports to Track (The Best Ones)
- How to Create Google Analytics 4 Custom Exploration Reports
- How to Track SEO Rankings in Google Analytics 4 [Free Tools]
Still not using ExactMetrics? What are you waiting for?
And don’t forget to follow us on X and Facebook for more helpful Google Analytics and website tips.


