Google Analytics 4 (GA4) is incredibly powerful for gaining valuable insight into your website’s performance. But did you know that you can use Google Analytics alerts to automatically get notified of important changes that happen on your site?
GA4 alerts are fully customizable, which means you can set them up to track whatever is most important to your business, such as sale fluctuations, drops or surges in traffic, engagement rate changes, and lots more.
It’s a really handy feature that gives you a way to tell Google, “Hey, if this unusual thing happens, I need to know ASAP,” which can be a serious lifesaver, allowing you to react promptly to any sudden changes or unexpected issues.
So, in this article, we’ll show you step-by-step how to create custom GA4 alerts, and how you can use Google Analytics alerts to keep a close eye on your website. Ready to get started?
What Are Google Analytics Alerts?
Google Analytics alerts are automatic notifications based on specific conditions or thresholds you’ve set up. They help you track changes in your Google Analytics 4 property and detect anomalies in your website’s metrics by notifying you whenever something noteworthy happens. They were known as Custom Alerts in the previous version of Analytics (Universal Analytics) but are now called Custom Insights in GA4.
These automated insights allow you to keep a close watch on your own website and your competitors without spending a ton of time manually checking for changes. Pretty cool, right? So, are you ready to learn how to set up custom Google Analytics alerts to monitor changes in your site’s metrics?
How to Create Custom Alerts in GA4
To set up custom alerts in Google Analytics 4 for anomaly detection and to monitor changes in your site’s metrics, you can use GA4’s custom insights. Just follow the steps below to learn how.
- Step 1: Go to Custom Insights in GA4
- Step 2: Create a Google Analytics Alert
- Step 3: Set the Conditions of Your GA4 Alert
- Step 4: View Your Custom Insights
If you don’t have an account with Google Analytics tracking already set up for your website property, follow our tutorial on How to Add Google Analytics to WordPress to get started.
Step 1: Go to Custom Insights in GA4
First things first, you need to log into your Google Analytics 4 account.
Once logged in, scroll to the bottom of your Analytics dashboard on the Home screen and find the section titled Insights & recommendations. Click the link that says View all insights.
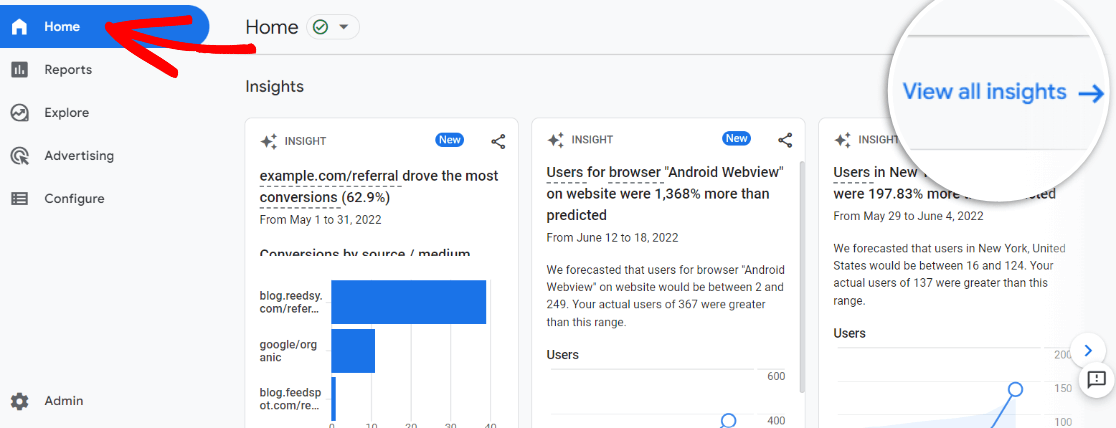
Alternatively, if you don’t have anything displayed here, click the button that says See suggested insights.
If you click View all insights, you’ll be taken to the page where you can view all of your custom alerts. Click Create in the top right.
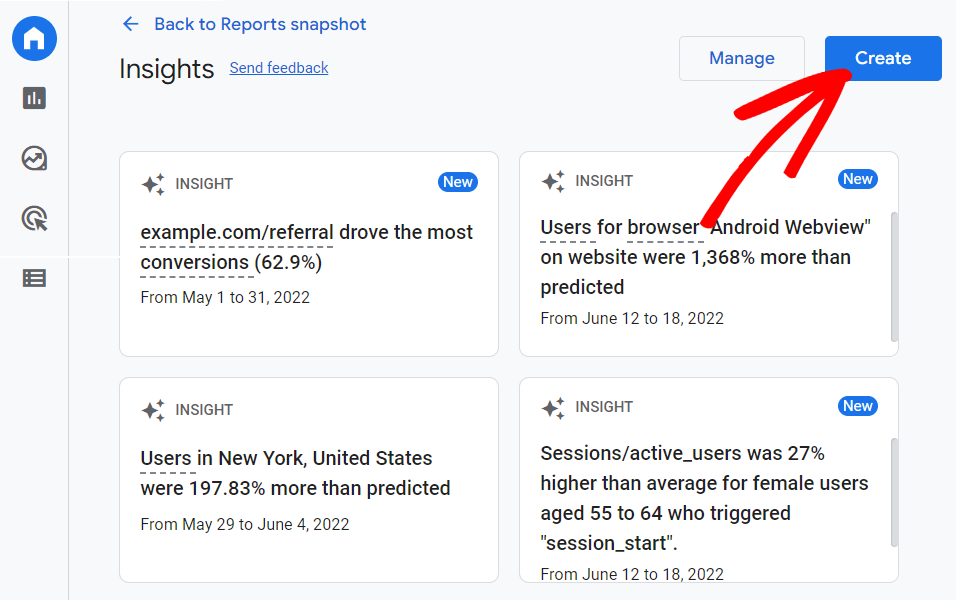
Step 2: Create a New Google Analytics Alert
Now, in the slide-out for Create Custom Insight, you’ll see a list of Suggested Custom Insights. You can use the checkboxes to decide if you’d like to use them or click Review and create to customize their settings first.
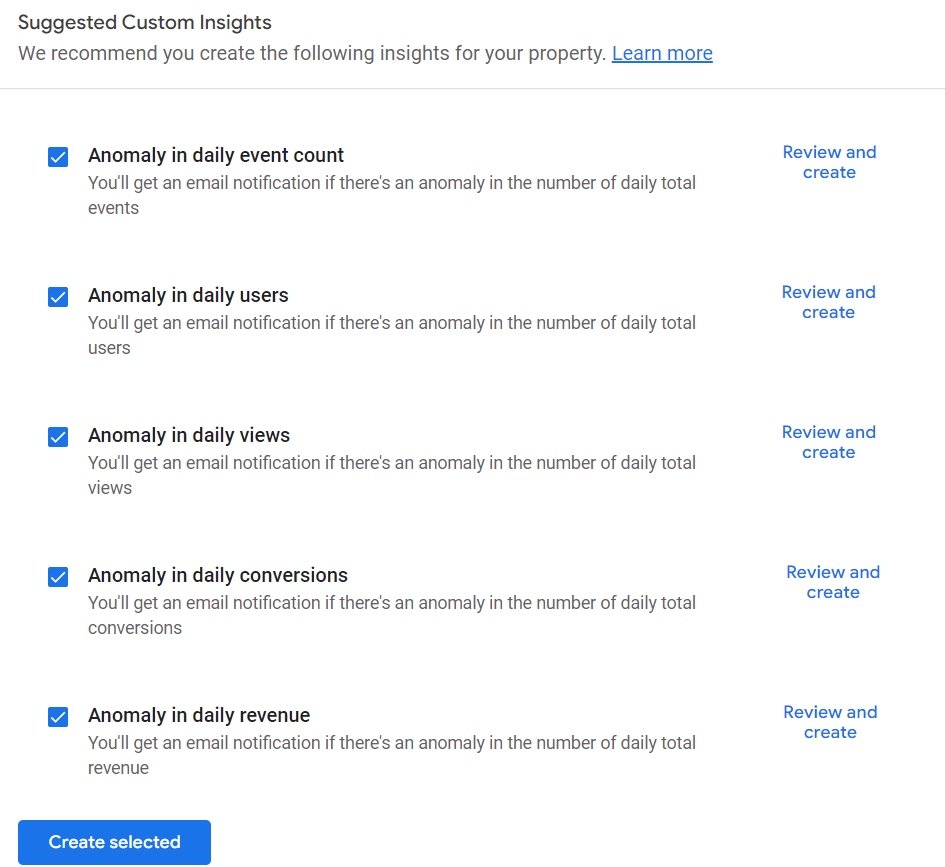
To create your own custom Google Analytics alert, click the button under Start from scratch that says Create new.

Step 3: Set the Conditions of Your GA4 Alert
Next, set the conditions of your custom alert.
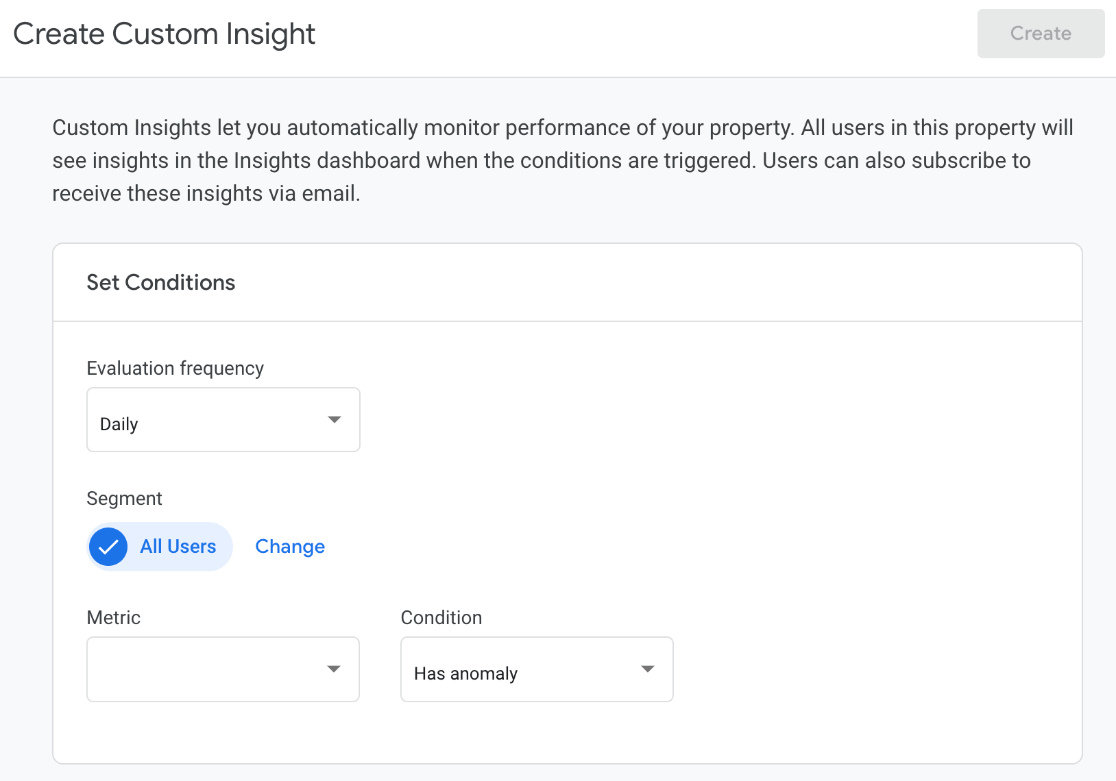
Here’s a breakdown of the fields you’ll need to fill out under Set Conditions:
- Evaluation frequency: Determines how often Google Analytics will check to see if the condition was met and send an alert if it was.
- Segment: Allows you to specify which users Google Analytics should consider when monitoring. For example, you could set an alert to only consider traffic from social media or users from a specific country. Just leave it set to All Users if you want to consider all website traffic for your threshold.
- Metric: The value you want to detect anomalies or changes in, such as page views, engagement rate, etc.
- Condition and Value: Determines what triggers the alert. Google Analytics can use machine learning and a set of Intelligence features to update you on any anomalies in your chosen metric. Or, you can set the alert to trigger when your metric reaches a specified number or percentage threshold.
Next, fill out the field for Choose insight name, and check that the email to receive your alerts is correct, or add additional email addresses under Manage notifications.
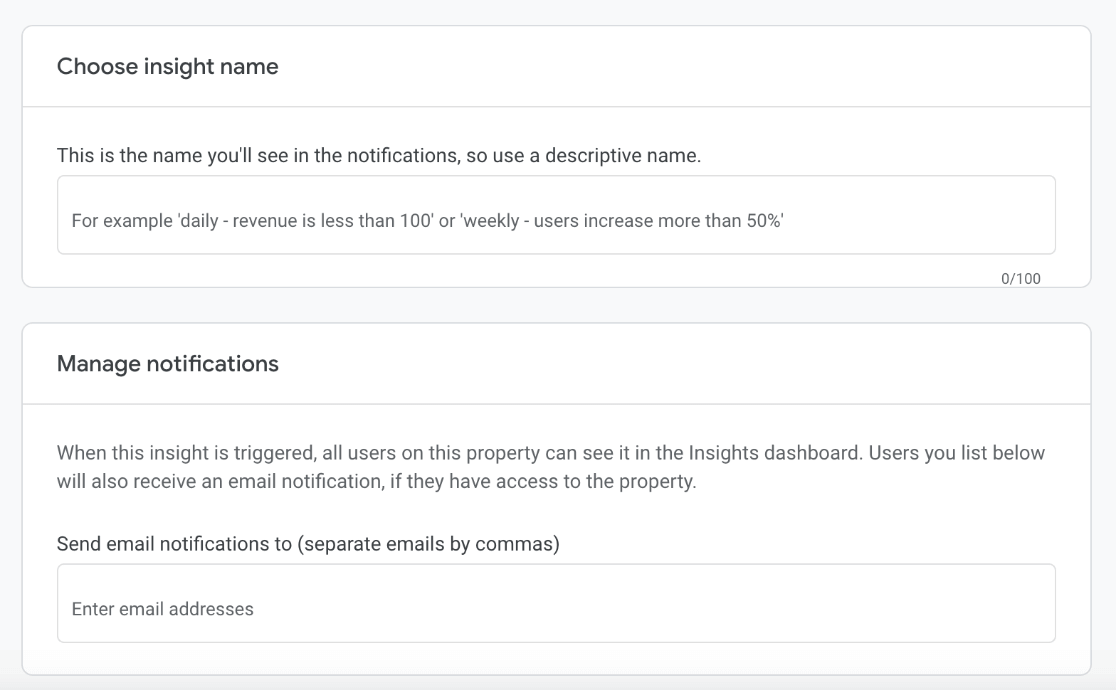
When you’re finished, click the button at the top right that says Create.
That’s it! Your new custom Google Analytics alert is created.
Step 4: View Your Custom Insights
Now that you’ve set up your custom insight in GA4, we’ll show you how to find and manage your alerts. You can see your custom insights on your Home page dashboard as we saw in the previous step as well as in your Reports snapshot.
Just look for the card titled Insights and click the link to View all insights.
Do note that you won’t see any Google Analytics alerts until one of your custom insights is triggered. When it is triggered, you’ll also receive an email notification about the change.
In the same area that we used to create a new GA4 alert, you can click on each existing alert to view more details about it. Or, press the Manage button at the top to see a list of all your custom Google Analytics alerts (regardless of whether they’ve been triggered).

Here, you can edit alerts or delete them by clicking the 3 dots to the right of each one. Use the toggle to turn off email notifications for an alert.
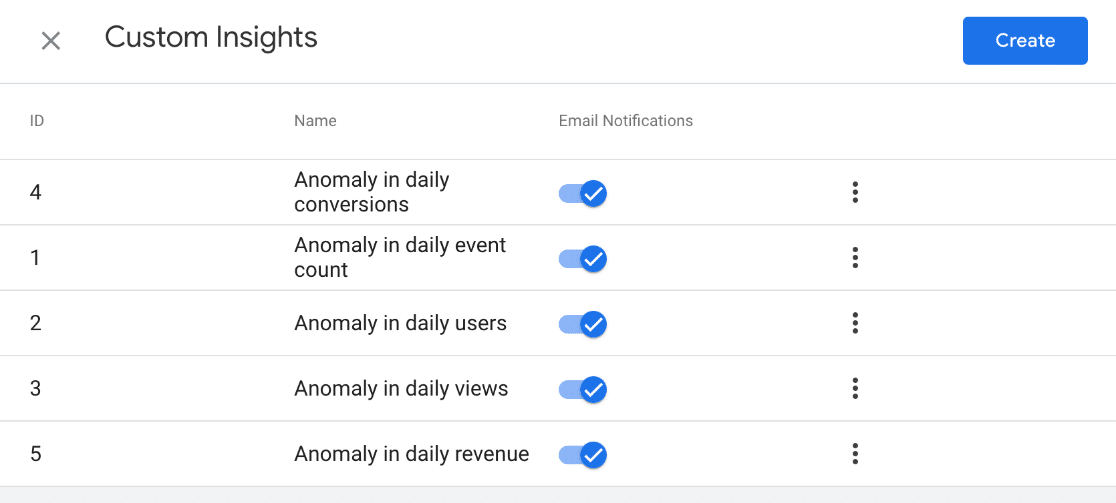
Observing and analyzing your Google Analytics alerts gives you a stronger grasp of how your website is performing. Getting the right GA4 alerts in place and keeping a close eye on them is a great way to be proactive about your website’s performance.
How to Use Custom Google Analytics Alerts
As you’ve learned, Google Analytics alerts can notify you of any significant shifts in your website metrics, but what are some of the best ways to use GA4 alerts? Let’s take a look at 3 popular custom insights you can set up.
1. Track Sudden Traffic Drops
One of the best ways to use Google Analytics alerts is to monitor sudden drops in traffic. These drops can indicate an issue with your website that needs immediate attention, such as a crash or an algorithm update.
By setting up a custom alert, you’ll know immediately when there’s a steep decrease that warrants further investigation. An easy way to set this one up is by using the suggested insight from Google Analytics called Anomaly in daily users.
This will tell you about any major changes in the number of users on your site, and you can customize the monitoring frequency.
2. Monitor Marketing Success
Want to know as soon as you hit a conversion milestone? Just create a custom insight to notify you when the number of conversions hits your target goal.
Google Analytics alerts can also be particularly useful when you have a special campaign running and want to keep tabs on its effectiveness. You can set up a custom insight that tracks the conversions or traffic coming from a specific campaign.
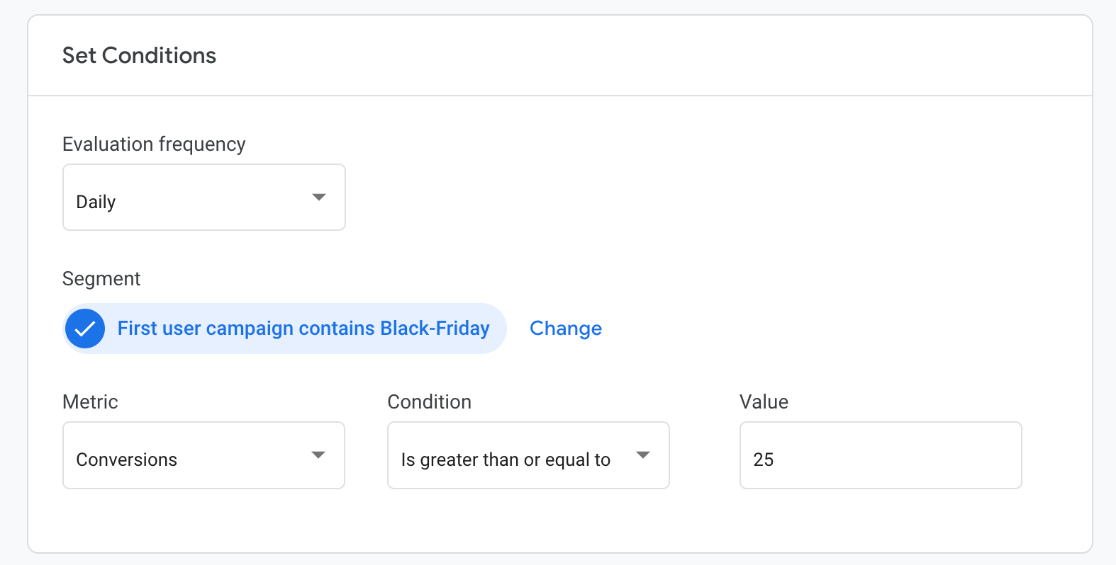
You can also use a custom alert to detect traffic surges from certain sources. For example, if you’re using social media marketing, a Google Analytics alert can notify you when social media traffic increases a certain amount.
By analyzing this data, you can better understand the impact of your social media efforts.
3. GA4 Alerts for 404 Errors
When visitors encounter a broken link (404 error) on your site, it disrupts the entire user experience. By setting up a GA4 alert for 404 error detection, you can quickly rectify these issues and maintain a smooth user journey.
As helpful as a custom insight for 404 errors is, it’s not so straightforward to set up. If you want an easy way to monitor and fix broken links on your WordPress website, we recommend Broken Link Check by AIOSEO.
To set up a GA4 alert for broken links manually, you’ll first need to create a new audience by navigating to Admin » Audiences:
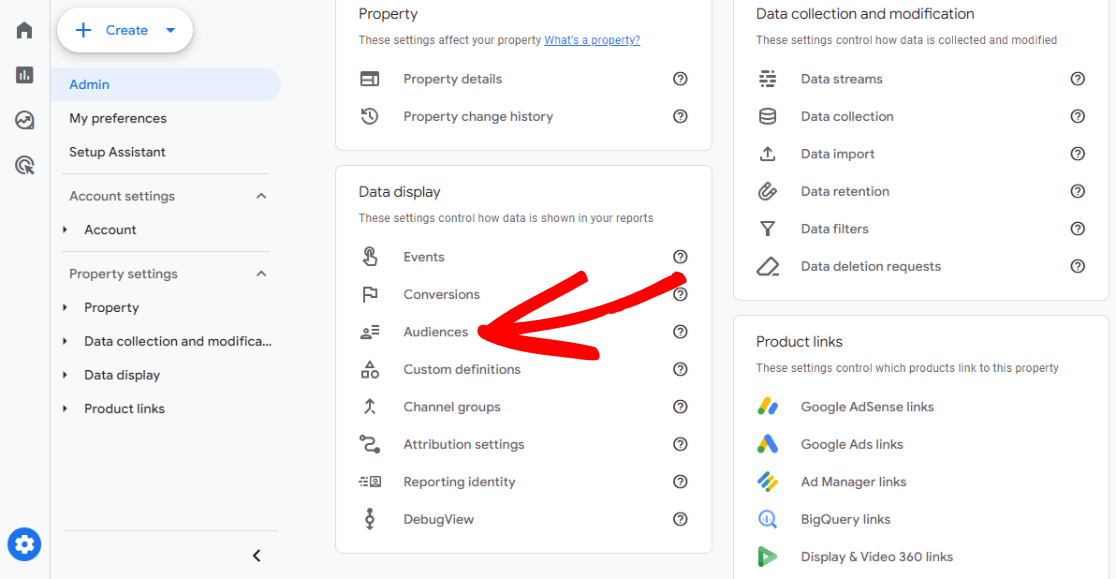
Then, click the blue New Audience button and select the option to Create a custom audience:
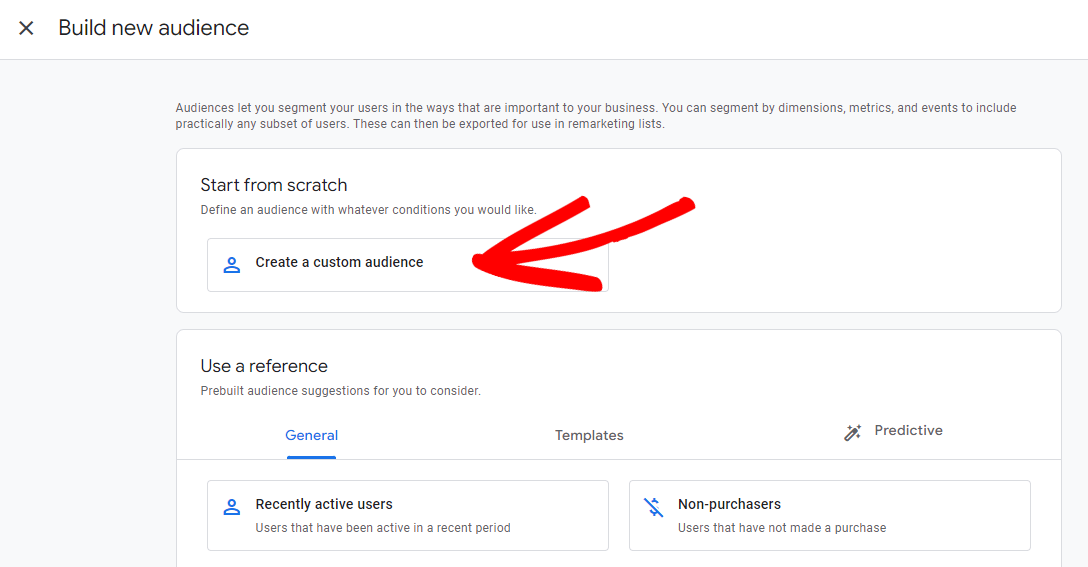
Now, click the dropdown menu with the icon of a person to change the scope to Within the same session (the icon will change to a little webpage). Then, click the dropdown menu where it says Add new condition and select page_view.
Next, Click + Add parameter. Select page_title, choose Contains, and type the title of your website’s 404 page (for example, Page not found is ours).
In the right panel, under Additional audience settings, change the Membership Duration to 1 days. Finally, give your new audience a name at the top. The audience settings should look like this when you’re finished.
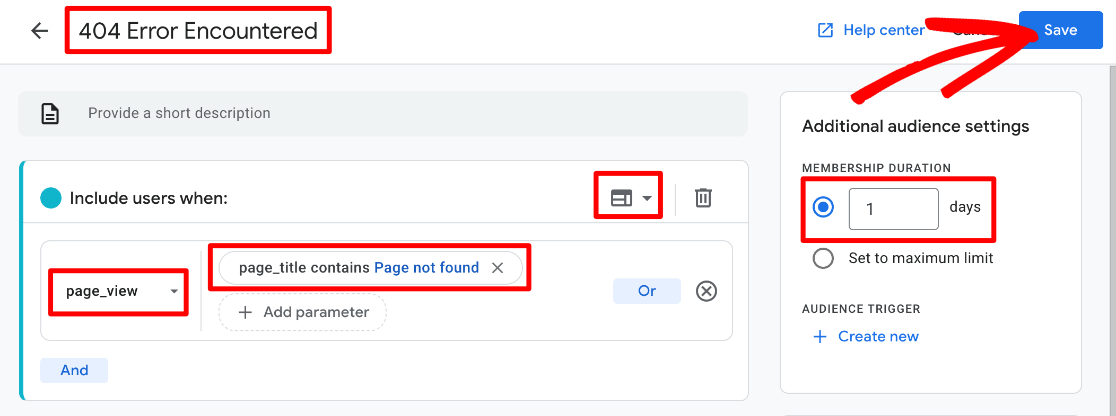
Click Save at the top. Now, go back to the Custom Insights area from previously in the tutorial, and create a new custom insight from scratch.
Choose Daily for the Evaluation frequency. Then, click Change under Segment.
In the segment slide-out, select Audience name for your Dimension and exactly matches for the Match Type. Under Value, select the new audience you just created. Press Apply at the bottom.
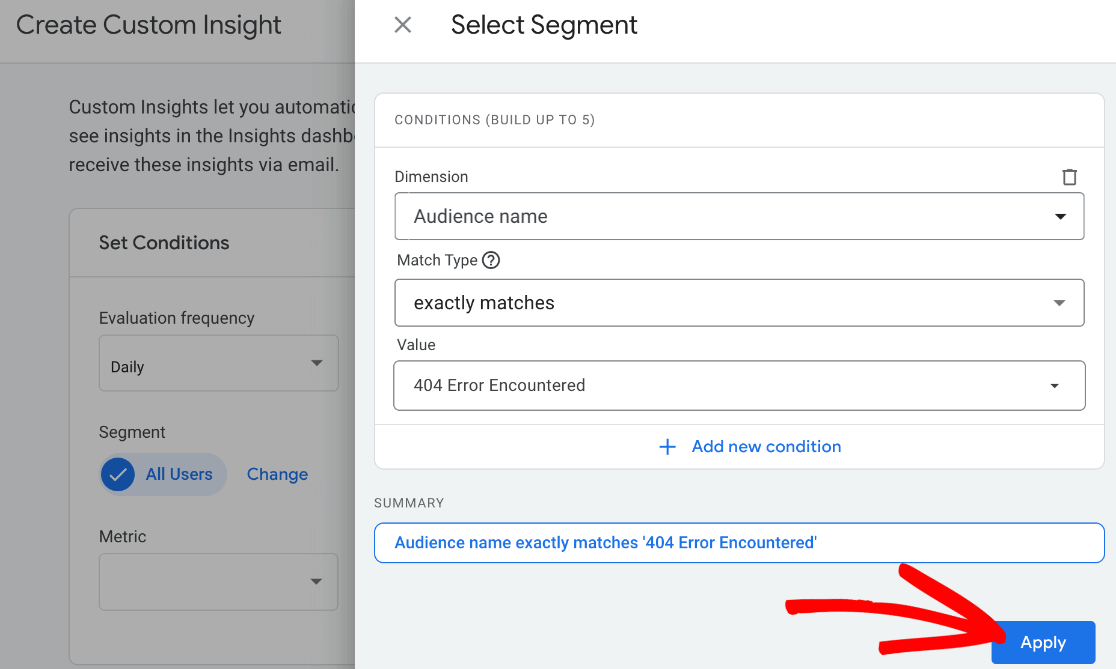
Finally, for your Metric, choose Total users. Set the condition to is greater than or equal to, and enter 1 for the Value. Fill out the name and notification area, and press Create at the top.
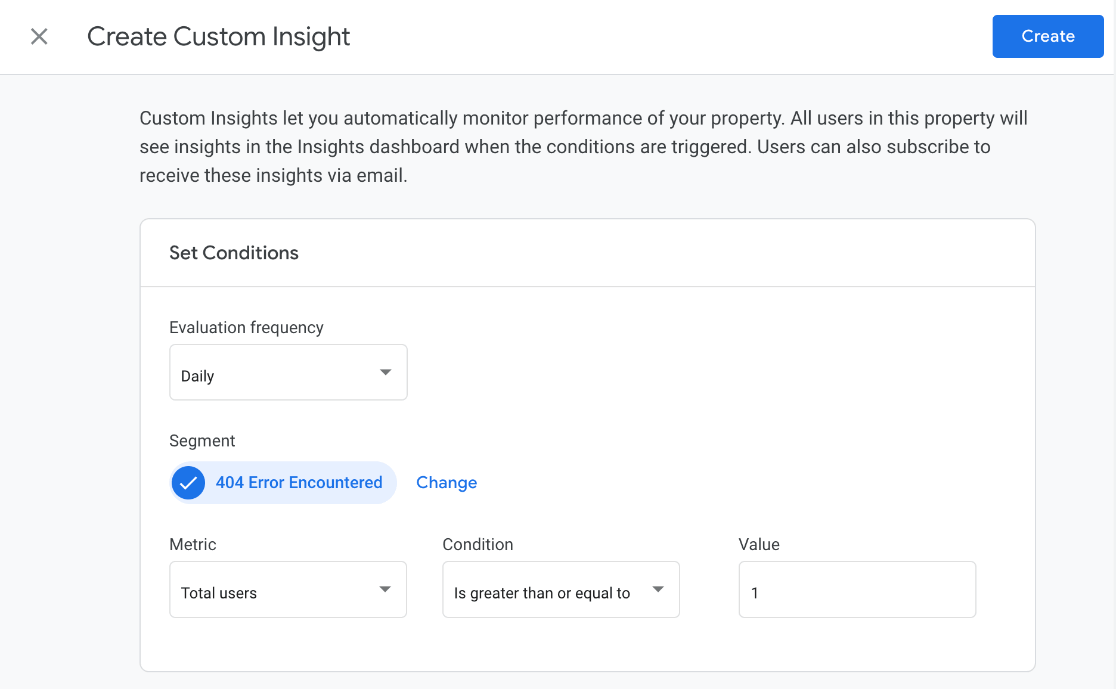
Now you have a custom alert that will notify you when users visit the 404 error page on your site, so you can quickly fix the link or set up a redirect.
That said, it’s not foolproof since users may end up on that page if they type your direct URL incorrectly or search your site for a page that doesn’t exist. That’s why we still recommend using a plugin like Broken Link Checker instead.
Want to create a custom 404 error page for your site? Check out SeedProd, the best page builder for WordPress. You can create custom 404 error pages, enable a custom maintenance mode page, landing pages, and more in a matter of minutes.
Congrats! You’ve successfully learned how to use custom Google Analytics alerts to monitor your site.
We hope this article has helped you learn more about GA4 alerts. Ready to start making custom reports? Check out How to Create Google Analytics 4 Custom Exploration Reports.
Not using ExactMetrics yet? What are you waiting for?
Don’t forget to follow us on X and Facebook to see all the latest reviews, tips, and Google Analytics tutorials.

