Do you want to learn how to create an opt-in form in WordPress that grabs people’s attention and gets them to sign up for your newsletters?
An opt-in form is essential to growing your email list, SMS subscribers, and overall brand by staying connected with your audience even after they’ve left your website.
In this guide, we’ll take you step-by-step through how to create opt-in forms in WordPress that are engaging to users. We’ll also show you how to use targeting options to get as many subscribers as possible.
What Is an Opt-In Form in WordPress?
An opt-in form is a tool website visitors use to join your email list. It’s a big deal because it helps you keep in touch with your audience, build relationships, and make users remember your brand.
You can put this form in different places on your website, like in your articles, in the sidebar, at the bottom of the page, or in a popup. But, to get lots of people to sign up, you need to make it really tempting. This is where the idea of a lead magnet comes in, which is something cool you offer for signing up, like a free eBook, a PDF guide, or a discount code.
Also, you need to figure out the best time and place to show the form when visitors are most likely to sign up. Once someone subscribes, you can send them newsletters and promotional content to build a connection and keep them coming back for more of your content, products, and services.
How to Create an Opt-In Form in WordPress
We’re going to show you two easy methods for how to add an opt-in form to WordPress. Just follow along, and we’ll walk you through the process for both.
OptinMonster is the best tool for lead generation on any website platform, including WordPress, Shopify, Joomla, and even HTML sites. This method is perfect if you’re looking for powerful targeting features, diverse campaign options, pre-designed templates, and advanced integrations.
WPForms is our favorite form builder for WordPress, and the Lite version allows you to make opt-in forms to add to your pages, posts, and widget areas. It’s a great option if you’re looking for a free way to add simple opt-in forms without the need for targeting capabilities and different campaign types.
Method #1: Build an Opt-In Campaign with OptinMonster
OptinMonster truly shines as the best plugin for generating leads, letting you create a variety of effective campaigns like popups, floating bars, full-screen messages, inline forms, slide-in messages, spin-to-win coupon wheels, and more
OptinMonster’s campaign variety gives you lots of options for convincing visitors to sign up for your emails, but you want to be careful not to overwhelm visitors with too many of these campaigns. Luckily, the plugin helps with this by using smart targeting features.
Smart targeting rules let you decide when and where your sign-up forms appear. For example, use targeting to show opt-in campaigns depending on whether someone is visiting your site for the first time or if they’ve been here before, which page they’re on, where they’re located, how far they scroll, and more.
One of OptinMonster’s best targeting features is its Exit Intent technology. This lets you target visitors who are about to leave your site to reduce cart abandonment and bounce rate. Check out more of OptinMonster’s popular features:
- Easy drag-and-drop builder
- Yes/No forms to create multi-step campaigns
- Attention-grabbing animation and sound effects
- Campaign scheduling and A/B split testing
- Integration with popular email marketing services like Constant Contact, Drip, and Mailchimp
- Simple analytics reports and integration with Google Analytics
- And lots more!
Step 1: Install OptinMonster
To get started on creating your opt-in form, you need to first install and activate OptinMonster. Head to the pricing page and sign up for one of their plans. Plans start at $9 per month with a 14-day money-back guarantee.
After signing up, leave your account page open and go to your WordPress site in a new tab. Go to Plugins » Add New and search for OptinMonster. This is a free connector plugin that lets you connect your OptinMonster account to WordPress.
Go ahead and click Install Now. When the button changes to say Activate, click it.
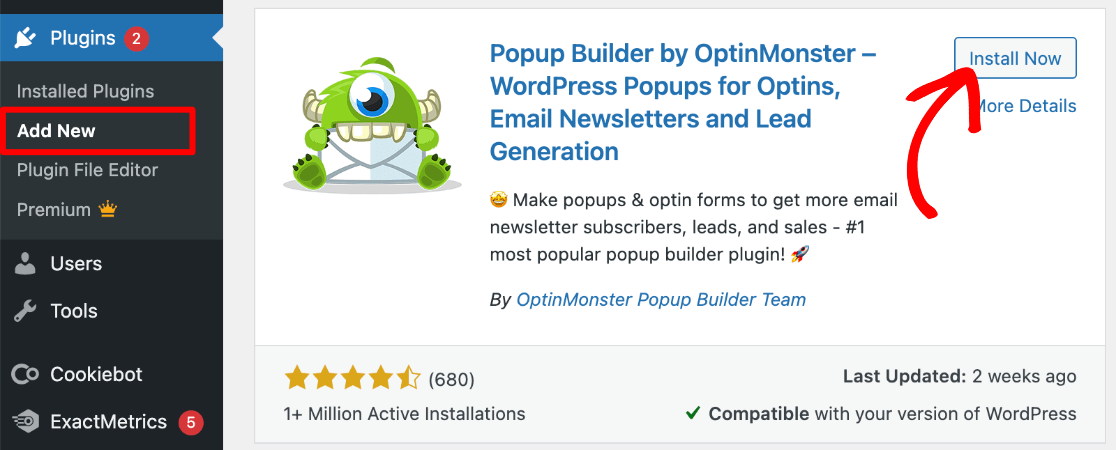
If your OptinMonster account is still open in another tab, the plugin will automatically detect it. Just follow the prompts in the setup wizard to connect it to WordPress.
Step 2: Create a New Opt-In Campaign
From your WordPress admin menu, click OptinMonster » Dashboard. We’re going to show you how to create a Popup optin form for this tutorial, but you’ll see a number of other styles that you can also choose from. Click on the one you’d like to use.

Next, you’ll see the available templates under each style type. There are designs for all kinds of campaigns like holidays, special events, promotions, and more. You can hover over any template to see a Preview.
Since we want to maximize the number of visitors who sign up with our opt-in form, we’re going to use the template titled Lead Magnet Download. This template will let you add a lead magnet (downloadable content) like a free eBook, cheat sheet, checklist, or PDF guide to your form in exchange for visitors signing up.
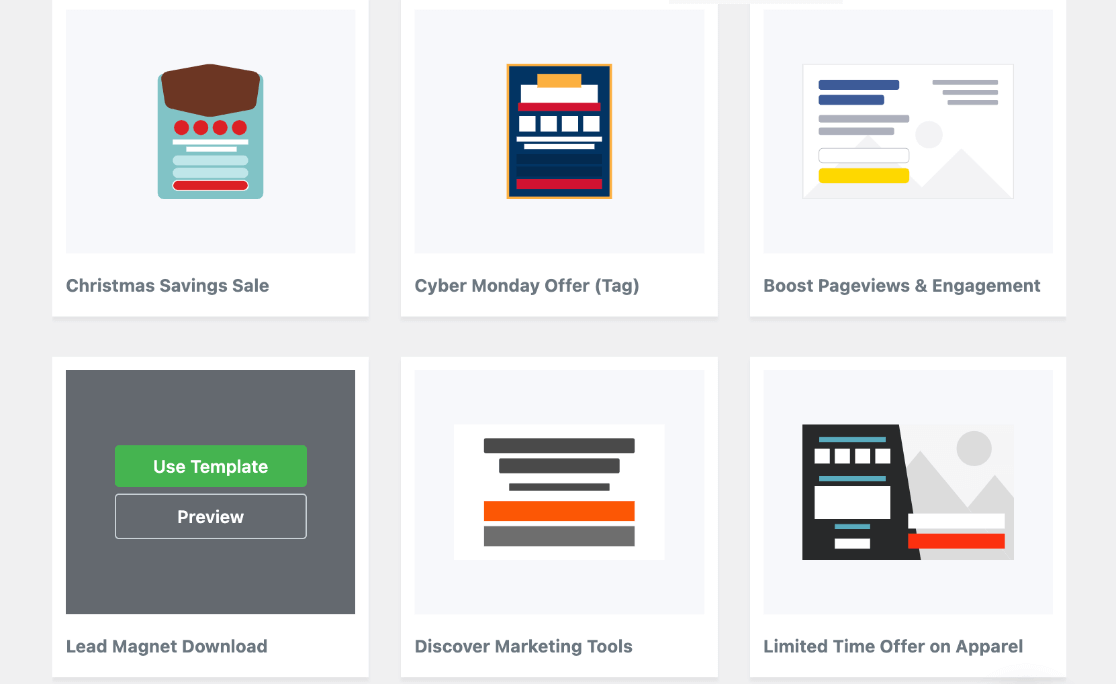
Click the green button to Use Template. Next, you’ll see a popup asking you to name your campaign. This name is only for internal purposes and won’t be shown to visitors, so choose something that will help you easily identify which campaign it is.
When you’re done, press Start Building.
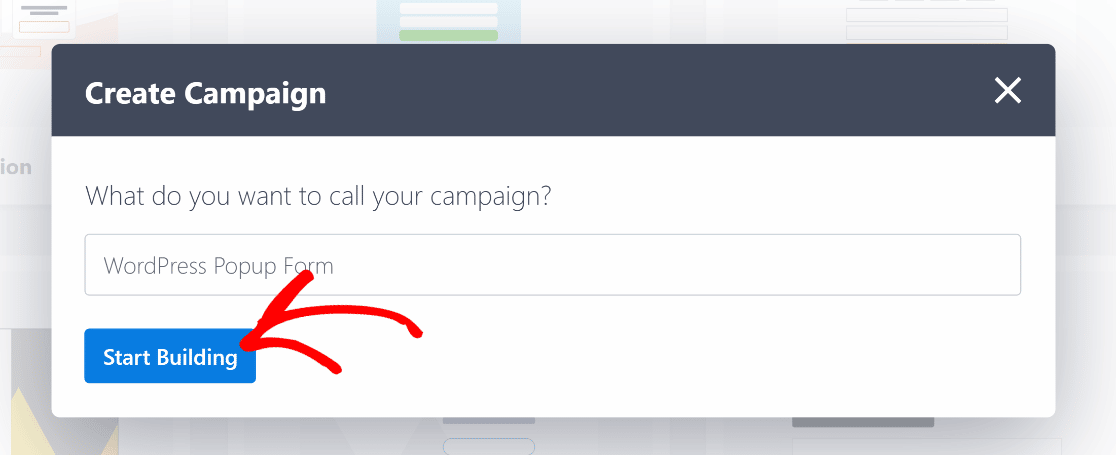
After that, you’ll be taken to the campaign builder, where we’ll customize your WordPress opt-in form in the next steps.
Step 3: Customize Your Opt-In Form Design
The campaign builder has an easy drag-and-drop interface where you can drag blocks to add elements to your live preview. Click an element to see customization options in the left taskbar.
Just click on any text block and start typing what you’d like it to say. You can highlight text to see a text editor that you can use to change the font, font size, and formatting.
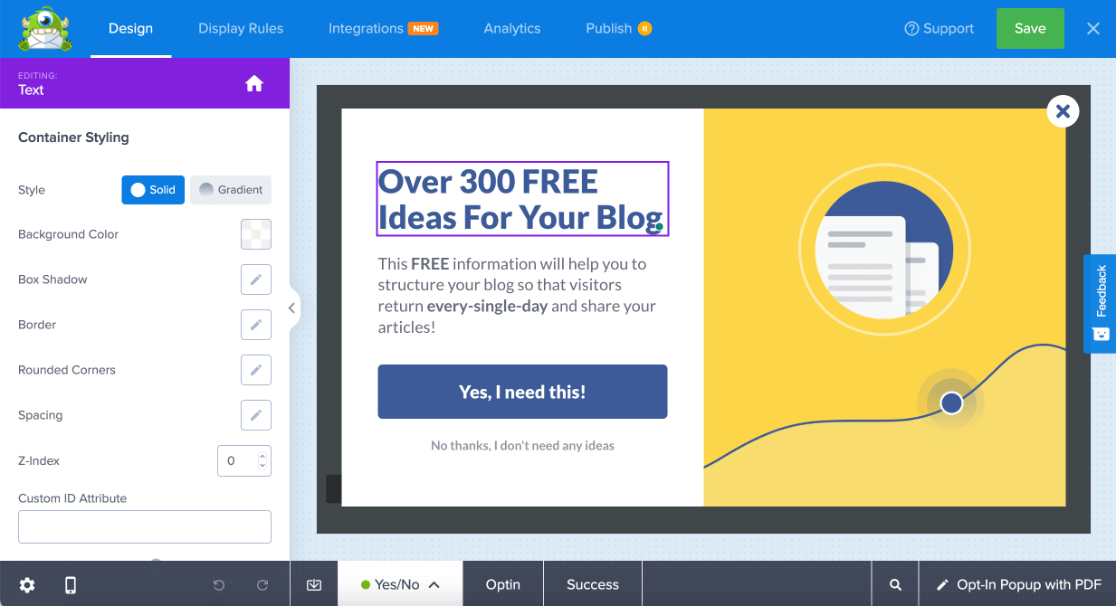
To change the image that’s included (on the right side in our example), just click it, and you’ll be able to replace it with your own image or a stock photo from Unsplash using the left taskbar. Click the Advanced tab to customize the size, formatting, borders, and more in the taskbar.
By clicking elements and using the taskbar, you can change the CTA (call-to-action) button colors, add background images, and customize your opt-in form to look exactly the way you want. If you want to move, save (for future use), duplicate, or delete a block, you can use the toolbar that appears above any block when you click on it.

This template uses a Yes/No question followed by the Optin form and a Success view. Yes/No means that, like our example, there’s a double opt-in form where users first select if they want whatever is being offered before being asked to provide an email or phone number.
This feature can help increase conversions because users may be more likely to provide contact details when asked after they’ve already decided they want the lead magnet being offered. It can also give you insight into whether customers are not opting in because they don’t want what’s being offered or because they don’t want to provide an email.

However, you can disable the Yes/No setting by clicking the arrow next to it in the bottom toolbar if you prefer. Use this area of the toolbar to easily switch between each view and customize what the user sees.
You can click the opt-in button element and use the Content tab in the sidebar to customize the label, like asking for a phone number instead of an email. To change what happens when a visitor submits the form, use the drop-down menu under Button Click Action.
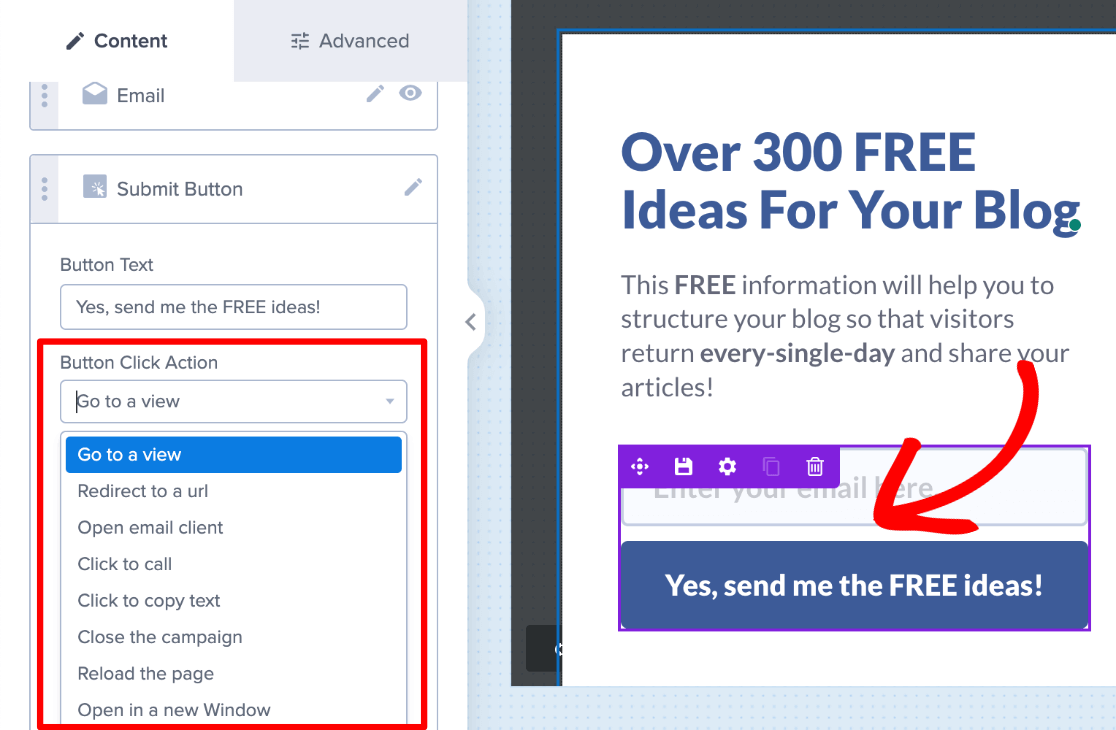
By default, the campaign is set to display the Success view when a visitor opts in, but you can change this. For example, you may want to Redirect to a URL where users can download their freebie instead of sending it through email or provide a coupon code for customers to use with the Click to copy text action.
OptinMonster provides a ton of options for complete customization, so feel free to explore the builder and continue designing your opt-in form to match your brand. Don’t forget to click Save in the top right when you’re done!
When you’re ready, we’ll move on to setting up the targeting features that make OptinMonster so powerful.
Step 3: Edit Your Opt-In Campaign’s Display Rules
Now that you’ve learned how to create an opt-in form in WordPress, let’s see how to add targeting and other features to customize exactly when, where, and to whom your opt-in form is shown.
While still in the campaign builder, click Display Rules in the top menu.

You’ll see that your default display rules are set to show the opt-in campaign to users who spend at least 5 seconds on any page of your site. You can edit these rules by using the drop-down menus or you can Add a New Rule.
Notice that ALL of the following conditions must be met is set by default. To change it to be if ANY ONE of the rules are met, click it.
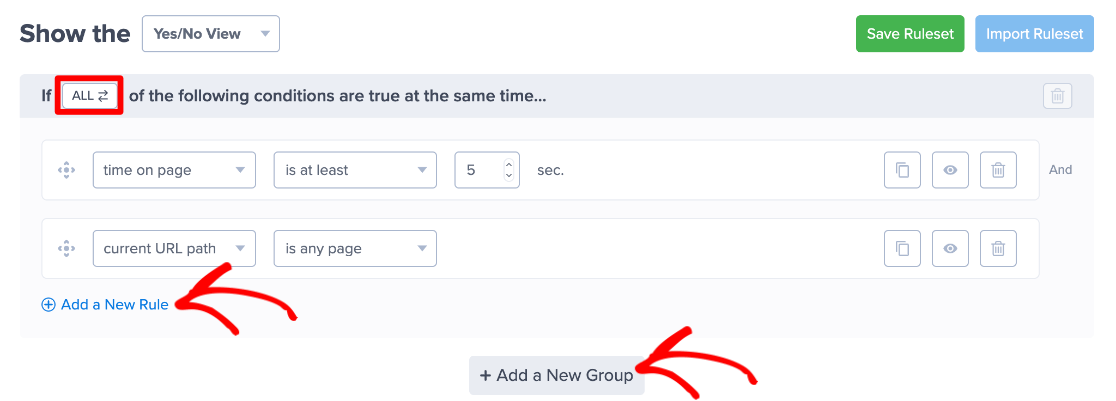
The + Add a New Group button at the bottom is useful if you want to have a set of rules that must ALL be met AND a set of rules where ANY ONE must be met. For example, you could display your opt-in form to users who spent at least 5 seconds on your site AND are either new visitors OR have been inactive (not clicking or scrolling) for a certain period of time.
When you edit or add a rule, you’ll see all the available rules categorized by Popular, Trigger, Targeting, Personalization, OnSite Retargeting, and Ecommerce.
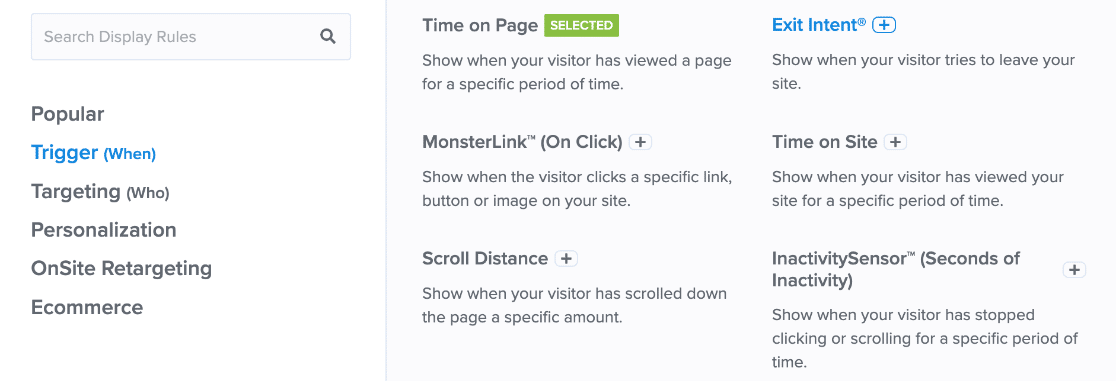
For this tutorial, we’re going to try and reduce how many new users leave our website without ever returning. We’ll target new visitors who have been on any page other than the homepage for at least 5 seconds and are about to exit our site. So, our rules will look like this:
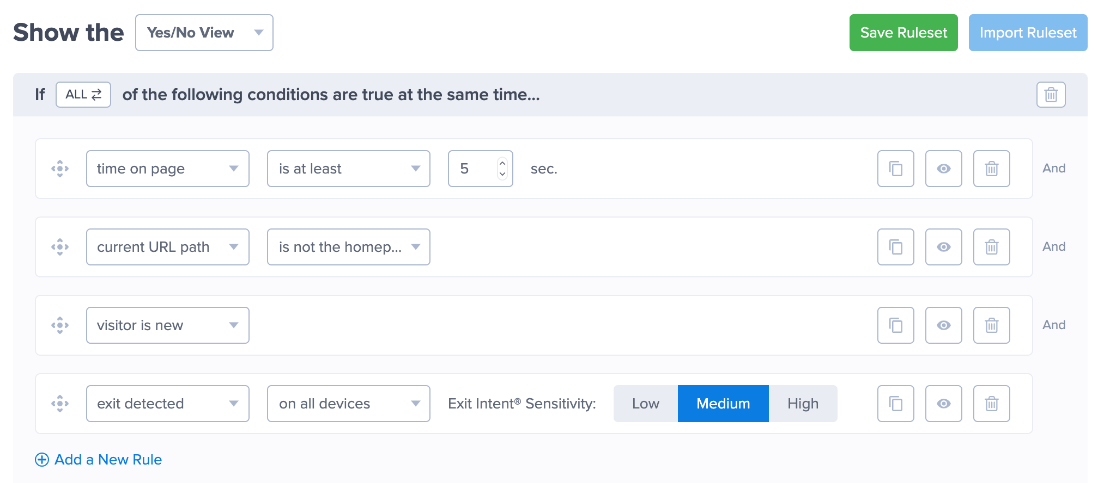
As you can see, OptinMonster’s display rules allow you to create really powerful campaigns that are super-targeted. So, now that you’re well on your way to growing your subscriber list with opt-in forms, let’s see how to connect your opt-in form to your email marketing service.
Step 4: Connect Your Opt-In Form to Email Marketing
OptinMonster integrates with tons of popular email marketing services, so you can easily add new subscribers from your opt-in forms. Just click the Integrations tab at the top.
Use the search bar to find your provider, and simply follow the on-screen instructions.
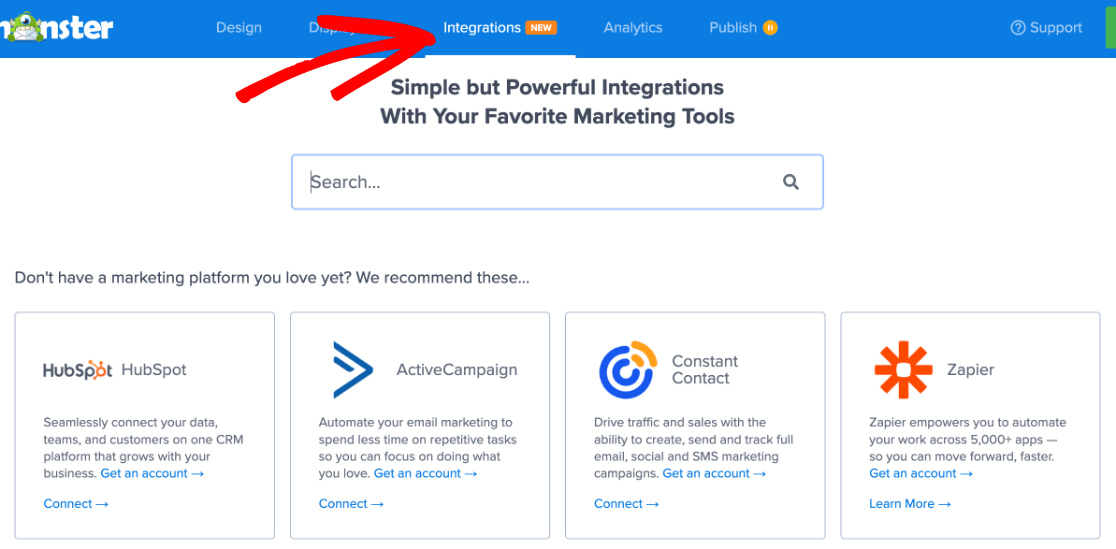
For many providers, all you’ll need to do is log into your email account to connect it. For others, you may need to add your API key, which you can usually find in the admin area of your email provider account.
Once you connect OptinMonster to your email marketing, you can tag new subscribers and assign them to categories based on which opt-in campaign they subscribed with. That way, you keep your email lists clean and ensure that users receive the right marketing content.
You’re almost done adding an opt-in form to WordPress! All we have left is to publish it.
Step 5: Publish Your Opt-In Campaign on WordPress
Publishing your new campaign is actually the easiest part! First, click the Publish tab at the top of the builder.

To see how your opt-in form looks on the front end of your site before publishing, click the Preview button next to your website name.
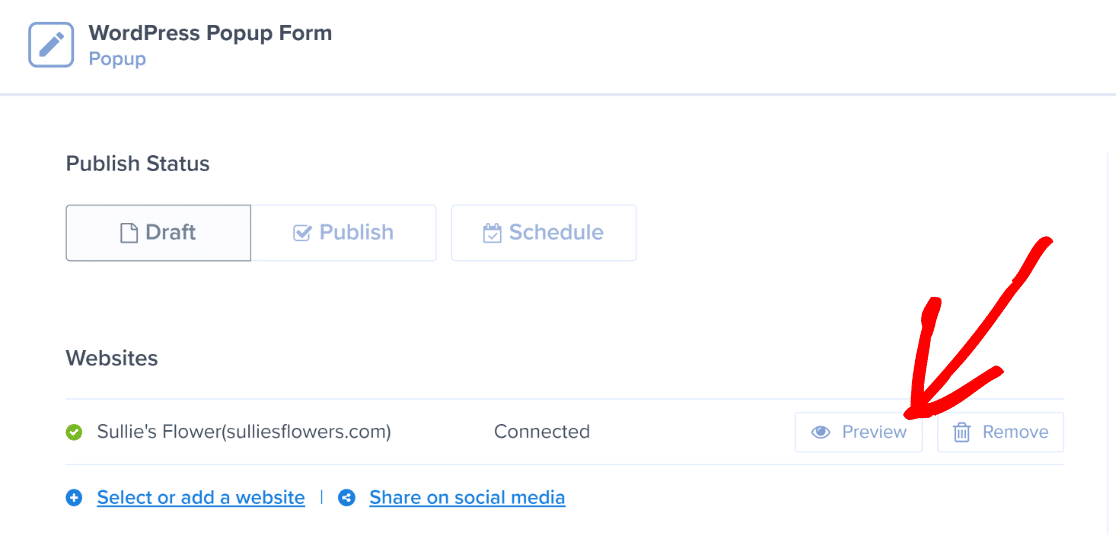
A new tab will open where you can see how your opt-in form will look to visitors. Check out the WordPress opt-in popup form we made during this tutorial!

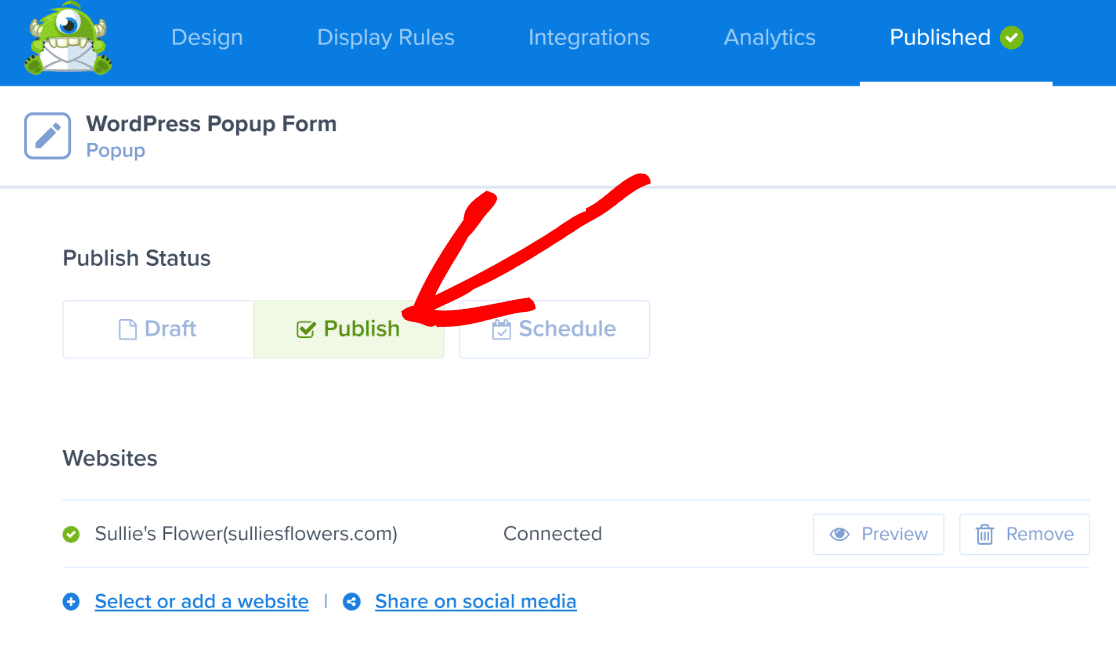
If everything looks good, change the button from Draft to Publish. That’s it, you’ve successfully published your new opt-in campaign on WordPress.
To confirm your new opt-in campaign is published, go to OptinMonster » Campaigns after exiting the builder.
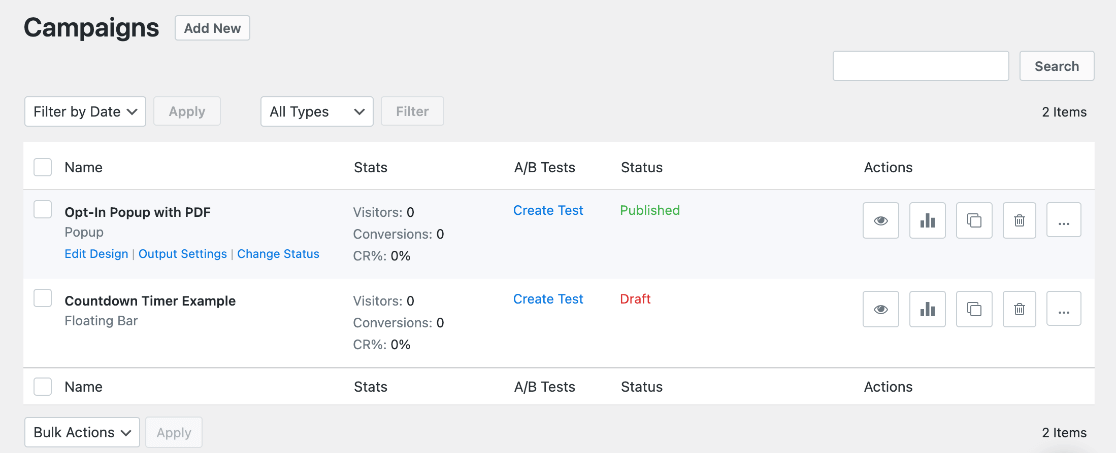
You’re done! You learned how to create an opt-in form in WordPress with OptinMonster.
Now, let’s move on to our second method, where we’ll be using WPForms to create a simple opt-in form that you can embed on your site.
Pro Tip: OptinMonster integrates seamlessly with WPForms and includes a native block in the builder where you can embed a form from WPForms in your campaigns.
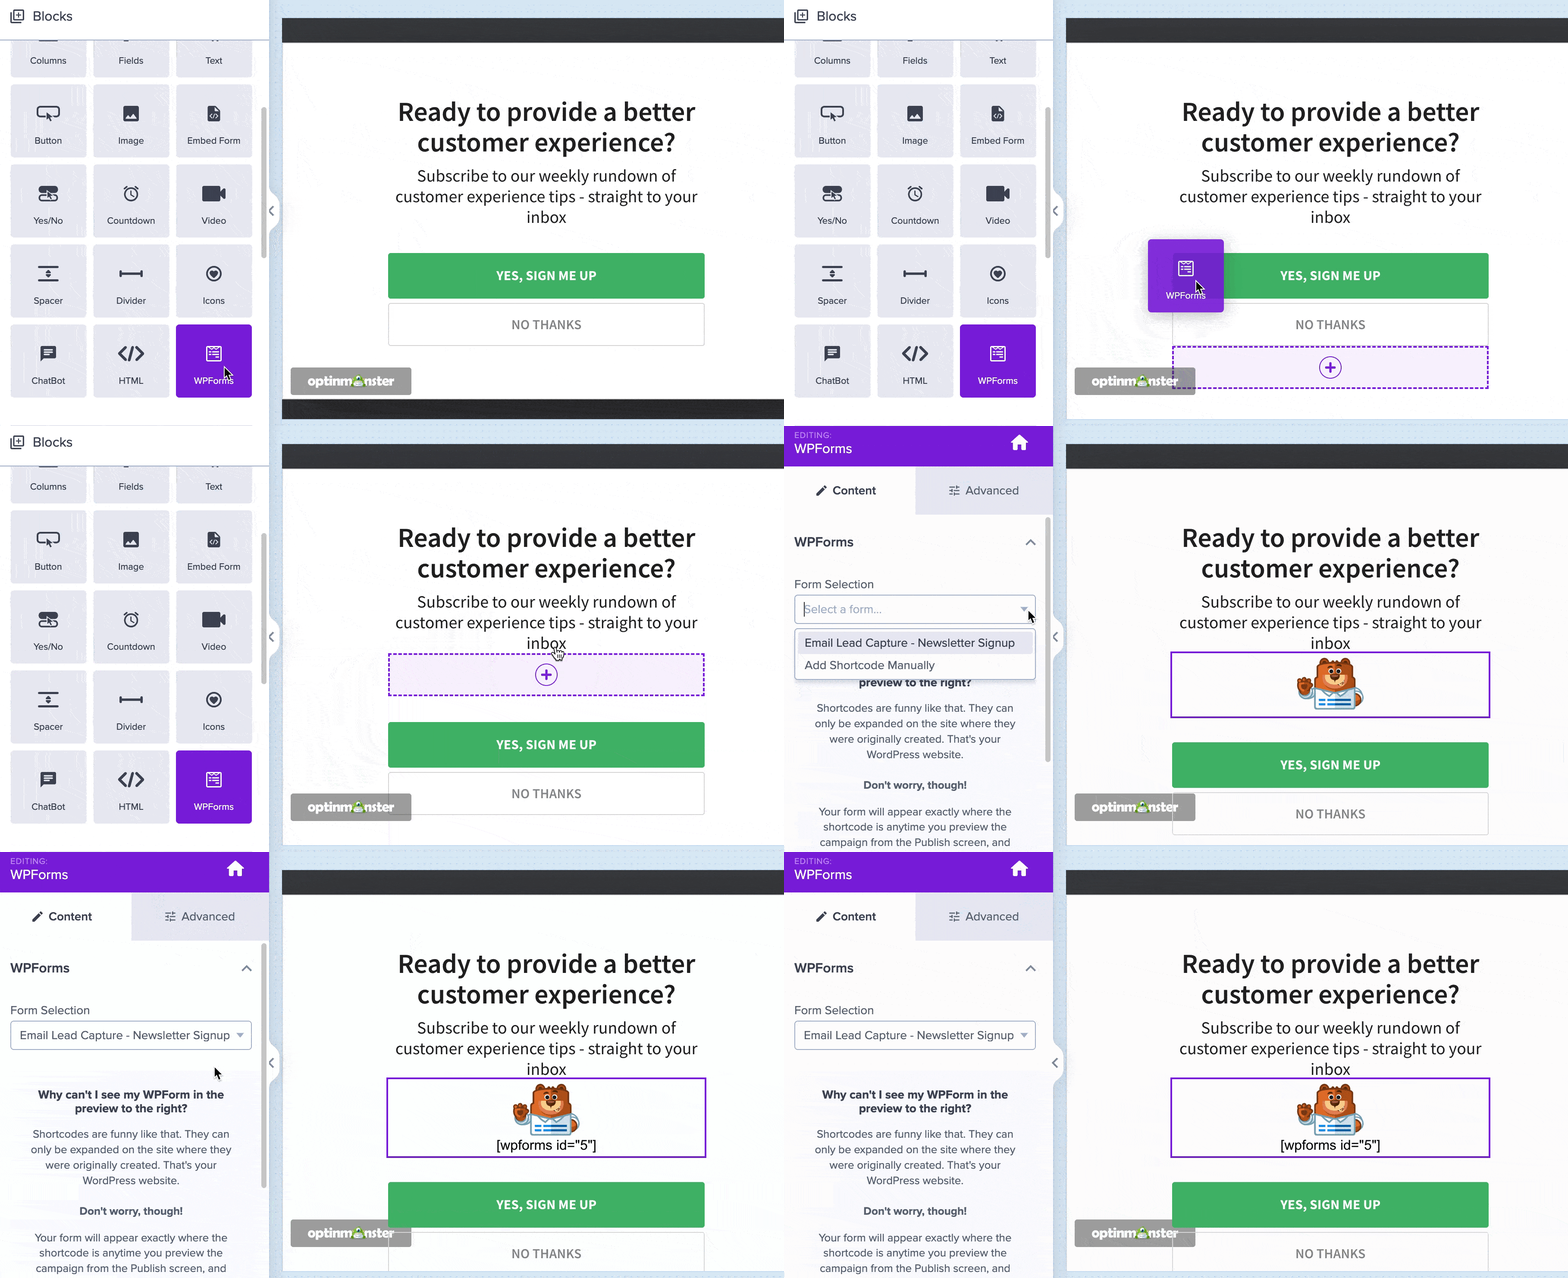
If you like the idea of creating more custom forms but want the lead magnet and targeting features of OptinMonster, we recommend using the two plugins together! Keep reading to see how to create an opt-in form in WordPress with WPForms.
Method #2: Add an Opt-In Form in WordPress with WPForms
WPForms is the top choice for building forms on WordPress. It’s incredibly versatile, allowing you to create various forms like subscriber opt-in forms, registration forms, contact forms, order forms, surveys or polls, and more.
One of the standout features of WPForms is its user-friendly visual form builder. It comes with tons of pre-built templates, and the drag-and-drop builder lets you see the design of your form as you customize it, making the process easy and beginner-friendly.
Another cool feature is “conditional logic,” which means you can ask follow-up questions based on how someone answers a previous question. It’s like having a smart form that adapts to what people say to gather more focused information. Or, in the case of an opt-in form, you can use it to segment subscribers based on their responses.
But that’s not all – you can connect your form to email marketing providers and payment gateways. So, if you’re offering something premium, like a subscription or membership, people can even make payments through your forms.
WPForms offers a free version that’s great for creating a simple opt-in form. So, if you’re on a tight budget, WPForms Lite is perfect. But if you want more advanced features, premium plans start at $39.50 per year. This gets you extra tools, more options for form fields, advanced integrations, and more.
Now, let’s see how to use WPForms Lite to create a free opt-in form on WordPress. Remember, WPForms also integrates seamlessly with OptinMonster. You can use the two plugins together to create highly targeted on-site campaigns with fully customized forms embedded.
Step 1: Install WPForms
To start, you need to install and activate the plugin on your WordPress site. Head to Plugins » Add New.
For the free version, just type in WPForms in the search bar and press Install Now when you see it listed. After the button changes to say Activate, click it.
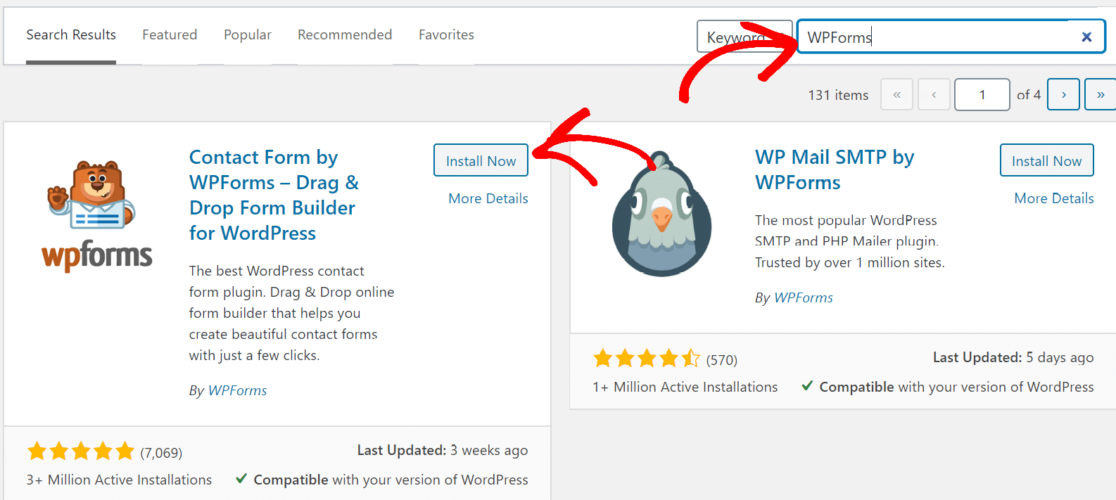
If you’re using a premium version of WPForms, you’ll need to click the Upload Plugin button at the top of your add new plugin page. Then, upload the zip file that you downloaded after purchasing and press Activate. Next, go to WPForms » Settings and paste your license key (found in your account area on WPForms or in your confirmation email), and press Verify Key.
Step 2: Create a New Sign-Up Form
Now, we’ll create a new form to allow users to opt into our marketing emails. Go to WPForms » Add New in your WordPress menu.
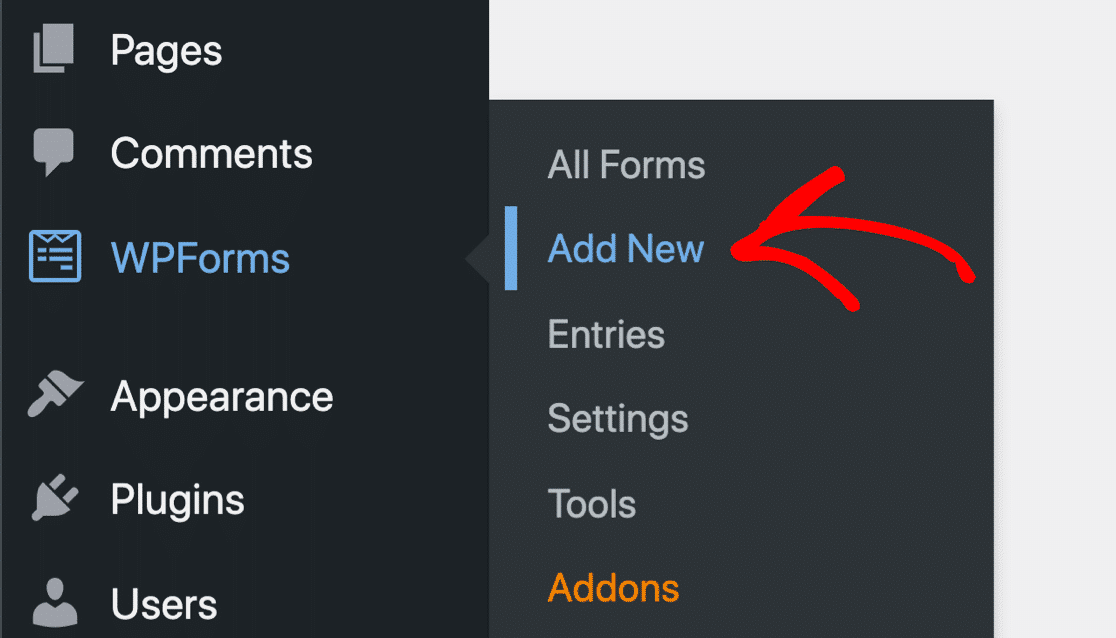
You’ll immediately be taken to the first step where you can select a template. You can search for a form type or use the categories on the left to find what you’re looking for.
Go ahead and Name Your Form at the top and select Newsletter Signup Form for this tutorial.
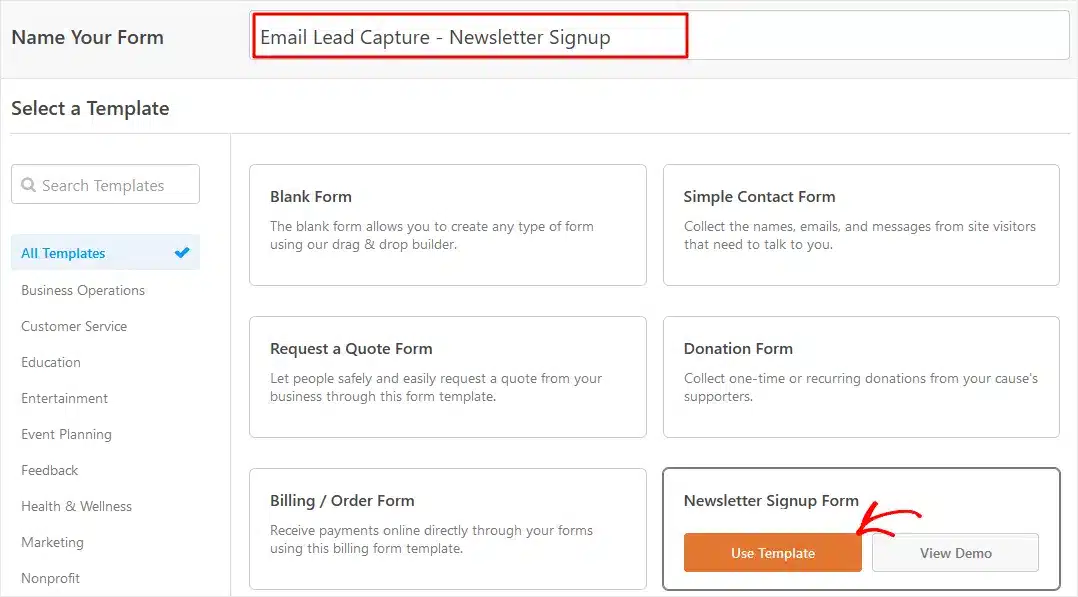
Click Use Template to launch the form builder.
You’ll now see a user-friendly interface where you can customize your form, add fields, and adjust settings. You’ll notice that the Name and Email fields have already been added to your opt-in form.
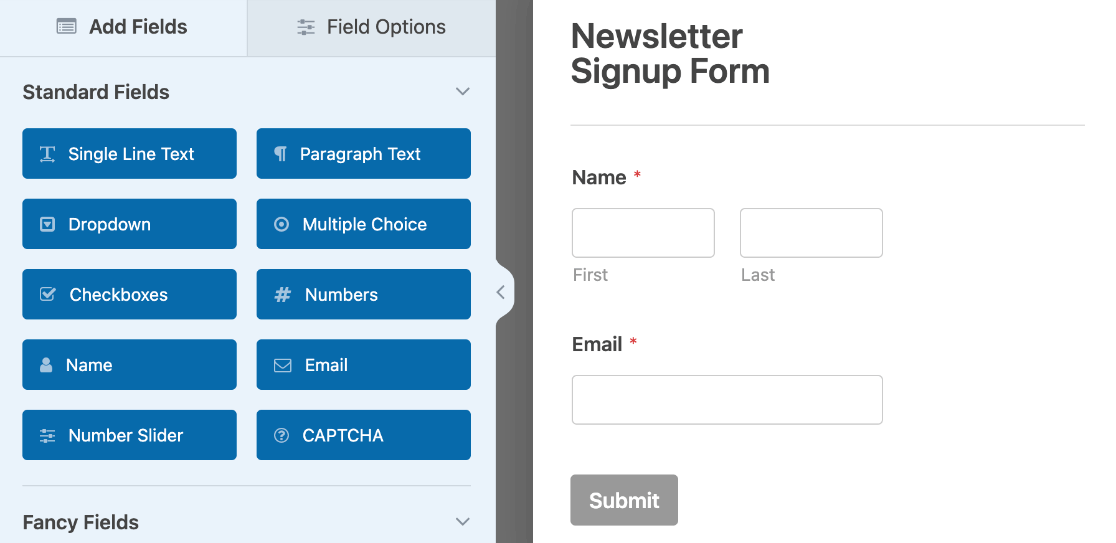
To add form fields, just drag and drop them onto the area you want on the form. You can add more text, drop-down menus, multiple-choice questions, checkboxes, numbers, number sliders, and a Captcha field. You can also add payment fields with Stripe integration, even with the free version!
If you want to use the elements under “Fancy Fields” to capture more details like phone number, address, website URL, and more, or use other payment gateways, you’ll need to upgrade to a premium plan.
When you click any field, you’ll see options in the left taskbar where you can edit the Label, change the Format, add a Description, and mark whether the question is Required or not.
For example, we’re going to add a multiple-choice question so that we can segment new subscribers by what they’re interested in, but we won’t make it required. That way, users can still submit the form without answering this question.
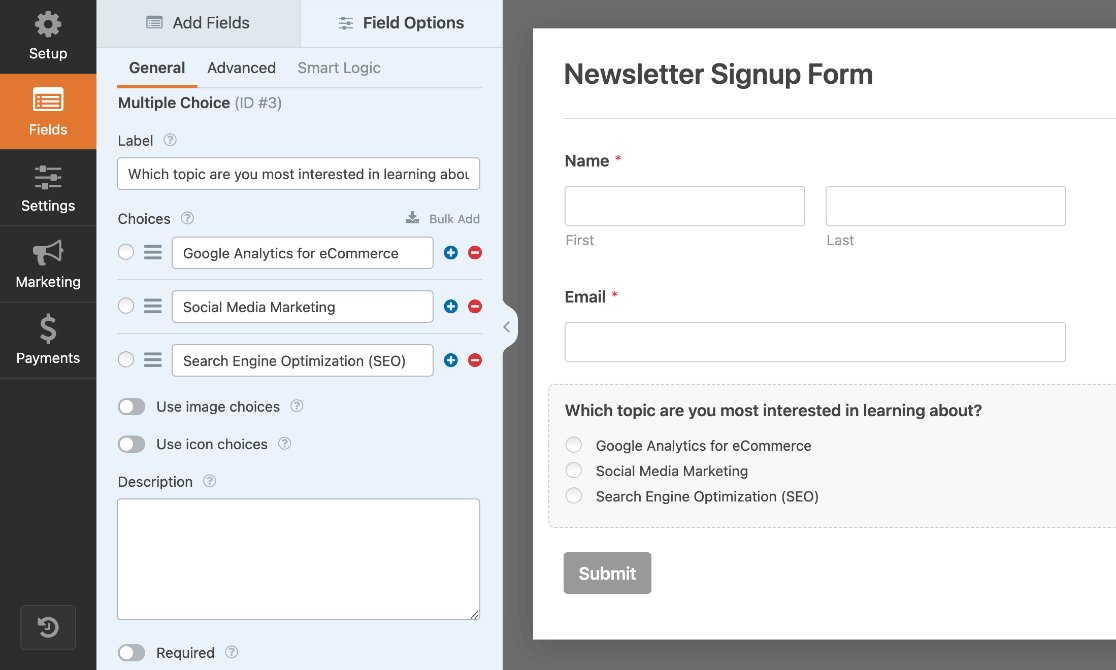
Next, we’ll show you how to adjust the settings on your form, show a confirmation message after users subscribe, and connect the opt-in form to your email provider.
Step 3: Customize Opt-In Form Settings
After customizing your fields, click the Settings tab on the left. In the first section, General, you can change the Form Name, add a Form Description, and edit the Submit Button Text that visitors see.
You can also add Tags to keep your forms organized. For example, you might have varying signup forms to use in different areas of your site, so you can use tags to group them all under “Lead Capture.” You’ll also find an area to add custom CSS under the Advanced tab.
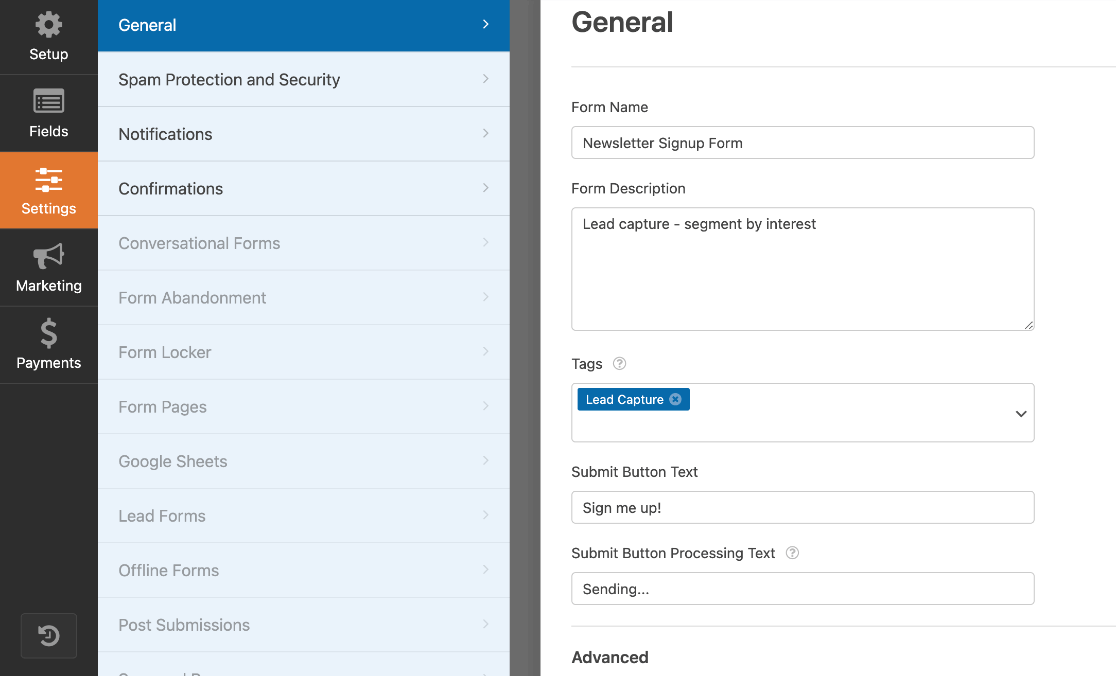
The next area in Settings is Spam Protection and Security, where you can enable reCaptcha and other security measures. Below this section, click Notifications.
Here, you can decide if you want to be notified or not when a visitor submits your form and customize those notifications.
If you’re using a premium version of WPForms, you can also use Conditional Logic to send notifications to different emails depending on users’ responses. For example, if you used a multiple-choice question for users to sign up for either your newsletter or sale notification, you could use this feature to send new signup notifications to the team members responsible for each area.
Or, set up automated confirmation emails to send to new subscribers by clicking the Add New Confirmation button and using the smart tag, Email, which will auto-detect the visitor’s submitted email address.
Next, click the settings section titled Confirmations.
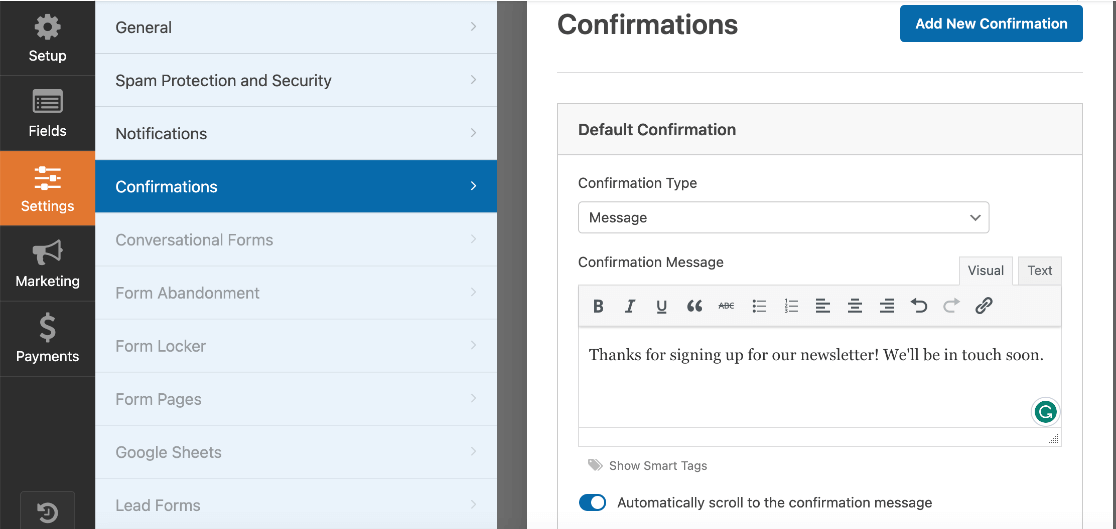
In this area, you can customize the message shown to customers after they submit your opt-in form. Or, use the drop-down menu where it says Message to change what happens when the form is submitted. The options are:
- Message: Display a custom message to thank visitors or confirm their subscription.
- Show Page: Show any page on your website, such as your blog.
- Redirect to URL: Send users to a third-party website.
If you’re using a premium plan, this is another area where you can use Conditional Logic to change the message or action depending on how visitors answered a question. Just press Add New Confirmation.
For example, we asked which topic visitors were most interested in learning about. We could use conditional logic to show users a tailored confirmation message or take them to a blog post that’s specific to their chosen interest.
Make sure to click Save before leaving the Settings section.

Step 4: Connect Opt-In Form to Email
Next up, you’ll want to connect your opt-in form to your email provider or a marketing and automation platform like Hubspot.
Click the Marketing tab in the left menu. Here, you can see all the available integrations and what’s available for your license level. If you’re using the free version of WPForms, you can connect to Constant Contact or Uncanny Automator.
Select your integration, and press the Add New Connection button in the top right.
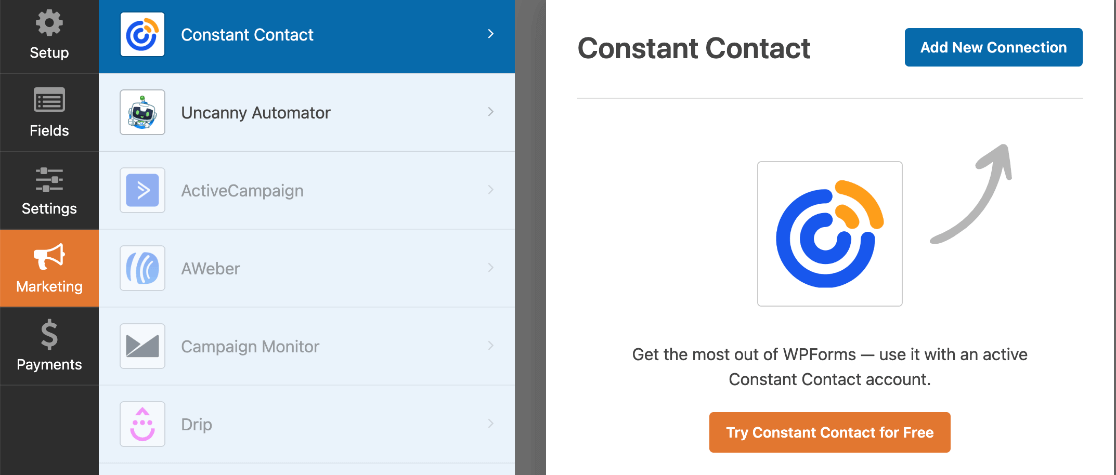
Just follow the onscreen instructions to finish setting up the connection. Your opt-in form is ready to go live on your site! Let’s see how to make that happen.
Step 5: Publish Your Opt-In Form on WordPress
It’s the last step of learning how to create an opt-in form in WordPress! WPForms makes it really easy to publish forms on any post, page, or widget-ready area.
First, you can click the Preview tab at the top of the builder to see how the form looks on your site. Here’s how ours looks!
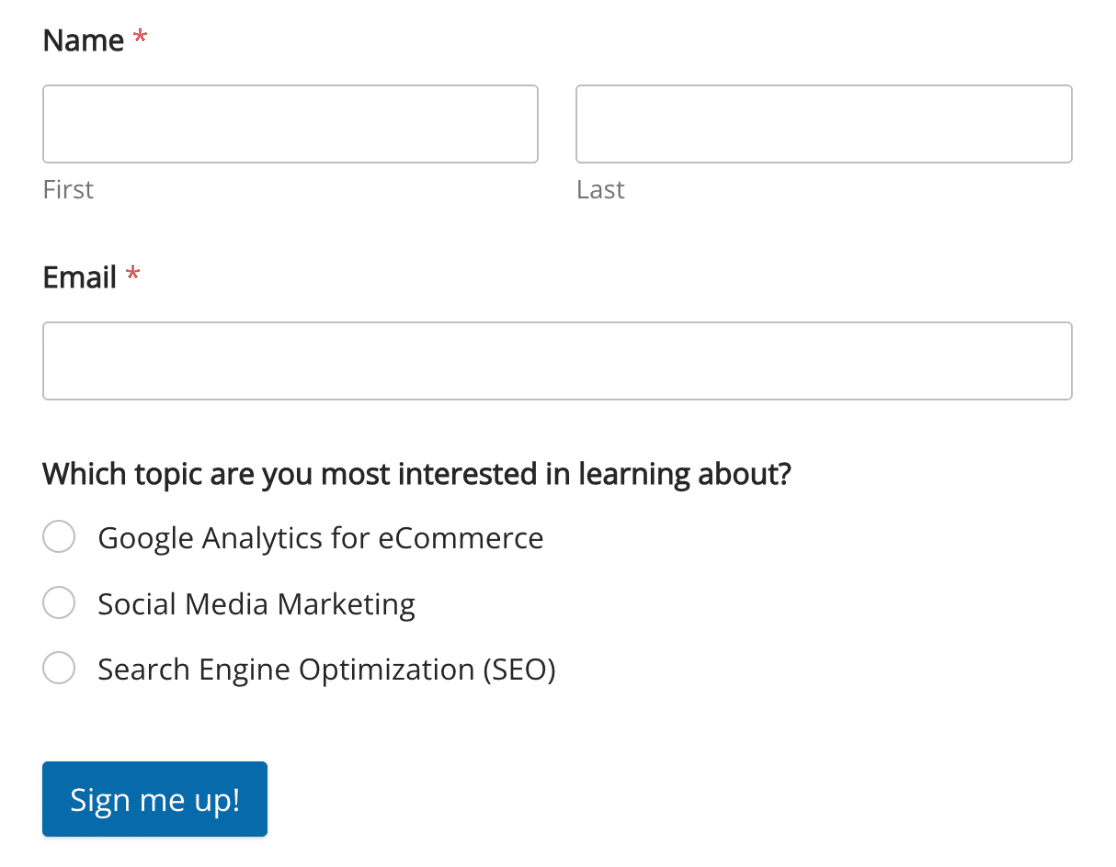
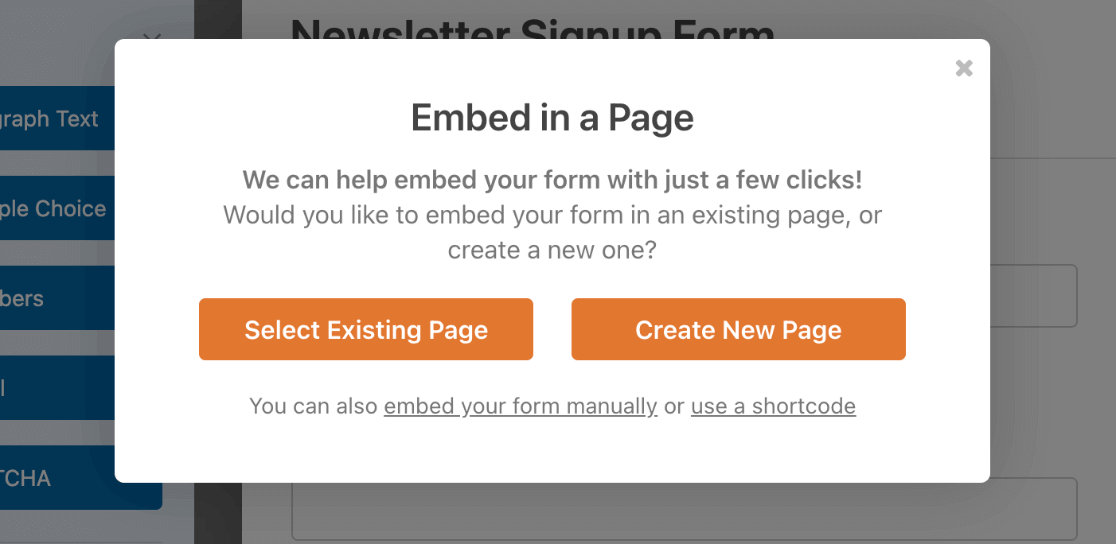
If everything looks good, click the Embed button at the top. A popup will appear where you have the options of Select Existing Page or Create New. You also click the link to use a shortcode. This will show you the shortcode for your form to embed it anywhere.
Alternatively, you can use WPForms native Gutenberg block to add a form anywhere in the WordPress editor. While editing any post or page, just search for the WPForms block to add it.
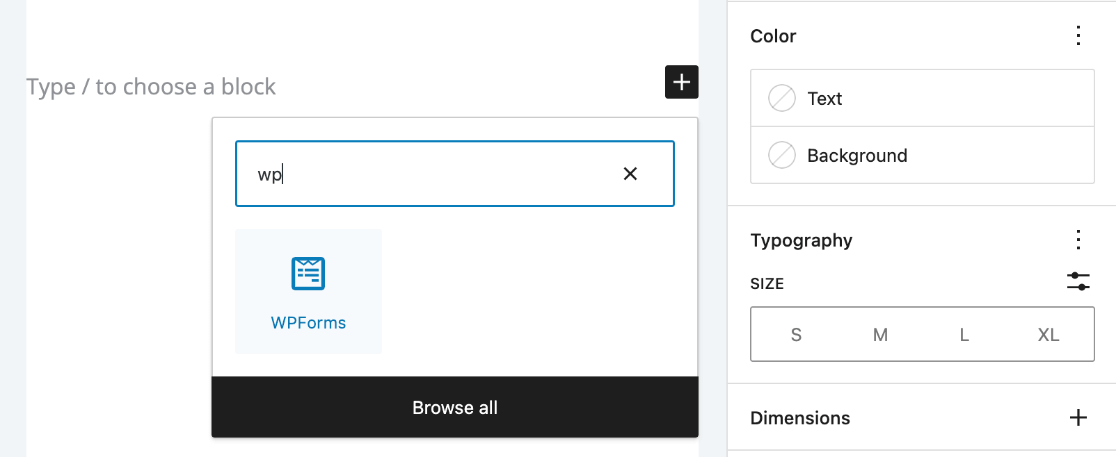
Use the block’s drop-down menu or sidebar to select which form you want to use.

Make sure to press Update at the top of the editor if you added an opt-in form to an existing page or post.
That’s it! Your form is live and will start capturing leads on your site.
Track Opt-In Form Performance
The last thing to think about is tracking your opt-in forms. Whether you’re using an OptinMonster campaign, WPForms, a combination of both, or a different tool like Thrive Leads, you’ll want to track how your opt-in forms are performing.
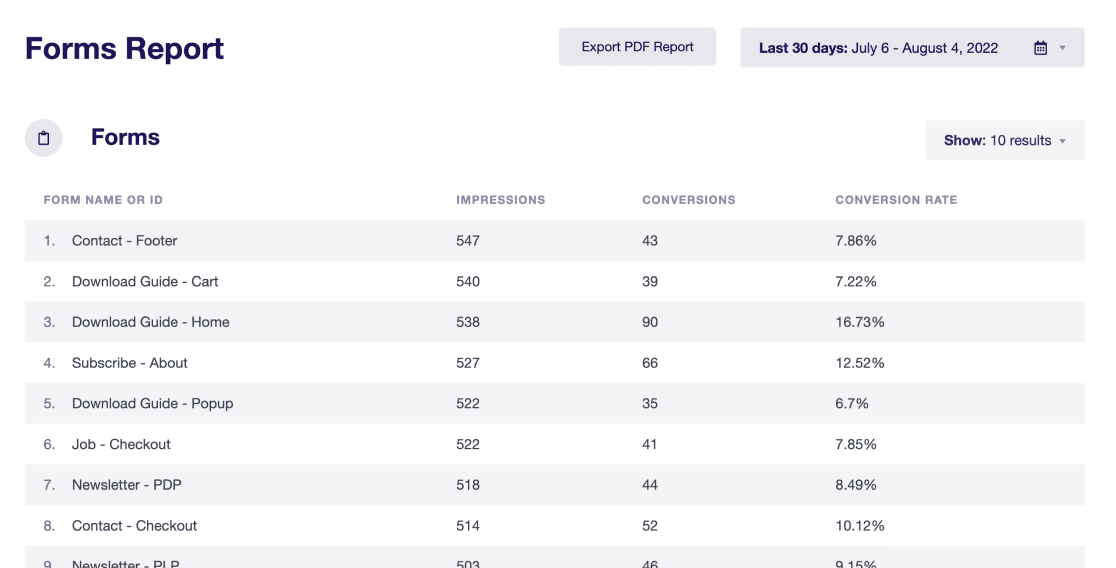
By tracking which forms get the most impressions and submissions, you can see what’s working and what needs to be improved.
With ExactMetrics, it’s easier than ever to set up form tracking and campaign tracking in Google Analytics. The plugin comes with tons of advanced tracking features right out of the box and brings all your most important Google Analytics metrics to your WordPress dashboard.
You can easily see which Forms are performing the best and driving conversions.
Get started with ExactMetrics now!
Well, that’s all for now.
We hope you enjoyed learning how to create opt-in forms in WordPress. If so, have you thought about creating a lead capture landing page? Check out our list of the Best WordPress Landing Page Builder Plugins to get started.
Not using ExactMetrics yet? What are you waiting for?
Don’t forget to follow us on Twitter and Facebook to see all the latest reviews, tips, and Google Analytics tutorials.


