On-page SEO is absolutely essential if you want your website to rank in search engines. Ignoring it can cause your site to not rank at all, significantly impacting your organic traffic.
Thankfully, WordPress makes on-page SEO straightforward. With a bit of effort and the right strategies, you’ll start seeing keyword rankings in no time.
But what exactly is on-page SEO, and how do you do it in WordPress?? In this comprehensive guide, we will cover the following:
- What is On-Page SEO and Why Is it Important?
- How to Do On-Page SEO (step-by-step)
- Key Google Updates You Should Know About
- Best Way to Do On-Page SEO in WordPress
- Bonus: Track Your TruSEO Scores with ExactMetrics
Let’s dive in and explore how you can optimize your WordPress site’s on-page SEO for better search engine rankings.
What is On-Page SEO and Why Is it Important?
On-page SEO includes different techniques to make your web pages rank higher in search engines and attract the right visitors. It covers everything from your content to the HTML code.
By focusing on on-page SEO, you make your website easy for search engines to find and users to enjoy, which helps boost your rankings and increase organic traffic.
Some of the key elements of on-page SEO include:
- A Focused, Keyword-Rich Meta Title.
- A Focused, Keyword-Rich Meta Description
- An Optimized URL
- Keywords in Article Headings and Throughout the Content
- Internal Links to Other Relevant Content on Your Site
- Optimized Images
- Schema, if Applicable
On-page SEO is essential for ranking your website and content in search engines and driving more organic traffic. By optimizing each element, you create a solid foundation for your SEO strategy, ensuring that your content is both visible and valuable to users.
Now, let’s review each element in detail to examine how to rock your on-page SEO.
How to Do On-Page SEO (step-by-step)
Follow these steps to ensure each one-page SEO element of your content is optimized for maximum visibility and effectiveness:
- Step 1: Use a Focused, Keyword-Rich Title
- Step 2: Write A Focused, Keyword-Rich Meta Description
- Step 3: Use an Optimized URL
- Step 4: Have Good Keyword Distribution
- Step 5: Add Internal Links to Other Relevant Content
- Step 6: Optimize Your Images
- Step 7: Use Schema Markup
Step 1: Use a Focused, Keyword-Rich Title
The blue links in Google’s search results are the page title, and the text underneath is the meta description.
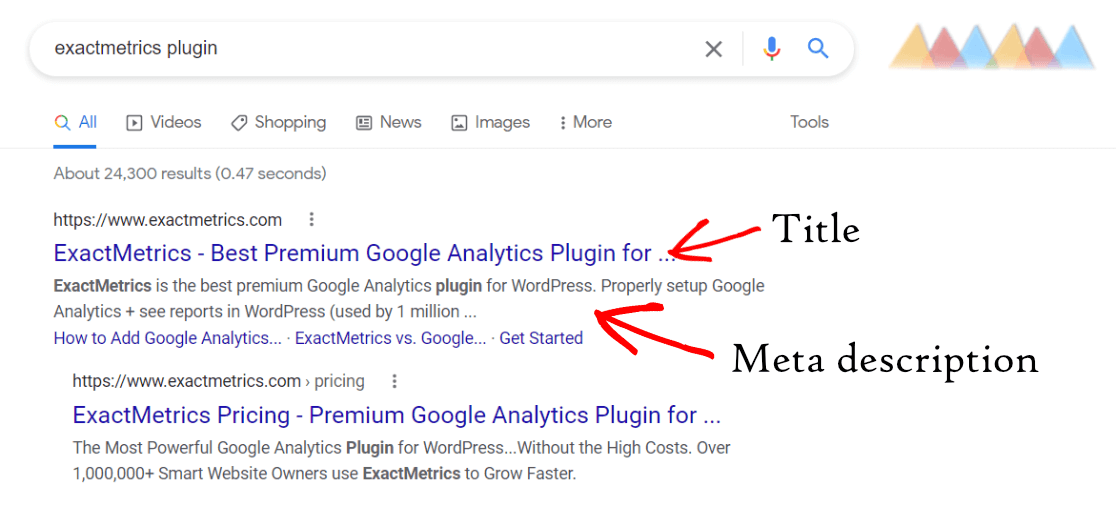
In Google’s search results, the blue links you see are the page titles, and the text underneath them is the meta description. When looking for an answer or resource in Google search, you probably click on the result that best matches what you’re looking for and has a title that stands out.
The keywords in your title are crucial for helping your page rank in search results. Therefore, your title must be carefully optimized to include your main keyphrase, stand out, and compel searchers to click on your result.
Understanding search intent is key to crafting an effective title. Search intent refers to the reason behind a user’s query—what they hope to find when they type their search terms into Google. There are typically four types of search intent:
- Informational Intent: The user seeks information or answers to specific questions.
- Navigational Intent: The user is trying to find a specific website or page.
- Transactional Intent: The user intends to purchase or complete a transaction.
- Commercial Investigation: The user is looking to compare products or services before deciding.
Your title should align with the search intent of your target audience. For example, if you’re targeting users looking for information on how to do on-page SEO in WordPress, your title should indicate that your content will provide a comprehensive guide or detailed instructions.
Examples:
- Optimized Title: ‘How to Do On-Page SEO in WordPress: A Step-by-Step Guide’
- This title includes the main keyphrase ‘on-page SEO in WordPress’ and clearly indicates that the article will provide detailed, step-by-step instructions aligning with informational search intent.
- Unoptimized Title: ‘On-Page SEO Tips’
- This title is too vague and does not indicate what the reader will learn, nor does it include the full keyword.
By focusing on a keyword-rich title that matches your audience’s search intent, you can improve your chances of ranking higher in search results and attracting more clicks from users looking for the specific information you provide.
Step 2: Write A Focused, Keyword-Rich Meta Description
Think of your title and meta description together like an ad for your page. The title draws searchers in, and the meta description helps compel them to click.
Your meta description should include your main keyphrase and even a supporting keyword, but it should also explain to searchers why they should click on your result. This is your opportunity to summarize the content and highlight its value.
Key Elements of a Great Meta Description
- Include Your Main Keyphrase: This reinforces the relevance of your page to the search query and helps with ranking.
- Be Descriptive and Compelling: Clearly describe what users will find on your page and make it compelling enough to entice clicks.
- Highlight the Value: Explain your content’s benefits or unique points to show searchers why it’s worth their time.
Example:
- Optimized Meta Description: ‘Learn how to optimize your WordPress site with our comprehensive on-page SEO guide. Step-by-step instructions and expert tips included.’
- This description includes the main keyphrase ‘on-page SEO,’ highlights the value (‘comprehensive guide,’ ‘step-by-step instructions,’ ‘expert tips’), and encourages users to click.
Understanding Google’s Behavior with Meta Descriptions
One thing to note about meta descriptions is that Google will often rewrite them based on the query that was searched. Google aims to show searchers the content on your page that matches their keyphrase or question.
This can be helpful because it demonstrates that your content is highly relevant to their search. However, it can also be a bit frustrating because the description you carefully crafted might not always appear in search results.
Despite this, you should still create a great meta description for every site page, post, or product. A well-written meta description can:
- Increase your click-through rate (CTR).
- Provide searchers with a clear understanding of what your page offers.
- Enhance user experience by accurately representing your content.
By writing focused, keyword-rich meta descriptions, you can improve the likelihood that your page will stand out in search results and attract more clicks, ultimately driving more traffic to your site.
Step 3: Use an Optimized URL
For beginners, the URL is often a last thought regarding on-page SEO, but it should be on your radar! It’s an ideal spot to include your main keyword and can significantly impact search engine visibility and user experience.
Key Elements of an Optimized URL
- Include Your Main Keyword: This helps search engines understand the content of your page and can improve your rankings.
- Keep It Simple and Descriptive: A clear, concise URL is easier for users to read and remember.
- Avoid Unnecessary Parameters: URLs with random strings of numbers or letters (e.g., www.examplesite.com/?p=22) provide no useful information to search engines or users.
Examples
Unoptimized URL:
- www.examplesite.com/?p=22
- This URL gives zero clues to a search engine bot or potential visitor about what’s on the page.
Optimized URL:
- www.examplesite.com/how-to-do-onpage-seo-in-wordpress
- This URL is descriptive, includes the main keyword, and clearly indicates the content of the page.
Best Practices for Optimized URLs
- Follow a Simple Structure: Use a straightforward format like www.domainhere.com/page-title-here.
- Avoid Dates: Including the date the content was published is unnecessary and will quickly become outdated, making it less appealing to click on.
- Use Hyphens: Separate words with hyphens rather than underscores to improve readability and SEO.
By using an optimized URL, you can make your content more accessible and understandable for both search engines and users, helping to improve your overall SEO performance.
Step 4: Have Good Keyword Distribution
To rank your page for a certain keyword, you want that keyword and its close variations to be distributed throughout your content. Effective keyword distribution helps search engines understand the context of your page and improves your chances of ranking for those keywords.
Key Elements of Good Keyword Distribution
- Include Keywords in Headings: Ensure your primary keyword appears in at least one or two headings (H1, H2, etc.). This helps search engines identify your page’s main topics.
- Distribute Keywords Naturally: Your main keyword and its variations should be spread throughout the content in a natural and not forced way.
- Avoid Keyword Stuffing. Overusing keywords can make your content difficult to read and may result in Google penalties. Aim for a natural flow that prioritizes good readability for your users.
Best Practices for Keyword Distribution
- Use Keywords in the First 100 Words: This helps establish the topic early and signals relevance to search engines.
- Place Keywords Every 200 Words or So: This is a general guideline to ensure your keyword is consistently present without overdoing it. Adjust based on the length and flow of your content.
- Include Keywords in the Conclusion: Reinforce the main topic at the end of your article.
By maintaining good keyword distribution, you enhance the SEO of your page while keeping it reader-friendly. This balance is essential for achieving higher rankings and providing valuable content to your audience.
Step 5: Add Internal Links to Other Relevant Content
Internal links are super important for on-page SEO. They can help you rank higher in search results and guide real visitors through your site logically and helpfully.
Benefits of Internal Links
- Pass ‘Link Juice’: Internal links help distribute the authority (often called ‘link juice’) from high-performing pages to other pages on your site. For instance, if you have a post performing well in search and bringing in traffic, linking from that post to a new or underperforming one can signal to Google that the linked content is also valuable.
- Improve User Experience: Internal links allow visitors to explore related content. This can keep users engaged longer on your site, reduce bounce rates, and improve overall user experience.
- Enhance Crawling and Indexing: Internal links help search engine bots discover and index more pages on your site. A well-structured internal linking strategy ensures important pages are easily accessible to search engines.
Best Practices for Adding Internal Links
- Link to Relevant Content: Ensure that the links are contextually relevant and provide additional value to the reader.
- Use Descriptive Anchor Text: The clickable text of the link (anchor text) should be descriptive and include relevant keywords when possible. Avoid generic text like ‘click here,’ but use descriptive text like ‘read my on-page SEO guide to learn more.’
- Don’t Overdo It: While internal linking is beneficial, too many links can overwhelm readers and appear spammy. Aim for a natural number of links that fit seamlessly into your content.
Adding internal links to other relevant content can enhance your site’s SEO, improve the user experience, and ensure that your content is well-connected and easily navigable.
Step 6: Optimize Your Images
Optimized images are crucial for both SEO and accessibility. Ensuring your images are properly optimized enhances your site’s search engine performance and improves the user experience for visitors using screen readers.
Best Practices for Image Optimization
- Use Descriptive Alt Text: The alt text should clearly describe the image and include relevant keywords naturally. This helps both search engines and users understand the image’s content.
- Optimize Image File Names: Use descriptive, keyword-rich file names for your images before uploading them to your site. Avoid generic names like “image1.jpg.”
- Compress Images: Ensure images are compressed to reduce file size without compromising quality. This helps improve page load times.
- Use Appropriate Formats: Choose the right image format (JPEG for photos, PNG for graphics with transparency) to balance quality and file size.
- Include Image Titles: While not as crucial as alt text, image titles can provide additional context for users and search engines.
By optimizing your images, you can improve your site’s SEO and ensure it is accessible to all users. Descriptive alt text, keyword-rich file names, and proper compression are key practices that will help your images contribute positively to your overall SEO strategy.
For more on optimizing images, read Image SEO: How To Best Optimize Your Images In WordPress (17 Tips).
Step 7: Use Schema Markup
When running Google searches, you will probably see some results with extra information that look different from other results. If you search for a recipe, a review, a product, or a how-to post, you’ll often see enhanced details in the search results.
Schema markup is a type of structured data that you add to your HTML to improve the way search engines read and represent your page in search engine results. This markup can provide additional context about your content, such as ratings, reviews, cooking times, ingredients, and more.
For example, when you search for a recipe for apple pie, many of the results will have ratings, reviews, how long the recipe takes to make, a photo, and possibly even ingredients. Check out this example:

These extra bits of information appear in the results because of Schema. Schema is a special code you include on your page that tells Google more about the content.
Benefits of Using Schema Markup
- Enhanced Search Listings: Schema can help your content stand out in search results with rich snippets, which can improve your click-through rate (CTR).
- Improved Search Engine Understanding: Schema helps search engines understand the context of your content, which can lead to better indexing and ranking.
- Better User Experience: Providing more detailed information directly in search results can help users quickly find what they are looking for.
If you have a content type that can benefit from Schema usage, you should definitely try it to gain that extra step up in search results.
The best way to add Schema to your pages is with a schema plugin. These plugins simplify the process and ensure your markup is correctly formatted. We’ll recommend our favorite one further down below.
Key Google Updates You Should Know About

Staying on top of Google’s latest updates is crucial for keeping your site’s SEO game strong. Here’s a breakdown of the most recent changes you should know about:
Helpful Content
Google’s helpful content update is all about providing users with genuinely useful information. The idea is to create content that answers people’s questions and adds value. To nail this:
- Know Your Audience: Understand what your readers are looking for and make sure your content meets their needs.
- Be Clear and Direct: Skip the fluff and get straight to the point. People appreciate clear, actionable advice they can use right away.
- Offer Something Extra: Go beyond the basics. Share unique insights, detailed analyses, or practical tips that people won’t find elsewhere.
E-A-T (Expertise, Authoritativeness, Trustworthiness)
E-A-T stands for Expertise, Authoritativeness, and Trustworthiness. It’s a big deal for Google, especially for content that can affect people’s well-being or finances (like health advice or financial tips). Here’s how to show off your E-A-T:
- Show Your Expertise: Make sure knowledgeable folks write your content. Include author bios that highlight their credentials and experience.
- Build Authority: Get mentions and links from reputable websites in your field. Guest posts, interviews, and collaborations can help boost your credibility.
- Be Trustworthy: Make your site secure (use HTTPS), and be transparent with clear contact info and policies. Accurate, well-sourced content, user reviews, and testimonials can also help build trust.
Core Web Vitals
Core Web Vitals are all about how fast and smooth your site runs, and you can check them in Google Search Console. Google looks at things like how quickly your page loads, how soon it becomes interactive, and how stable it is as it loads. Here’s the scoop:
- Loading Speed (LCP): This measures how long it takes for the main content of a page to load. Aim for it to be under 2.5 seconds.
- Interactivity (FID): This looks at how quickly your site responds when users interact with it (like clicking a button). Aim for less than 100 milliseconds.
- Visual Stability (CLS): This checks if things shift around on your page as it loads. Aim for a low score to keep the page steady.
To improve these metrics:
- Optimize Your Images: Compress and resize images to speed up loading times.
- Streamline Your Code: Minimize the use of heavy JavaScript and third-party scripts.
- Boost Server Performance: Use a reliable hosting service and consider a Content Delivery Network (CDN) to deliver content faster.
Focusing on these updates can keep your site in good standing with Google and ensure a better user experience.
Now, let’s get into the best and easiest way for you to do on-page SEO in WordPress.
Best Way to Do On-Page SEO in WordPress
Okay, now you know all about on-page SEO and the most important Google updates. How do you work on those in WordPress?
To effectively do on-page SEO, you’ll need a plugin that allows you to edit some of the components we went over above easily. We highly recommend you use All in One SEO!
All in One SEO (AIOSEO) is an awesome plugin that can help you dial in your on-page SEO and increase traffic. The plugin has powerful features that easily manipulate your title, meta description, schema, and more.
It also “reads” your content and gives you specific, actionable tips to improve it to set you up for SEO success.
For example, let’s say you’re writing an article on eCommerce email marketing best practices. After writing your article and filling in your title and meta description, you can enter a Focus Keyphrase (“ecommerce email marketing” in our case).
The All in One SEO plugin scans your article content, title, meta description, and more to determine if it’s well optimized.
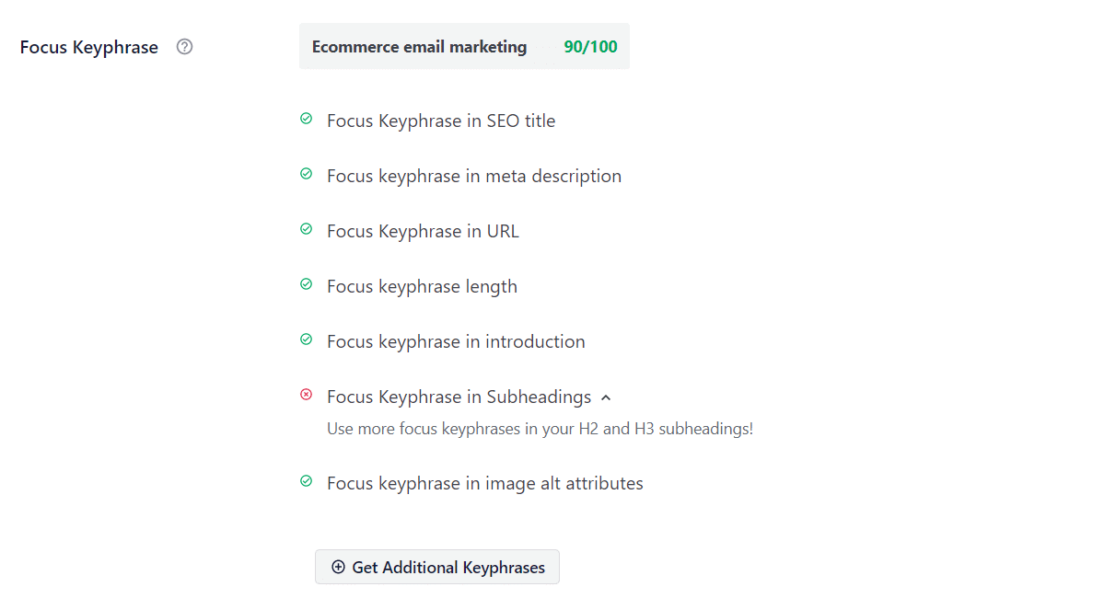
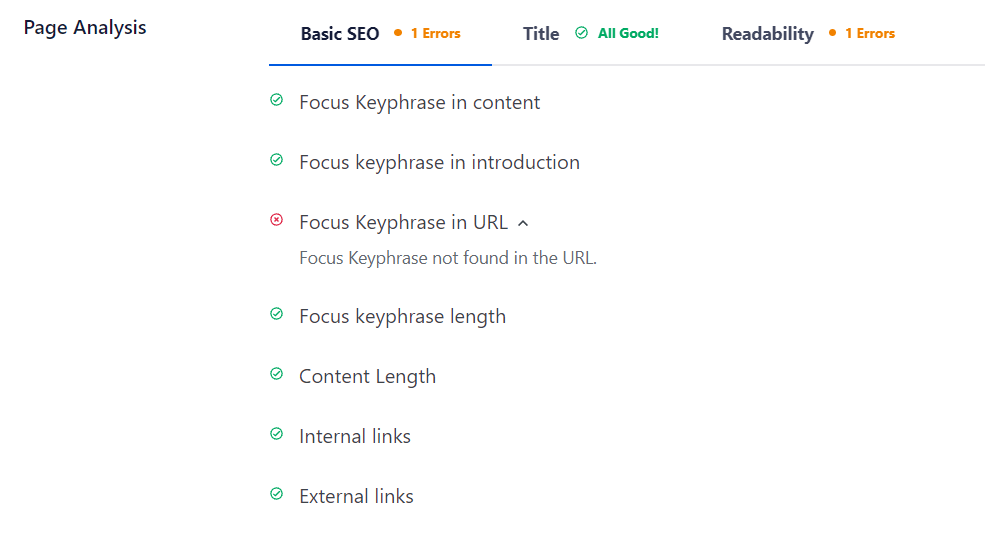
Then, you can scroll down further for even more on-page SEO suggestions in the Page Analysis section. Use the tabs on the top to see all of the suggestions:
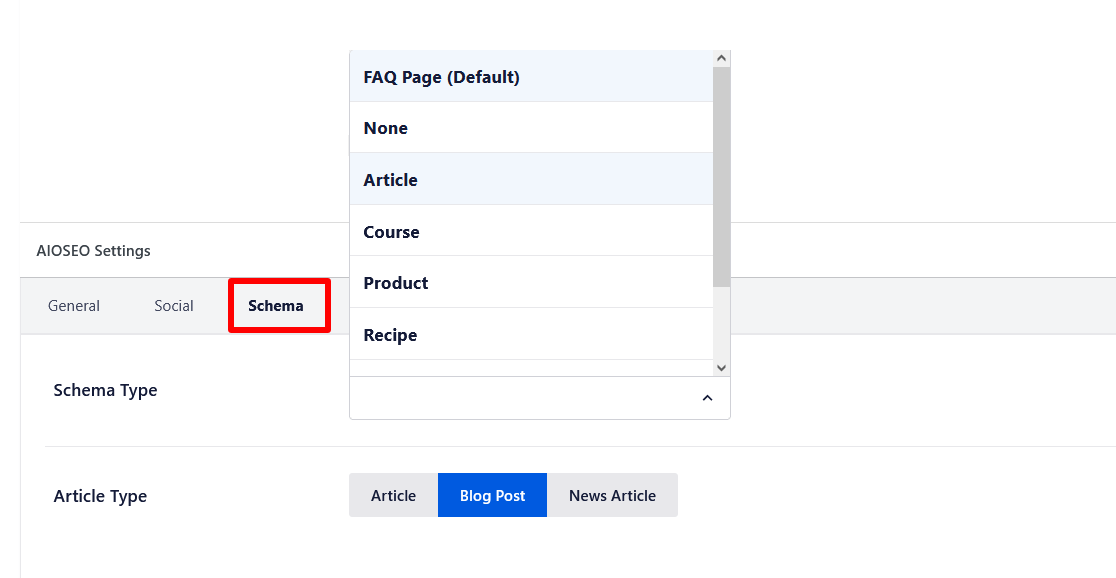
Remember when we mentioned using Schema? AIOSEO can help you with that, too. Just toggle to the Schema tab, choose your type, and fill in the details.
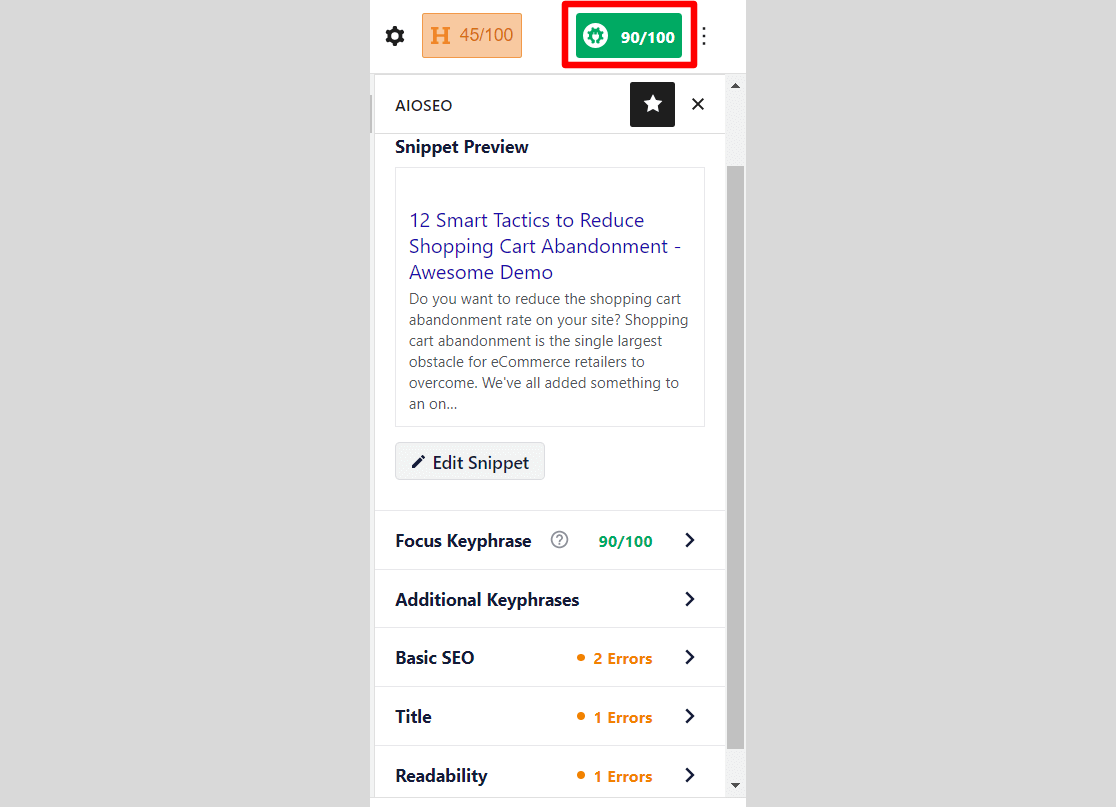
AIOSEO will also give you something called a TruSEO score. This is the score between 0 and 100 that the plugin gives your content to show you at a glance how optimized it is for search.
You can click on the score right in your WordPress sidebar to expand the suggestions for making the article more optimized:
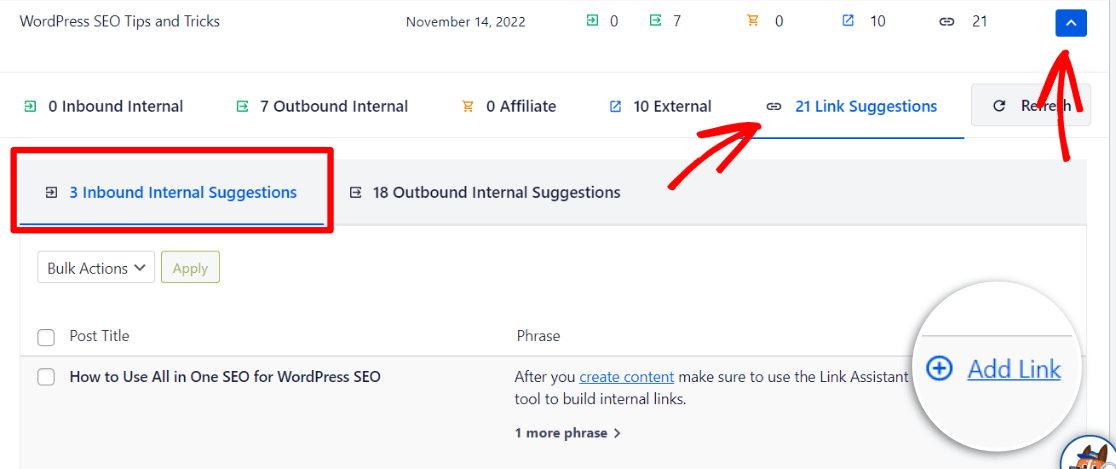
Additionally, the Link Assistant feature in All in One SEO makes adding internal links incredibly straightforward. Simply click on the Link Assistant tab under AIOSEO Settings to access a list of relevant linking suggestions that can be implemented with a single click.
Bonus: Don’t forget to explore the Broken Link Checker plugin from AIOSEO. This tool will periodically scan your site or the specific content you choose and notify you of any broken links.
Like Link Assistant, you can effortlessly use inline editing to correct broken links.
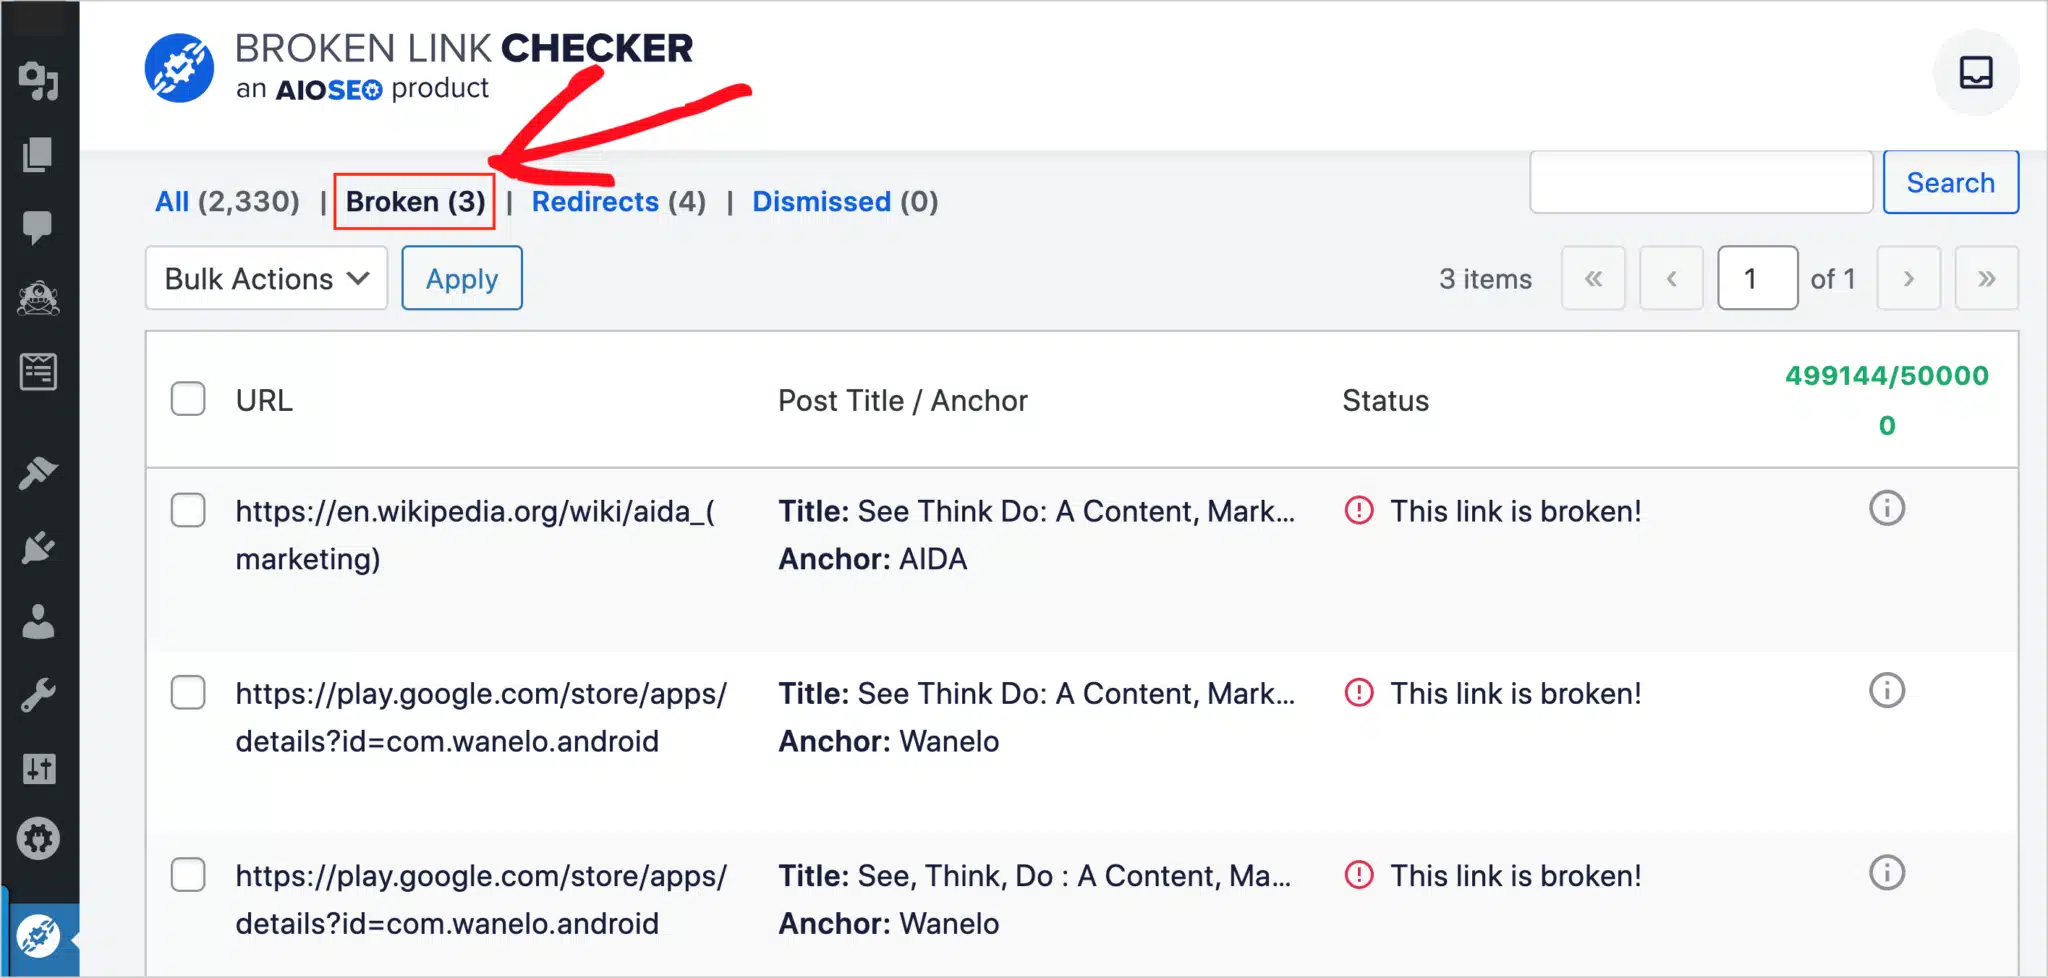
It also prevents any broken links from being crawled, significantly benefiting WordPress on-page SEO.
Get started with AIOSEO today.
Recap of How to Do On-Page SEO in WordPress
That was a lot of information about on-page SEO. So, here’s a quick summary of the steps to optimize on-page SEO in WordPress:
- Download and install the All in One SEO.
- Open the post or page you wish to optimize and navigate to the AIOSEO settings.
- Enter a Focus Keyphrase.
- Review and follow the suggestions provided in the Focus Keyphrase section.
- Examine and apply the recommendations in the Page Analysis section.
- Configure your Schema, if applicable.
- Check your TruSEO score.
- Add internal links.
Bonus: Track Your TruSEO Scores with ExactMetrics
If you’re using AIOSEO, you can track your TruSEO score in WordPress and Google Analytics with ExactMetrics.
To set it up, follow these simple steps:
- Make sure you have an ExactMetrics Pro license.
- Activate the Dimensions addon under ExactMetrics » Addons.
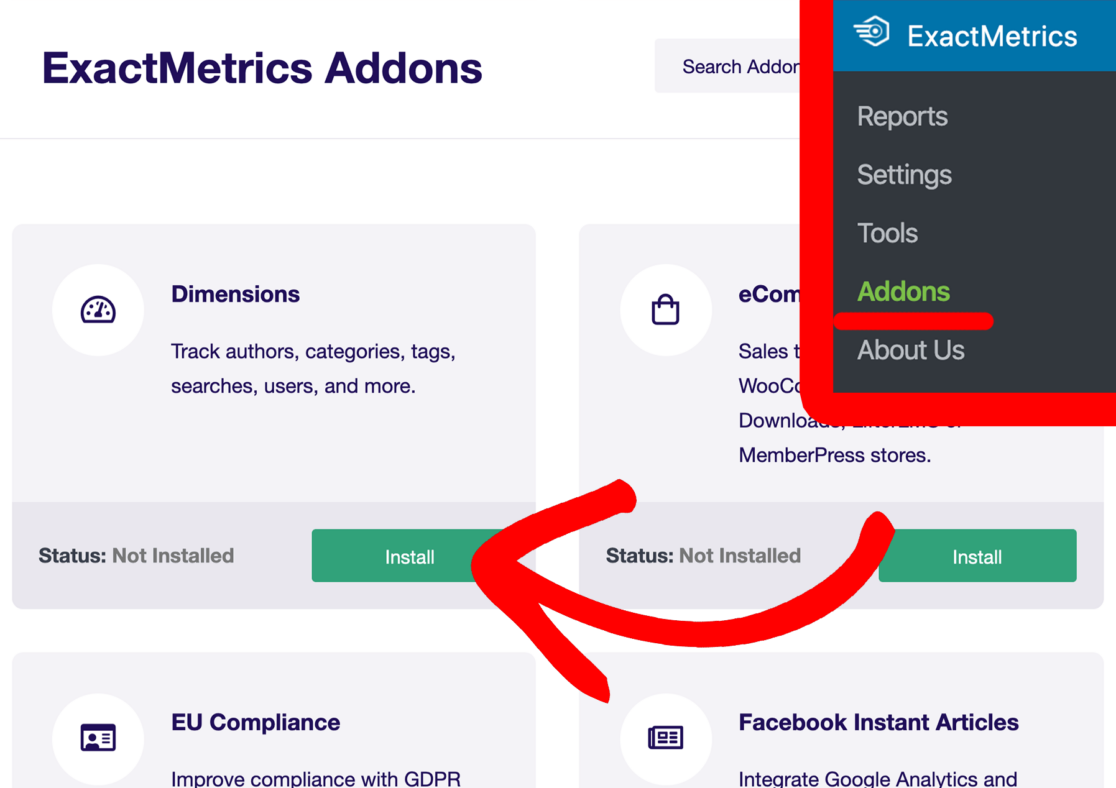
- Create the TruSEO custom dimension. For a walkthrough about how to do this, read Google Analytics Custom Dimensions: Complete Beginner’s Guide.
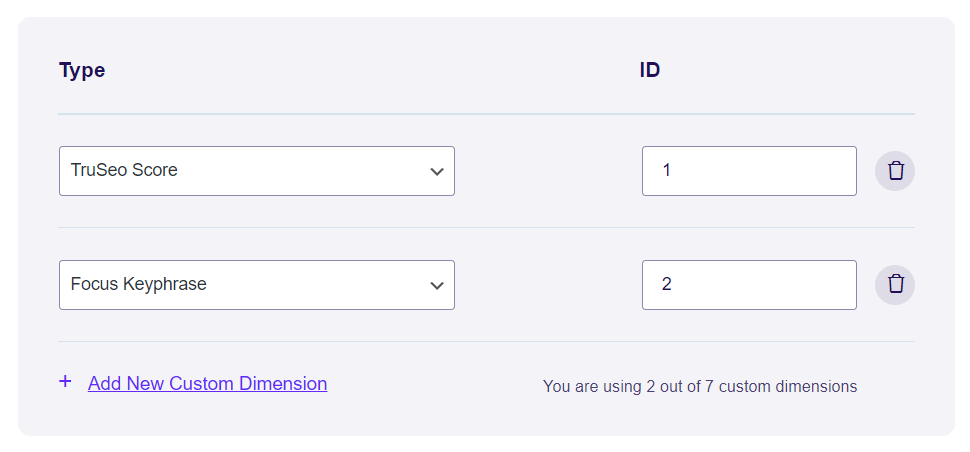
- You’re done! Your TruSEO score will now show up in a report in your ExactMetrics reports under Dimensions.
That’s it! We hope you found some great tips in our on-page SEO guide.
Want to learn more about WordPress SEO? Check out 10 Basic WordPress SEO Tips to Drive More Business.
Not an ExactMetrics user yet? Get started today!
Don’t forget to follow us on X and Facebook to see all the latest Google Analytics tutorials.


