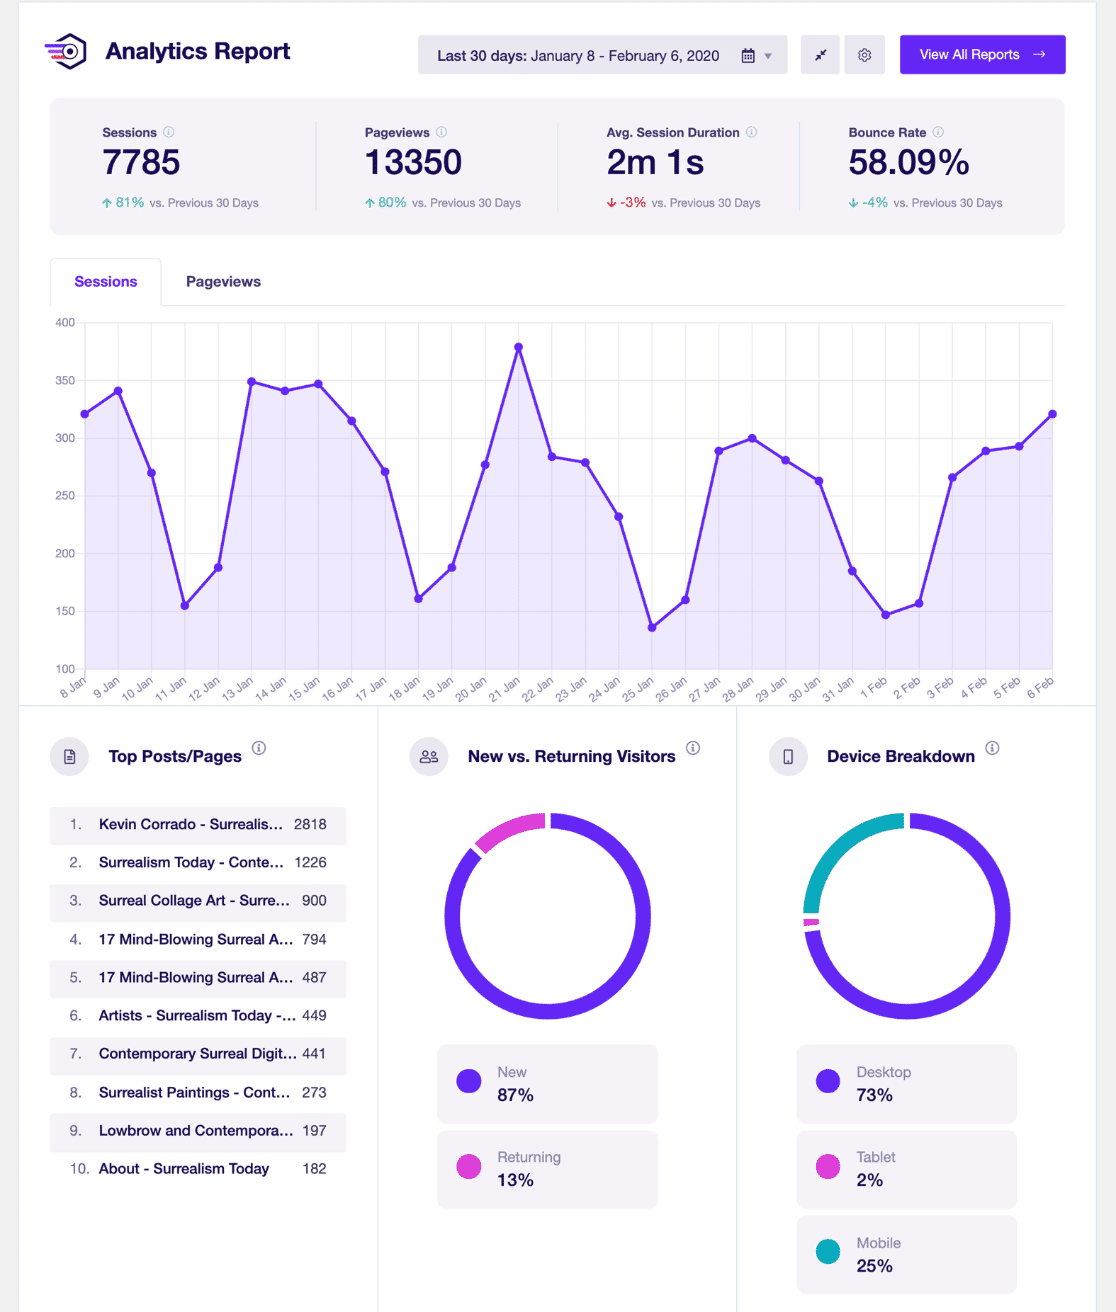
Need to add Google Analytics 4 (GA4) to WordPress? You’re in the right place!
In this step-by-step guide, we’ll show you how to add GA4 (Google Analytics 4) to WordPress using the best and easiest method for WordPress users.
Ready to get started? Let’s go!
What Is GA4 Analytics?
Google Analytics 4 (GA4) is a new version of Google Analytics that has many features and statistics in common with the previous version (Universal Analytics). However, GA4 also has some new features and omits a few things that were available in GA3.
Google Analytics 3 (Universal Analytics) was sunset on July 1, 2023, so it’s very important for GA3 users to start using GA4 immediately.
One of the most significant omissions you’ll notice in GA4 is your historical data. If you’ve been using Universal Analytics and you set up GA4 for your WordPress site, GA4 will not have any of your past data. This is because GA4 only begins collecting data from the moment you set it up.
That said, your old data will remain safe in your Universal Analytics property for about a year. To access your older data in Google Analytics, you’ll need to switch back and forth between the properties.
GA4 captures interactions in a different way than Universal Analytics, and Google Analytics 4 also offers some new features that were not available in GA3, like cross-platform data tracking (you can track data from your website and your mobile app in the same place). Overall, GA4 is a powerful tool that offers many new features, but it can be challenging for beginners.
How to Switch to Google Analytics 4 (The Easy Way)
To switch to Google Analytics 4, you first need to create a GA4 property and then set up Google Analytics 4 to fit your custom tracking needs. Although you need to set up GA4 to continue collecting data, actually using it is often easier said than done.
Google Analytics 4 has a different user interface, which may look really unfamiliar if you’re used to using GA3. You’ll need to invest time to figure out how to track the data you need and find the reports you’re after. It can be a steep learning curve even for intermediate users.
That’s why, among many other benefits, we suggest using a tool like ExactMetrics to add Google Analytics 4 to WordPress. It’ll simplify the process immensely and make the transition to GA4 much less time-consuming.
ExactMetrics is the best premium WordPress Analytics plugin, allowing you to easily set up Google Analytics without editing any code or needing a complicated tool like Google Tag Manager. You get advanced tracking right out of the box with an extremely user-friendly interface and Google Analytics reports right inside your WordPress dashboard.
Plus, you gain access to tons of additional Google Analytics features and advanced tracking capabilities with just a few simple clicks. Here are some of ExactMetrics’ most popular features:
- Custom event tracking and custom dimensions
- 1-click eCommerce tracking
- Conversion tracking for Google Ads, Microsoft (Bing) Ads, and Meta (Facebook) Ads
- Advanced form tracking and integration with the most popular form builders
- Display your most popular posts or products
- EU Compliance
- Affiliate and outbound link tracking
- Social media tracking
- Media and video play tracking
- And much more…
Ready to learn how to add Google Analytics to WordPress easily?
How to Add GA4 to WordPress
- Create a Google Analytics 4 Property
- Install ExactMetrics
- Connect Your GA4 Property
- Adjust Google Analytics Settings
Step 1: Create a Google Analytics 4 Property
If you don’t have a GA4 property set up yet, you’ll need to do that first. The instructions for this are different if you already have an Analytics account vs if you need to create one. Let’s take a look at the process for each.
Directions if you do not have a Google Analytics property set up
Directions if you already have a Universal Analytics property
If you do not have a Google Analytics property set up yet…
If you don’t have Google Analytics yet, follow these steps to set up your account and create a new GA4 property.
The first thing you’ll need to do is log in or sign up for a Google account.
To get started, you’ll need to open the Google Analytics website and click the Sign in to Analytics link or Start for free button in the top right corner of the page.

Next, you can log in to your existing Google account if you have one (make sure it’s the account you want to have connected to your website’s analytics). Or, click the Create account link to create a new Google account.
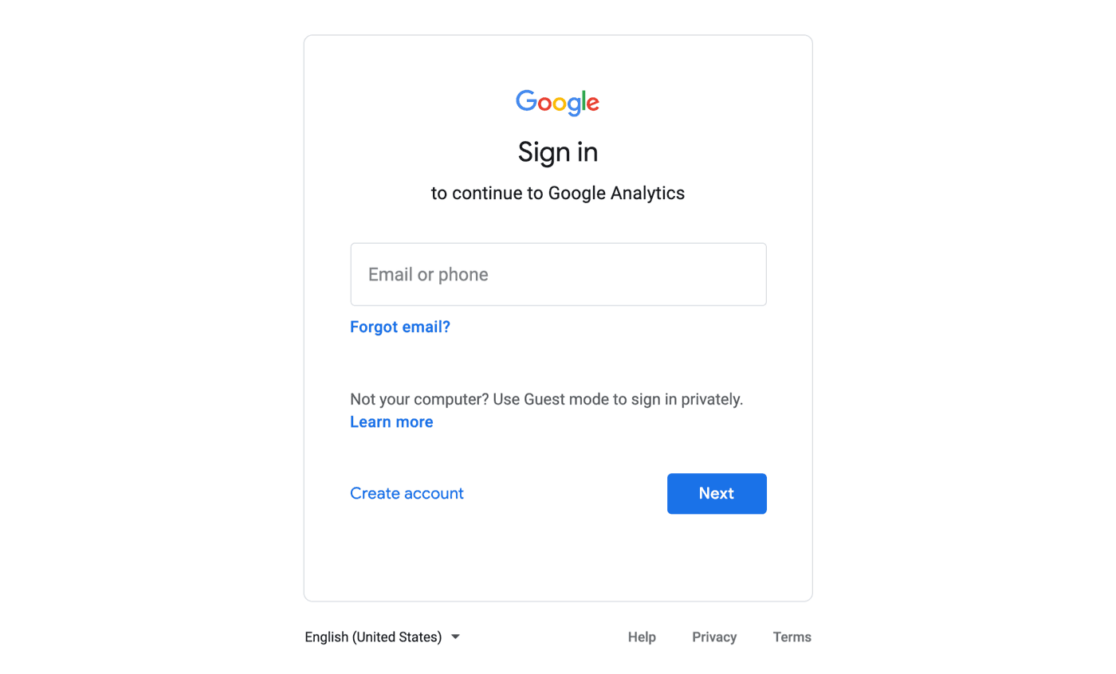
Now, click the blue Start Measuring button.

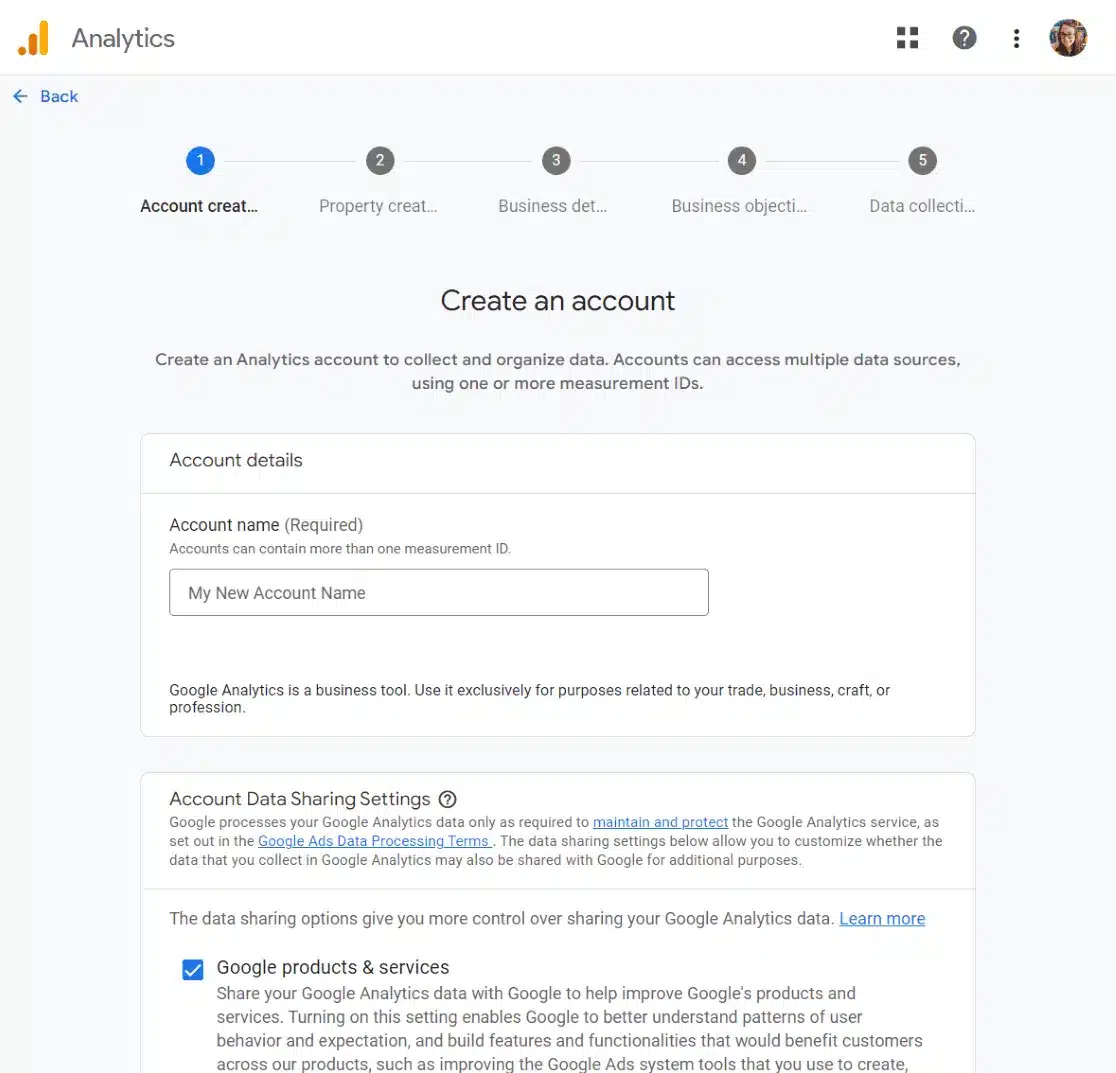
Next, you’ll need to enter the Account name for your Google Analytics account. You’ll also see different data-sharing settings. Make sure you check all the boxes and then click Next.
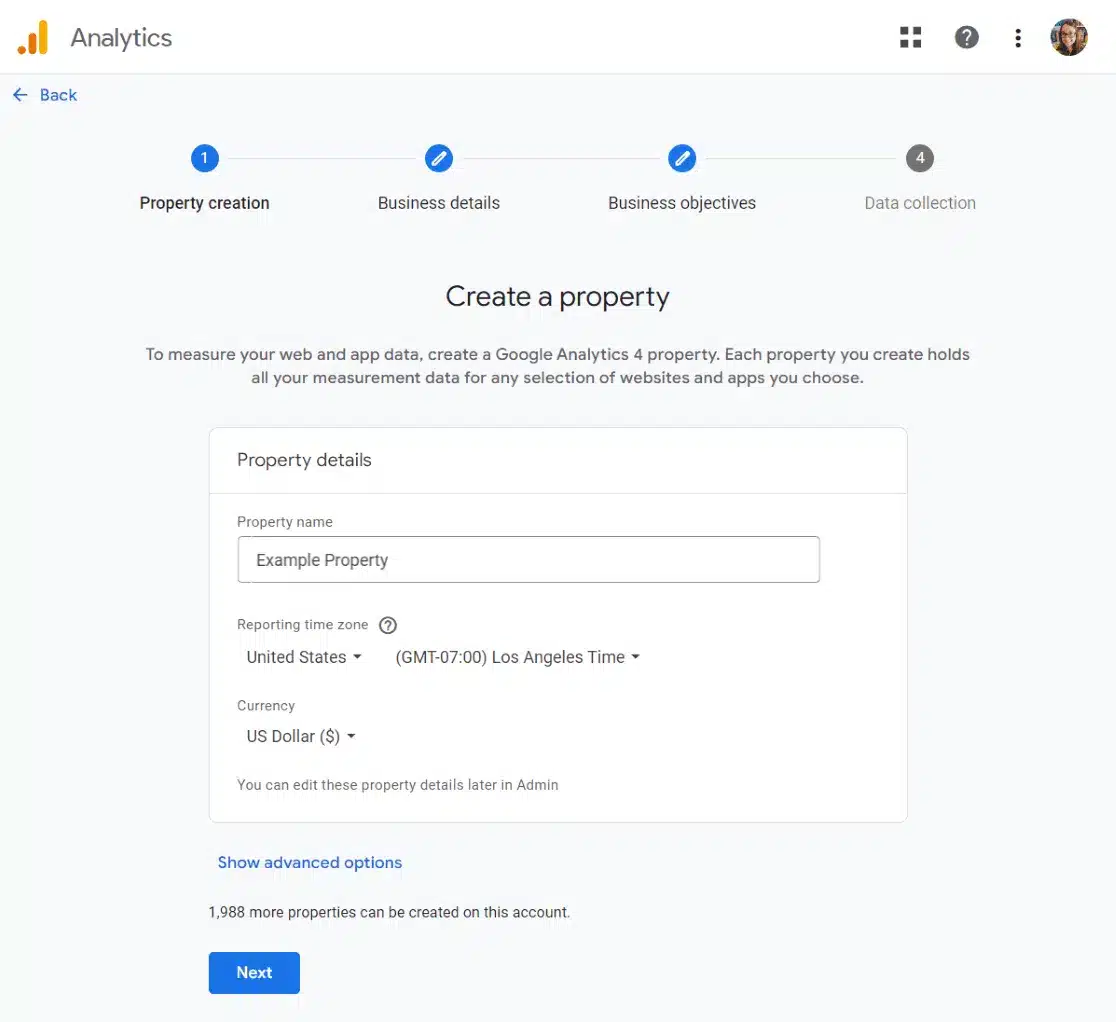
Now, you’ll have to enter the property details of your website. Start by entering a name, selecting a reporting time zone, and choosing your currency. Click Next.
On the next screen, fill in your business details and click Next. 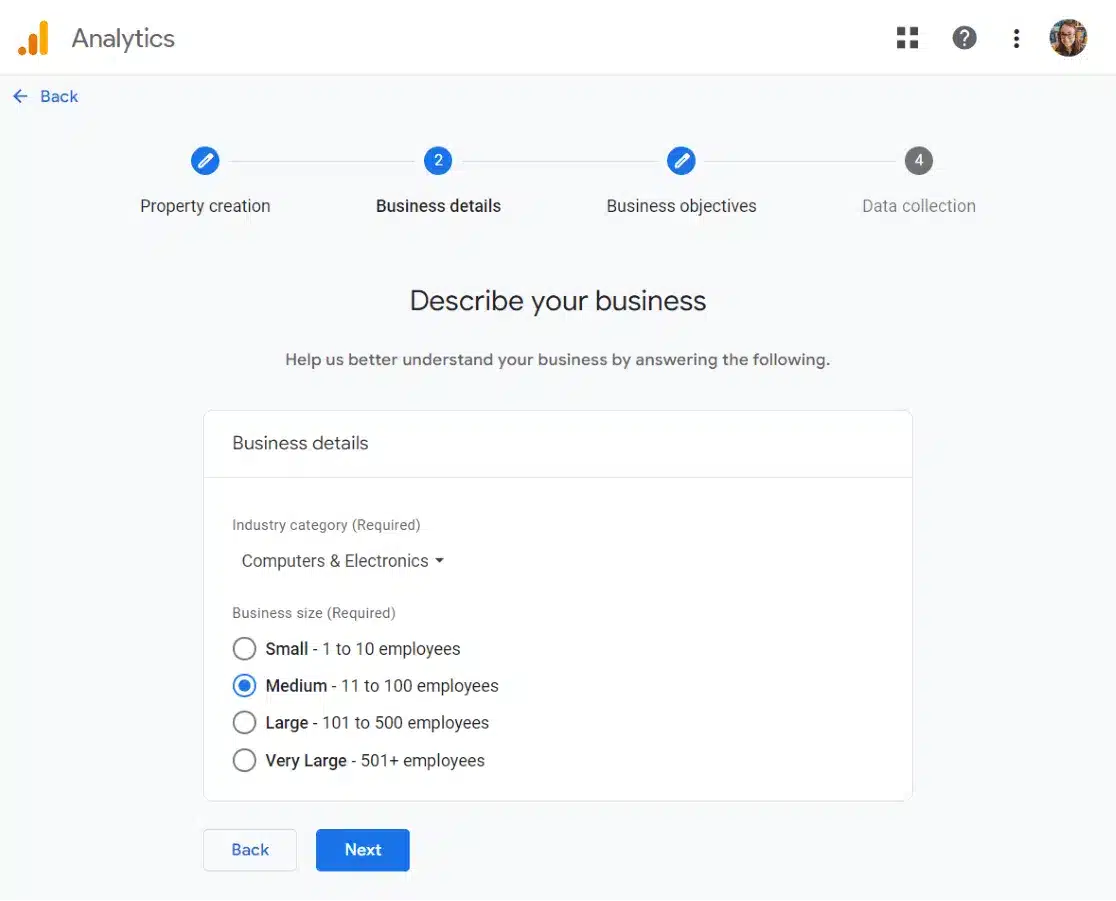
Finally, you’ll be asked what your business objectives are. We recommend selecting Get baseline reports in order to have all the Google Analytics reports populated in your account. Finally, hit Create.

That’s it! You’re new GA4 property is set up. Go ahead and jump to the next step.
If you already have a Universal Analytics property…
If you already have a Google Analytics account and a Universal Analytics property, you can go through the process of creating a GA4 property pretty easily by following Google’s Setup Assistant.
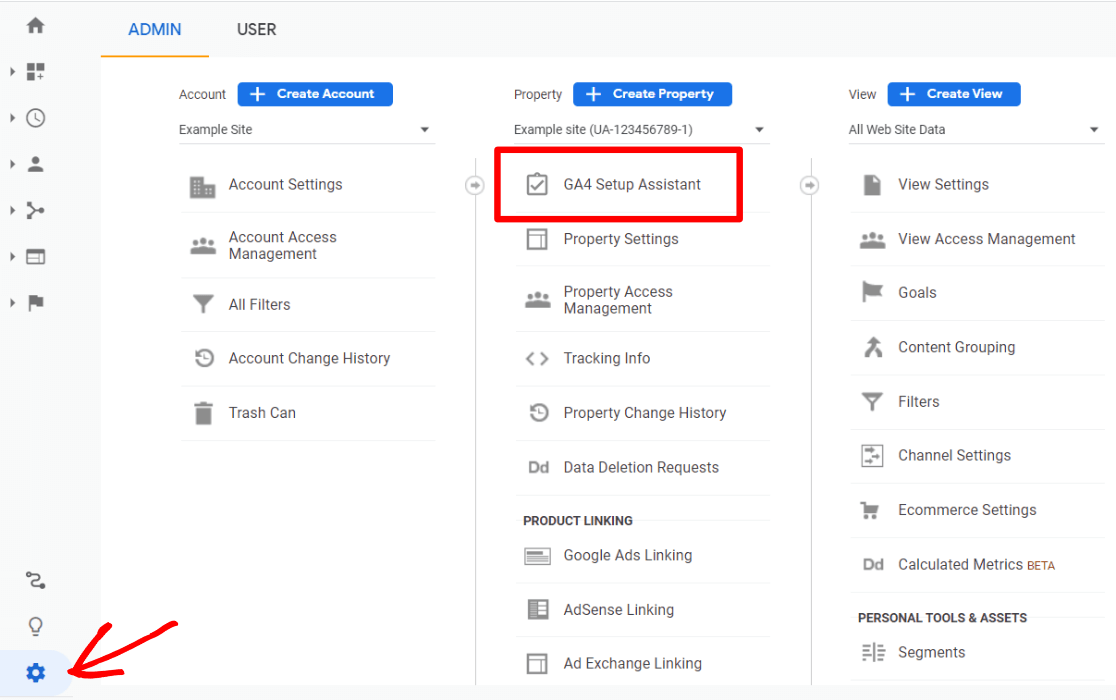
To access the assistant, head to the Admin cog in your Google Analytics account. Then, click GA4 Setup Assistant in the middle column.
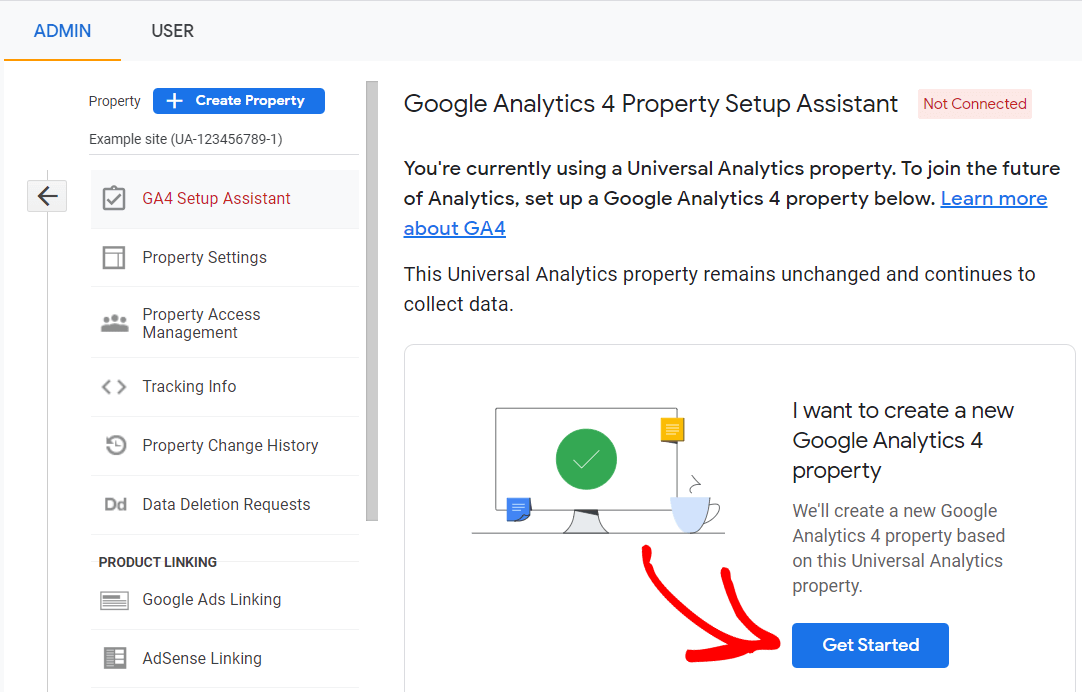
Next, click the blue Get Started button.
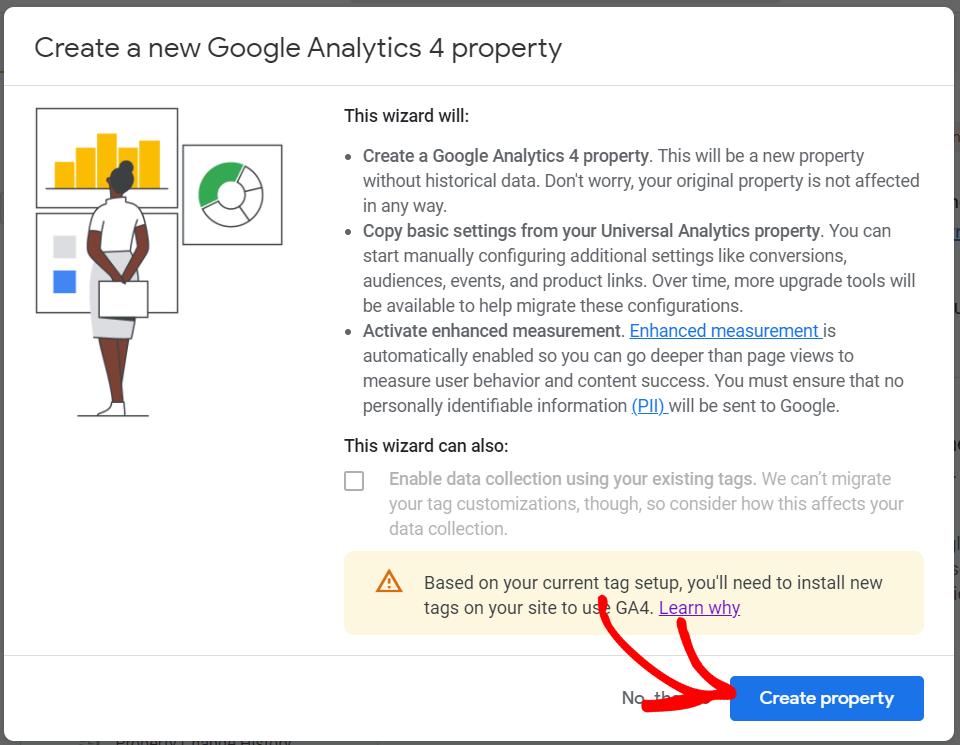
Then, click the Create Property button. The last option will either be checked or not based on which version of the tracking tag you currently have installed.
Your new property is created! Go ahead and click See Your GA4 Property.
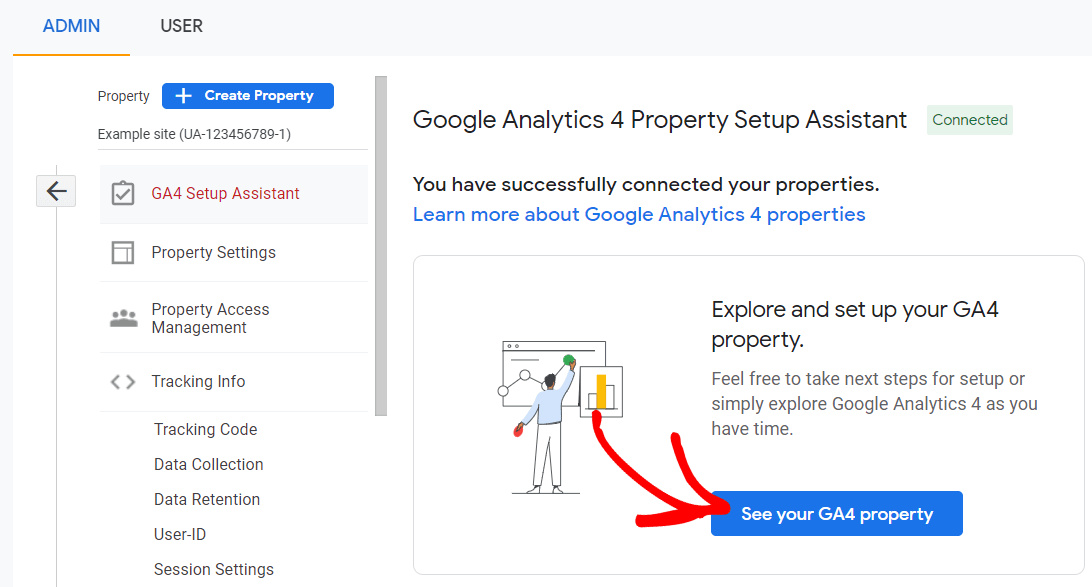
Alright, let’s leave that tab open now and move on to the next step.
Step 2: Install ExactMetrics
Typically, you’d have to manually insert the Google Analytics tracking code in your website’s core code files. But with ExactMetrics, you won’t need to touch any code.
To start, head to the ExactMetrics pricing page and purchase the license level that works best for you.
Already have the plugin? Skip to step 3.
Once you complete checkout, download the plugin.
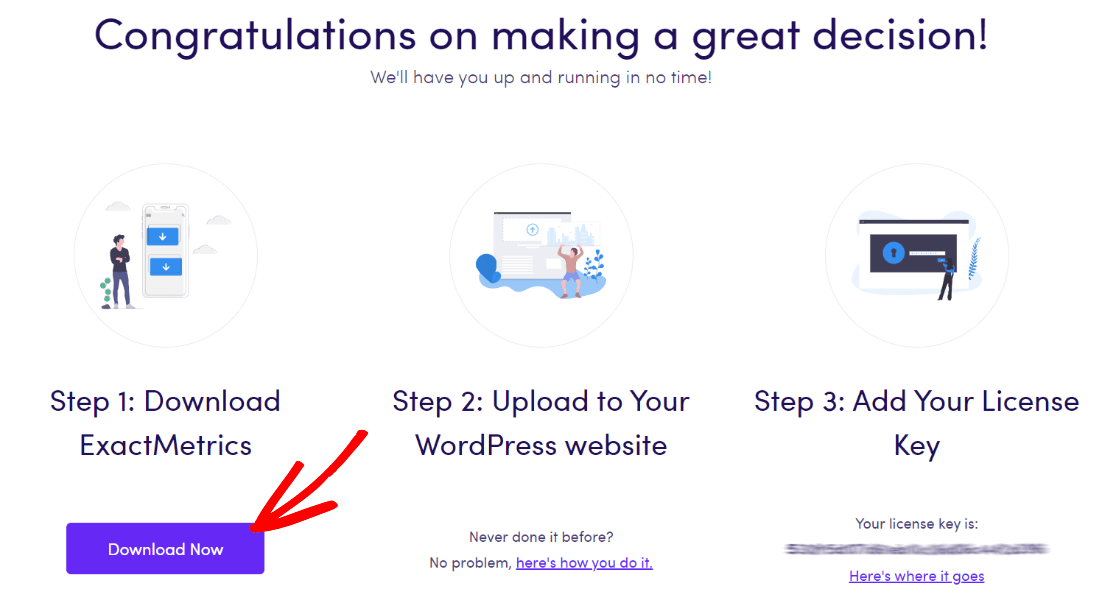
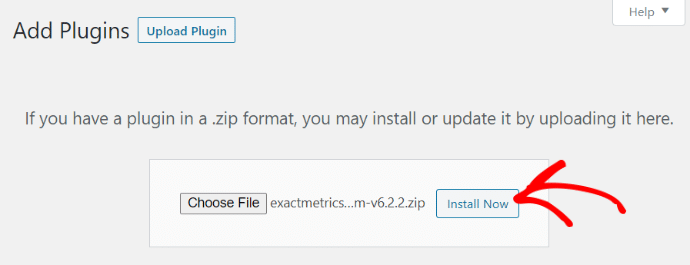
Next, upload it to your website. You can check out How to Install a WordPress Plugin if you need help with this step.
Step 3: Connect Your GA4 Property
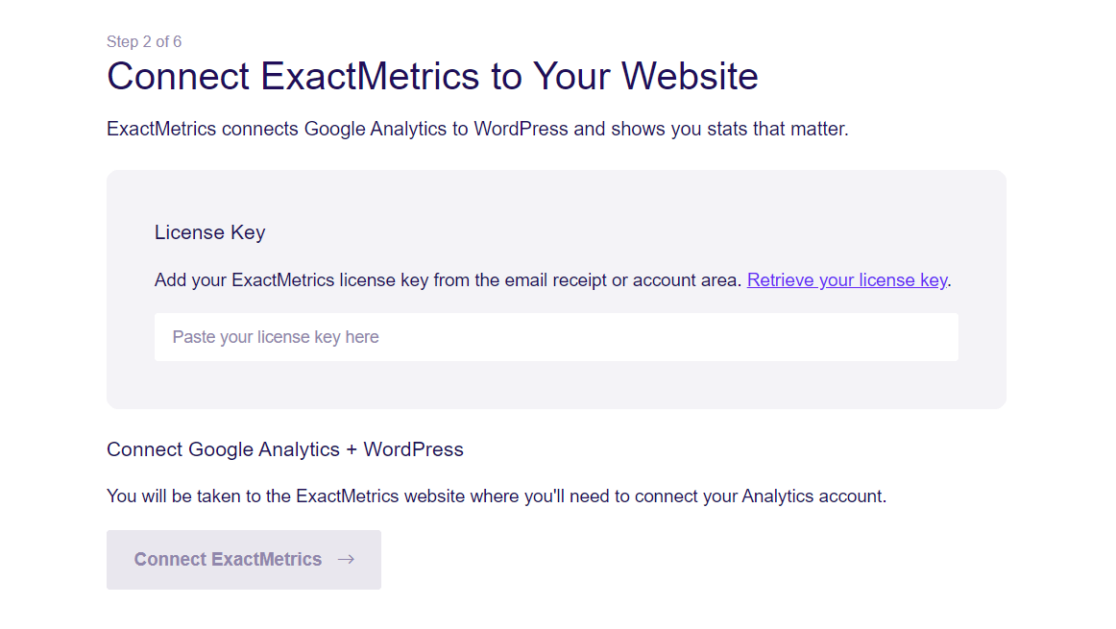
Now that you have ExactMetrics installed, you can add your license key and connect your Google Analytics account. To get set up, click on ExactMetrics under your WordPress Dashboard and click the big green Launch the wizard! button.
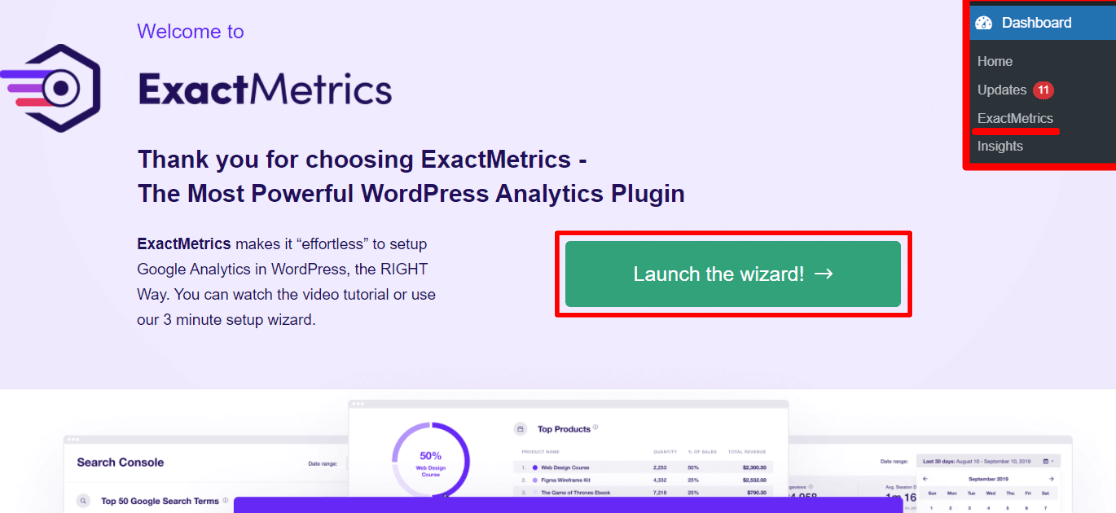
Once you’re in the wizard, you’ll get to this page where you’ll add your license key, which you can find in your purchase confirmation email or in your account area on the ExactMetrics website.
Next, go through the steps to connect your Google Analytics 4 property to ExactMetrics.
For more details on this step, check out our detailed guide on How to Add Google Analytics to Your WordPress Site.
Step 4: Adjust Google Analytics Settings
Now, we just need to adjust a couple of settings in Google Analytics 4, and you’ll be good to go!
Turn Off Enhanced Measurement
Your data stream in Google Analytics is created automatically with ExactMetrics, but you need to turn off Enhanced Measurement if you created your own already. ExactMetrics adds a lot of advanced Google Analytics tracking and leaving this setting turned on can actually give you false data.
To turn it off, go to Admin » Data Streams in your Analytics account and click on your data stream.

Then go ahead and click to toggle off Enhanced Measurement.
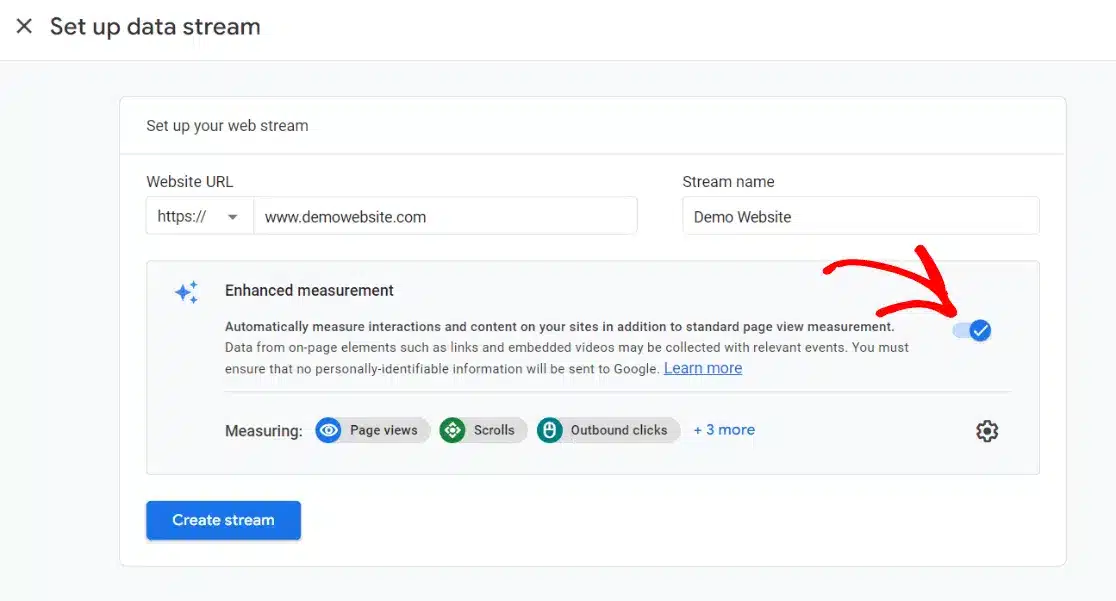
After you toggle the setting, you’ll see a popup asking if you want to turn it off. Click Turn off.
Again, leaving this setting on with ExactMetrics can interfere and skew your data, so make sure it’s turned off.
Adjust Data Retention
Next, we’ll adjust your data retention settings. Google Analytics will set your event data retention to 2 months by default, but most people want to use their data in custom reports for longer, so we’ll change it.
Go to Admin » Data Settings » Data Retention. Click the drop-down menu and change it to 14 months. Make sure to click Save at the bottom.
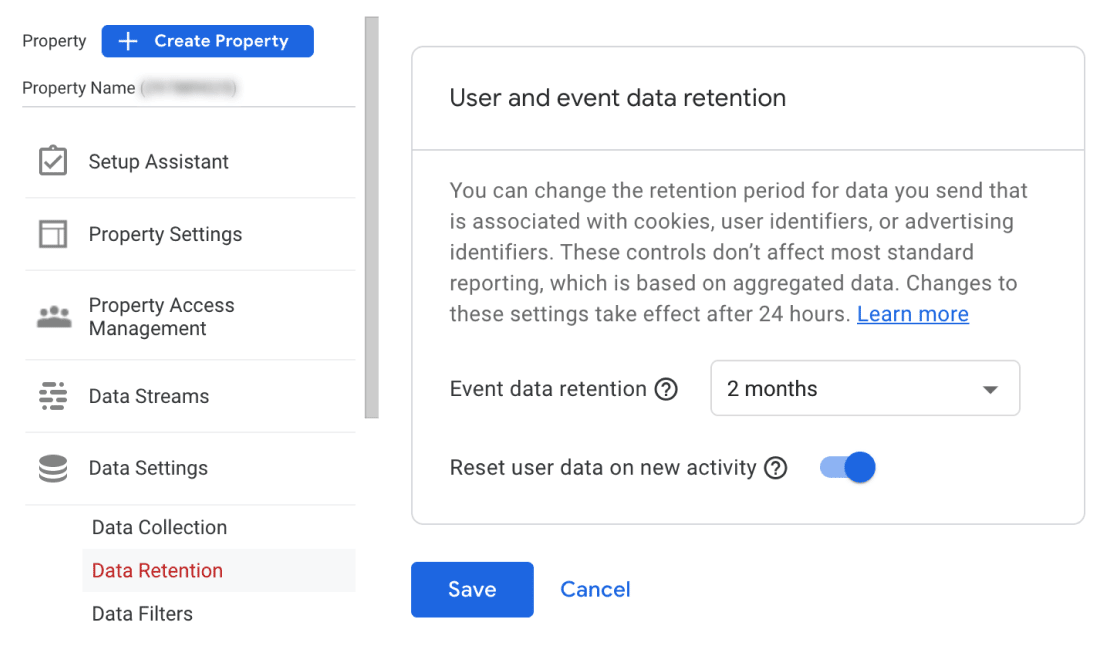
That’s all there is to it! You’ve successfully added Google Analytics 4 to WordPress. You can start viewing your site’s reports in WordPress after giving it up to 24 hours to collect data.
Just head to your WordPress site and click ExactMetrics » Reports. You’ll see your Overview report and tabs at the top for all your other important metrics, depending on your license level and installed addons.
Check out 8 Types of Google Analytics Reports to Track to get started with navigating GA4 and ExactMetrics reports.
Additionally, you can use these articles to learn more about how to use many of the advanced Google Analytics tracking features in ExactMetrics.
- Enable Custom Dimensions (post type, category, tags, and more)
- Set Up eCommerce Tracking
- Track Top Landing Pages and Conversions
- Find Traffic Source / Medium
- Track Your Forms
- Connect Search Console to Track Keywords
- Track Marketing Campaigns
- Track Affiliate Links and Outbound Links
- Video Tracking
- Track File Downloads
- See Our Documentation for More Help Getting Started
We hope you found our article on how to add GA4 to WordPress helpful, and we hope your transition to Google Analytics 4 is as smooth as possible!
Not using ExactMetrics yet? What are you waiting for?
Don’t forget to follow us on Twitter and Facebook to see all the latest reviews, tips, and Google Analytics tutorials.


